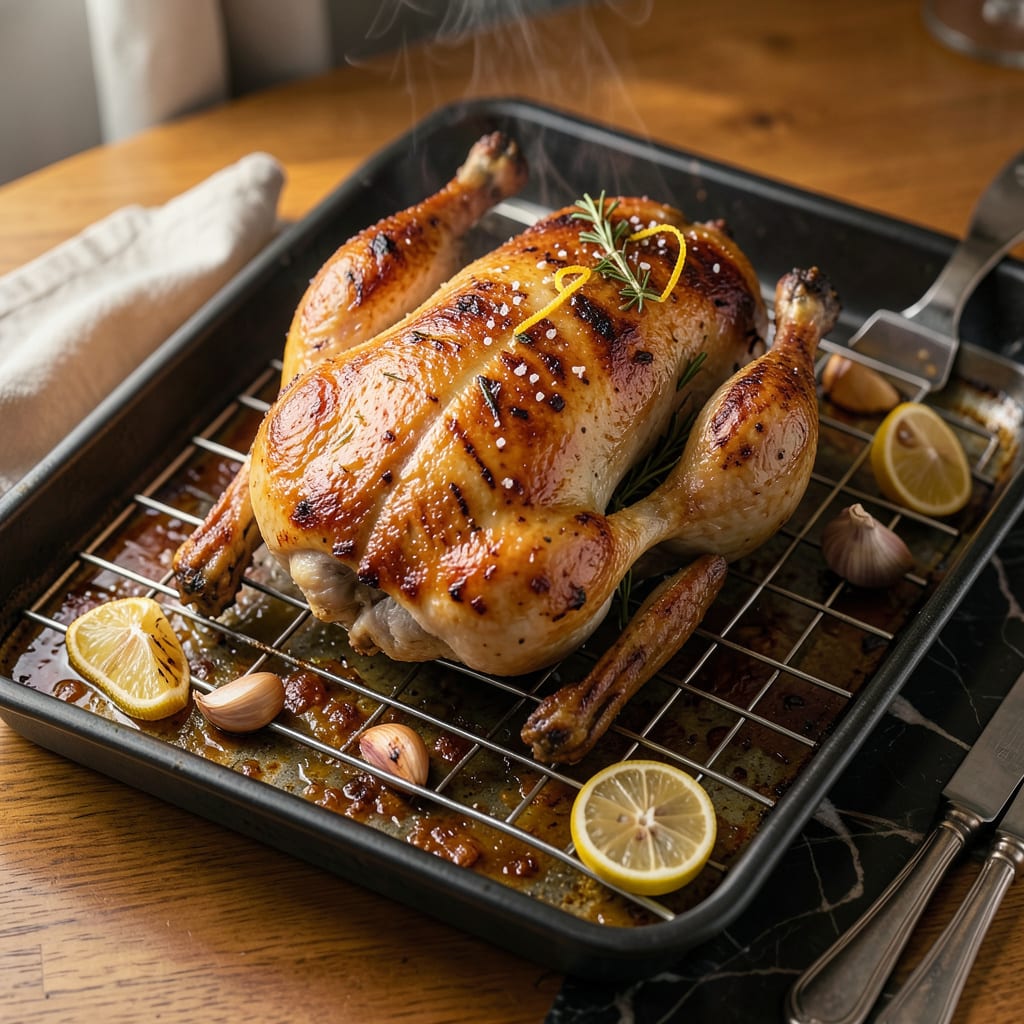
Let me tell you about the game-changer that transformed my chicken baking forever. That first time I used a wire rack instead of a baking sheet, I couldn’t believe the difference—crispy skin all over, not just on top, and meat so juicy it practically fell off the bone. No more soggy bottoms or uneven cooking.
Here’s the thing—most home cooks don’t realize that elevating chicken on a rack lets hot air circulate completely around it. The skin gets exposed to direct heat on all sides, rendering that fat into pure golden deliciousness. I’ve been using this method for years now, and it’s never failed me, whether I’m cooking thighs, breasts, or a whole bird.
You’ll end up with chicken that looks and tastes like it came from a professional kitchen. The skin turns out shatteringly crispy, the meat stays impossibly juicy, and cleanup is a breeze since the rack catches all the drippings. I’ve converted even the most skeptical family members with this simple trick.
Fair warning: once you try this, you’ll never go back to baking chicken directly on a sheet pan. The difference is that dramatic. Let’s get that oven preheated and make some magic happen.
📚 In This Guide
- What You’ll Need
- Instructions
- Tips and Common Mistakes
What Youll Need
- ● Chicken: 1 whole chicken (3–5 lbs) or 4–6 bone-in, skin-on pieces (thighs, drumsticks, or breasts). Pat dry with paper towels for crispier skin! 🍗
- ● Wire rack: 1 oven-safe wire rack (stainless steel or non-stick, sized to fit your baking sheet). Pro tip: Avoid flimsy racks—they warp!
- ○ Baking sheet: 1 half-sheet pan (18″ x 13″) or similar. Line with aluminum foil (optional, for easy cleanup).
- ● Seasonings: 1–2 tbsp olive oil or melted butter (for coating).
- ● 1 tsp salt (or to taste).
- ● ½ tsp black pepper.
- ○ 1 tsp garlic powder, paprika, or your favorite dry rub (optional but highly recommended!).
- ● Tools: Tongs or heat-resistant silicone gloves (for flipping/hot pans).
- ● Meat thermometer (instant-read, critical for perfect doneness!).
- ○ Pastry brush (for oil/butter, optional).
- ● Kitchen twine (if trussing a whole chicken).
- ○ Optional upgrades: Fresh herbs (rosemary, thyme) or citrus slices (lemon, orange) for aroma. 🌿
- ● Cooking spray (for non-stick racks).
- ● Broiler pan (if you prefer extra crispiness).
Instructions
Here’s how to bake chicken perfectly—crispy skin outside, juicy meat inside, every single time.
Prepare the Chicken for Maximum Crispiness
Start by patting your whole chicken completely dry with paper towels. I mean really dry—moisture is the enemy of crispy skin. Pay special attention to the cavity and under the wings where water tends to collect. This drying step is absolutely crucial for achieving that perfect golden-brown crust.
Season the chicken generously with salt and pepper, making sure to get it into all the nooks and crannies. I like to use about 1 tablespoon of salt for a 4-5 pound chicken. Let it sit uncovered in the refrigerator for at least 1 hour, or up to 24 hours if you have time. This drying and salting process is what creates that beautiful crispy skin we’re after.
Set Up Your Wire Rack and Baking Sheet
Position your oven rack in the middle of the oven and preheat to 425°F. While the oven heats, place a wire rack inside a rimmed baking sheet. The rack elevates the chicken, allowing hot air to circulate completely around it—this is the secret to even cooking and crispy skin all over, not just on top.
Lightly coat the wire rack with cooking spray or brush it with oil to prevent sticking. You want the chicken to release easily after cooking. Place your seasoned chicken breast-side up on the prepared rack. If you’re using butter or oil for extra browning, rub it on the skin now.
Bake at High Heat for Perfect Results
When the oven reaches 425°F, slide the baking sheet with the chicken in. Roast for 1 hour to 1 hour 15 minutes, depending on the size of your chicken. Don’t open the oven during cooking—every time you peek, you lose heat and steam the skin instead of crisping it.
You’ll know it’s done when the skin is deep golden brown and crispy, and an instant-read thermometer inserted into the thickest part of the thigh (not touching bone) reads 165°F. The juices should run clear when you pierce the thigh. If the skin isn’t crispy enough, you can broil for 2-3 minutes at the end, watching carefully to prevent burning.
Rest Before Carving for Juicy Meat
Transfer the chicken to a cutting board and tent loosely with foil. Let it rest for 15-20 minutes before carving. I know it’s tempting to dig in right away, but this resting period allows the juices to redistribute throughout the meat instead of running out onto your cutting board when you slice it.
During this rest, the internal temperature will actually rise a few degrees (this is called carryover cooking), and the meat will become more tender and juicy. Use this time to make a quick pan sauce from the drippings or prepare your side dishes. The crispy skin will stay crispy during this rest if you’ve tented it properly.
Tips and Common Mistakes
Let me share what I’ve learned from years of perfecting this method—small details that make a huge difference in texture and flavor.
The Drying Process: In Step 1, when you’re patting the chicken dry, use more paper towels than you think you need. I press firmly to absorb every drop of moisture, even inside the cavity. This isn’t just about crispiness—it prevents steam from building up under the skin during baking, which would make it rubbery instead of perfectly golden. For extra insurance, I sometimes let it air-dry in the fridge uncovered for the full 24 hours when I have time.
Heat Circulation: The wire rack setup in Step 2 is non-negotiable for even cooking. I position my oven rack exactly in the middle—this gives the chicken consistent heat from all directions. If your oven has hot spots, rotate the baking sheet halfway through the 1 hour to 1 hour 15 minutes baking time. Just do it quickly to minimize heat loss.
Temperature Control: At 425°F, the chicken cooks fast, so I check it at the 1-hour mark. The skin should be deep golden brown and make a satisfying crackling sound when pressed. If it’s not quite crispy enough after reaching 165°F internally, that 2-3 minute broil at the end works wonders—just stay right there watching it.
Resting Technique: During the 15-20 minute rest in Step 4, I tent the chicken very loosely with foil—just enough to keep it warm without trapping steam. This preserves that hard-earned crispiness while letting the juices redistribute. The foil should barely touch the skin, almost like a little hat rather than a tight wrap.
Pro Tips for Baking Chicken On Wire Rack
- Let me share what I’ve learned from years of perfecting this method—small details that make a huge difference in text…
- The Drying Process: In Step 1, when you’re patting the chicken dry, use more paper towels than you think you need. I …
- Heat Circulation: The wire rack setup in Step 2 is non-negotiable for even cooking. I position my oven rack exactly i…
Frequently Asked Questions
Do I need to flip the chicken when baking it on a wire rack?
Not usually! The wire rack promotes even air circulation, so flipping isn’t required for most cuts (like thighs or breasts). However, for whole chickens, rotate the pan halfway for uniform browning. Always check doneness with a meat thermometer (165°F for breasts, 175°F for dark meat).
How long should I bake chicken on a wire rack at 375°F?
Timing varies by cut:
- Boneless breasts (6 oz): 20–25 mins
- Bone-in thighs: 35–40 mins
- Whole chicken (4 lbs): 60–75 mins
Can I use parchment paper under the wire rack for easy cleanup?
Yes! Line the baking sheet under the rack with parchment or foil to catch drippings. Avoid placing parchment on the rack—it blocks airflow and steams the chicken. For extra crispiness, skip lining entirely and scrub the pan later.
Why is my chicken skin not crispy after baking on a wire rack?
Common culprits:
- Skin wasn’t patted completely dry (moisture = steam).
- Oven temp too low (try 400°F for crispier results).
- Overcrowding the rack (leave space between pieces).
What can I use if I don’t have a wire rack?
Improvise with:
- A cooling rack (oven-safe metal only).
- Vegetable “rack”: Line the pan with chopped onions, carrots, or potatoes to elevate the chicken.
- Crumpled foil balls (place under the chicken for airflow).
Baking chicken on a wire rack is the secret to perfectly crispy skin and juicy meat—every single time! 🍗 By letting air circulate all around, you’ll avoid soggy bottoms and lock in flavor without extra effort. Whether you’re meal prepping or cooking for a crowd, this simple trick elevates your chicken game with minimal fuss.
Ready to try it? Grab your favorite seasonings, preheat that oven, and get baking! For even more foolproof tips, check out our guide on mastering chicken temperatures—because great food starts with confidence. Happy cooking! 😊

Trained in classic French technique but raised on slow-cooked ribs and spicy rubs, she blends culinary skill with smoke and soul.
- Recipe for Pan Fried: Golden Crust with Savory Depth - October 3, 2026
- Recipe For Fried Chicken In A Pressure Cooker: Crispy Golden Bites in Half the Time - October 3, 2026
- Recipe For Leftover Fried Fish: Crunchy Leftovers Transformed - October 3, 2026