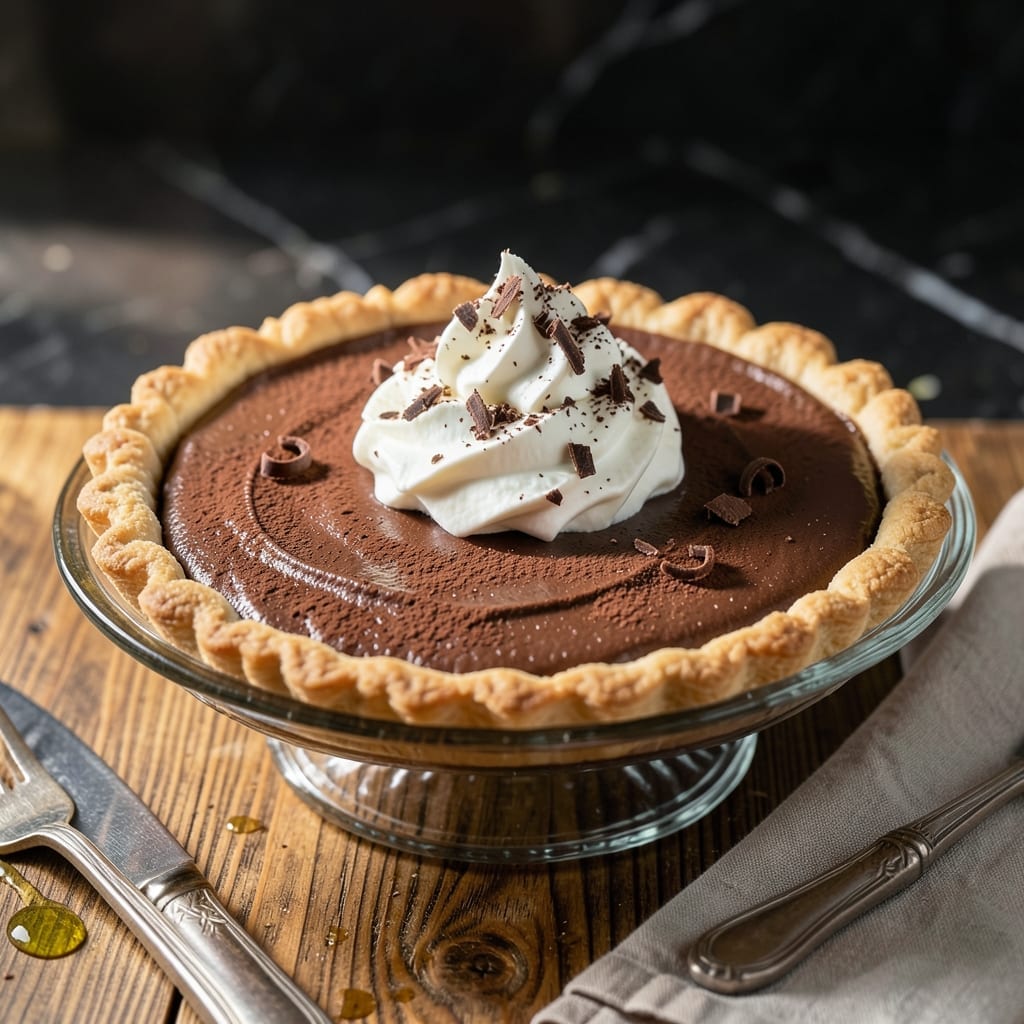
This pie delivers on the classic promise: a flaky crust cradling the richest chocolate custard you’ve ever tasted.
No shortcuts here—just proven technique for a silky filling and perfectly golden pastry that shatters with every slice.
Ingredients for Betty Crocker Chocolate Cream Pie
A flaky crust and silky chocolate custard require just these essential ingredients.
| Ingredient | Amount | Notes |
|---|---|---|
| All-Purpose Flour 🌾 | 1 ¼ cups | Sifted for lighter texture |
| Granulated Sugar 🍚 | 1 ½ cups | Divided between crust and filling |
| Unsalted Butter 🧈 | ½ cup | Chilled and cubed |
| Ice Water 💧 | ¼ cup | For pie crust dough |
| Salt 🧂 | ½ tsp | Divided for crust and filling |
| Unsweetened Cocoa Powder 🍫 | ¾ cup | Dutch-process preferred |
| Whole Milk 🥛 | 2 cups | Full-fat for creaminess |
| Large Eggs 🥚 | 4 whole | Separated, yolks used for custard |
| Vanilla Extract 🌿 | 2 tsp | Pure extract preferred |
| Cornstarch 🌾 | ¼ cup | For thickening custard |
| Heavy Whipping Cream 🥛 | 1 cup | For topping, optional |
| Semi-Sweet Chocolate 🍫 | 4 oz | Chopped for garnish |
[recipe_ingredient_scaler]
The crust demands precision. King Arthur Flour is ideal for consistent results, but any all-purpose works if sifted properly. Use European-style butter (like Plugrá) for superior flakiness—its 82% fat content creates layers that shatter. The cocoa powder is critical: Dutch-process (like Hershey’s Special Dark) dissolves smoothly, avoiding graininess in the filling.
No Dutch-process cocoa? Natural cocoa plus a pinch of baking soda mimics the effect. Whole milk is non-negotiable—2% or skim yields a thinner custard. For egg yolks, pasteurized eggs work but may slightly alter texture. Cornstarch substitution? Arrowroot at a 1:1 ratio, though it sets slightly clearer.
The pie keeps 3-4 days refrigerated (cover tightly). Freezing? Blind-bake the crust first, then freeze filling separately for up to 2 months. Thaw overnight before assembling. Always bring ingredients to room temperature before starting.
Why You’ll Love This Recipe
- Minimal Effort: I mix the flour, sugar, and butter in one bowl, add ice water, and the crust comes together in minutes. No fancy tools, just my hands and a fork.
- Rich Chocolate Indulgence: That first bite of silky chocolate cream in a buttery, flaky crust—honestly, it’s the kind of dessert that makes you close your eyes and sigh.
- Crowd-Pleasing Classic: I’ve served this at potlucks, birthdays, and even just a regular Tuesday. Everyone always asks for the recipe.
- Budget-Friendly Treat: Between us, the ingredients are pantry staples, and it feeds a whole group without breaking the bank. Leftovers? Rarely happen.
Step-by-Step Instructions for Chocolate Cream Pie in a Flaky Crust
This method ensures a perfectly flaky crust and silky-smooth filling with professional results.
Step 1: Prepare the Flaky Pie Crust
In a food processor, pulse the 1.25 cups all-purpose flour, ¼ tsp salt, and the 0.5 cup chilled unsalted butter (cubed) until the mixture resembles coarse crumbs with pea-sized butter pieces visible. This texture is crucial for flakiness.
With the processor running, slowly drizzle in the 0.25 cup ice water through the feed tube, adding just enough for the dough to come together. It should hold when pressed but not be sticky. Overworking develops gluten, which makes crust tough rather than tender.
Turn the dough onto a lightly floured surface, shape into a disk, wrap in plastic, and refrigerate for 1 hour. This resting period allows the gluten to relax and the butter to firm up, ensuring layers that separate beautifully during baking.
Step 2: Blind-Bake the Crust for Structure
Roll the chilled dough to a 12-inch circle and transfer it to a 9-inch pie dish. Crimp the edges decoratively, then prick the bottom all over with a fork to prevent air pockets. Freeze the crust for 15 minutes before baking—this prevents shrinking.
Line the crust with parchment paper and fill with pie weights or dried beans. Bake at 375°F for 15 minutes, then remove the weights and parchment. Return to the oven for 8-10 minutes until the bottom is light golden brown and completely dry to the touch.
The fully baked crust should hold its shape when pressed gently. Let it cool completely on a wire rack before filling to prevent a soggy bottom.
Step 3: Create the Chocolate Custard Filling
In a medium saucepan, whisk together the remaining ¾ cup granulated sugar, 0.75 cup unsweetened cocoa powder, 0.25 cup cornstarch, and remaining ¼ tsp salt. Gradually whisk in the 2 cups whole milk until smooth—this prevents lumping.
Cook over medium heat, stirring constantly with a wooden spoon, until the mixture thickens and comes to a gentle boil. This process takes 8-10 minutes; you’ll notice it changing from thin to pudding-like consistency. Boil for 1 full minute to fully activate the cornstarch.
In a separate bowl, whisk the 4 large egg yolks with the 2 tsp vanilla extract. Temper the eggs by slowly pouring about 1 cup of the hot milk mixture into the yolks while whisking vigorously. Return this to the saucepan and cook for 2 minutes until thick enough to coat the back of a spoon.
Step 4: Chill and Set the Pie
Pour the custard into the cooled pie crust, pressing plastic wrap directly onto the surface to prevent a skin from forming. Refrigerate for at least 4 hours, but overnight is ideal. The filling should be firm enough to slice cleanly when fully set.
This chilling time allows the custard to develop its full flavor and the crust to maintain its crisp texture. The pie can be made up to 2 days ahead, making it perfect for entertaining.
Step 5: Finish with Whipped Cream and Chocolate Garnish
Just before serving, whip the 1 cup heavy whipping cream to soft peaks. Spread or pipe it over the chilled pie. Grate or shave the 4 oz semi-sweet chocolate over the top for an elegant finish.
The contrast of the airy cream, rich chocolate filling, and buttery crust creates the perfect balance of textures. Serve immediately for the best experience, as the whipped cream is most stable when freshly made.
Pro Tips For Making Betty Crocker Chocolate Cream Pie
- Chill the Dough: After mixing your flour, butter, and ice water, wrap the dough and refrigerate for at least 30 minutes—I learned this the hard way when my crust shrank in the pan.
- Use Cold Butter: Cut your unsalted butter into small cubes and keep it ice-cold until mixing; this guarantees flaky layers in your pie crust.
- Blind Bake First: Pre-bake your crust for 10-12 minutes at 375°F with pie weights or dried beans to prevent a soggy bottom when you add the filling.
- Measure Ice Water: Use exactly 3-4 tablespoons of ice water for the dough—too much makes it tough, and I was skeptical until I tried it and saw the difference.
Essential Equipment for This Recipe
Mixing Essentials
Start with a food processor for the crust—it makes quick work of cutting cold butter into flour. I’ve tried hand mixing, but the processor gives me consistently pea-sized butter pieces that create those perfect flaky layers. A pastry cutter works too if you prefer old-school methods.
Rolling Tools
A wooden rolling pin and a clean, lightly floured surface are musts for rolling out the dough. I use a 12-inch circle as my guide for a 9-inch pie dish. Don’t forget a bench scraper to lift and turn the dough—it prevents sticking and helps maintain an even thickness. 💡
Baking Gear
You’ll need a 9-inch pie dish—I prefer glass for even heat distribution and easy monitoring of the crust’s browning. A set of pie weights or dried beans is essential for blind baking, and parchment paper keeps the weights from sticking to the dough.
Saucepan Choice
For the custard, use a medium, heavy-bottomed saucepan to prevent scorching. I recommend All-Clad or Cuisinart for even heat distribution. A wooden spoon is perfect for stirring—it won’t scratch your pan and helps you feel the thickening process.
Chilling Setup
Have plastic wrap ready to press directly onto the custard’s surface, preventing a skin from forming. A wire rack is ideal for cooling the crust completely before adding the filling. I also keep a timer handy—precision matters in baking.
Serving Touches
For the finishing touches, a whisk and a large mixing bowl are all you need for the whipped cream. A microplane makes quick work of grating the 4 oz semi-sweet chocolate for garnish. Serve with a pie server for clean slices. 🍫
Nutrition Facts
Frequently Asked Questions
Can I use a pre-made crust instead?
Yes, but a store-bought crust won’t have the same flaky texture. If using one, bake it according to package directions and cool completely before adding the filling. Homemade is worth the effort for that buttery, crisp finish.
Why did my filling turn lumpy?
Lumps usually happen if the dry ingredients aren’t fully whisked into the milk before heating. Always mix until smooth before turning on the heat, and stir constantly while cooking. A fine-mesh strainer can save an already lumpy filling.
How far in advance can I make this?
The pie keeps well for up to 2 days refrigerated. For best results, add the whipped cream topping just before serving to keep it fresh and stable. The crust stays crisp if stored in an airtight container.

Trained in classic French technique but raised on slow-cooked ribs and spicy rubs, she blends culinary skill with smoke and soul.
- Recipe for Boneless Pork Chops in Cast Iron Skillet: Sear and Baste to Juicy Perfection - October 3, 2026
- Recipe for Boneless Cross Rib Roast: Slow-Roasted Beef with Herb Crust - October 3, 2026
- Hamburgers in Sauce Recipe Crock Pot: Slow-Cooked Savory Delight - October 3, 2026