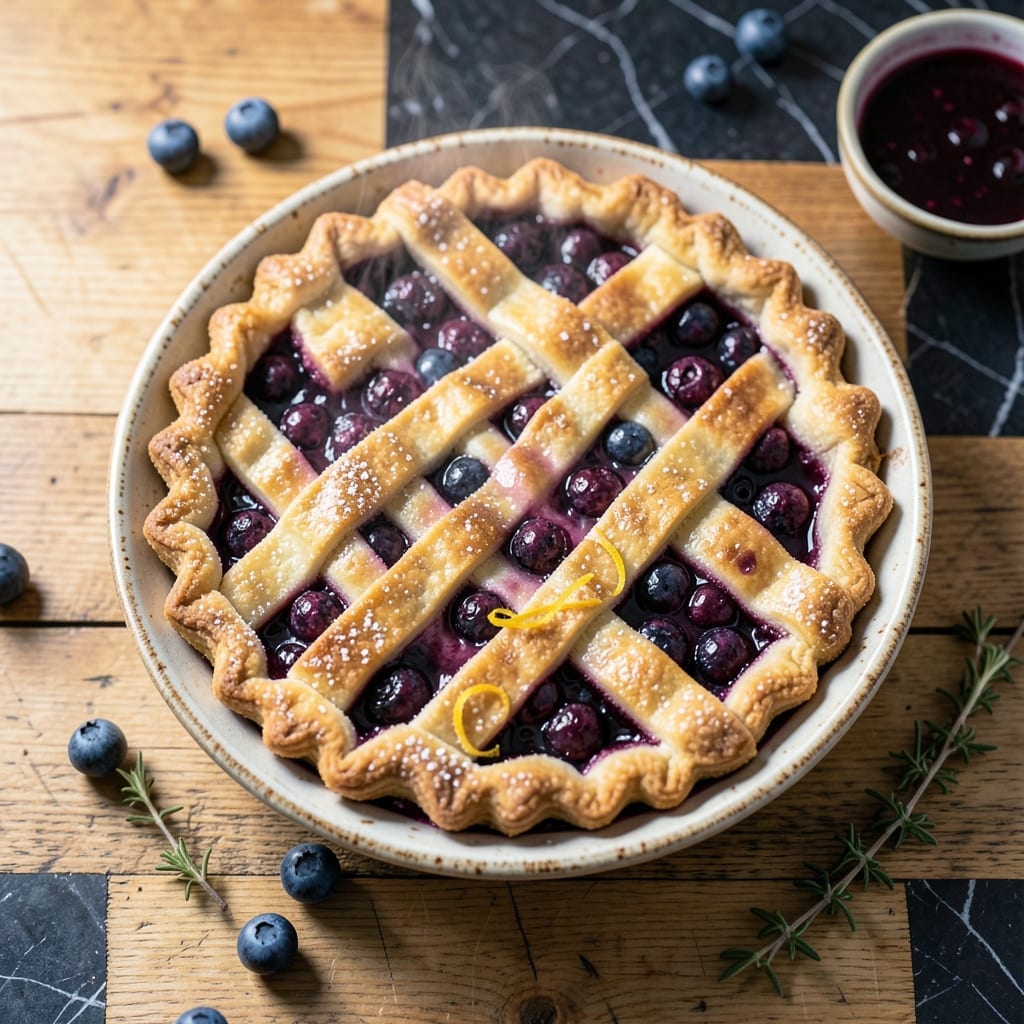
There’s a secret to making flaky blueberry pie with frozen berries that rivals fresh. The key is proper thickening and crust preparation.
This method ensures a golden crust and a filling that’s bursting with berry flavor, not soggy. No one will guess you used frozen fruit.
Ingredients for Blueberry Pie Recipe Frozen Berries
Frozen berries work beautifully with a few clever tweaks for perfect texture and flavor.
| Ingredient | Amount | Notes |
|---|---|---|
| Frozen Blueberries 🫐 | 6 cups | Do not thaw before using |
| Granulated Sugar 🍚 | ¾ cup | Adjust to taste preference |
| Cornstarch 🌾 | ¼ cup | For thickening filling |
| Lemon Juice 🍋 | 2 tbsp | Freshly squeezed preferred |
| Lemon Zest 🍋 | 1 tbsp | From 1 medium lemon |
| Ground Cinnamon 🌿 | ½ tsp | Adds warmth to filling |
| Salt 🧂 | ¼ tsp | Balances sweetness |
| All-Purpose Flour 🌾 | 2 ½ cups | Plus extra for dusting |
| Unsalted Butter 🧈 | 1 cup | Chilled and cubed |
| Ice Water 💧 | ½ cup | For pie crust dough |
| Large Egg 🥚 | 1 whole | For egg wash on crust |
| Vanilla Extract 🌿 | 1 tsp | Pure extract recommended |
[recipe_ingredient_scaler]
The blueberries are the star—Wyman’s or Cascadian Farm brands maintain excellent texture when frozen. For the crust, King Arthur Flour gives consistent results, and Land O’Lakes unsalted butter is my go-to for flakiness. Chilling the dough is non-negotiable (don’t rush this step). The cornstarch thickens without altering flavor, unlike some other thickeners.
Short on time? Pre-made pie crust from the refrigerated section works fine. No cornstarch? Instant tapioca at the same amount substitutes well. Swap fresh berries at a 1:1 ratio if you have them, but drain excess liquid. The vanilla can be omitted, but it adds depth that’s worth the extra 30 seconds.
Assembled pie freezes beautifully for up to 3 months before baking. Baked pie keeps at room temperature for 2 days, then refrigerate for up to 5 days. Always let it cool completely before slicing for clean pieces (worth the wait).
Why You’ll Love This Recipe
- No Thaw Needed: I just dump frozen blueberries straight into the filling—no prepping or waiting.
- Bright & Zesty: The lemon zest and juice make the berries taste fresh, not flat.
- Year-Round Favorite: I bake this in July or December—frozen berries work every time.
- Budget Win: A bag of frozen blueberries costs half what fresh do, and it tastes just as good.
Step-by-Step Instructions for Blueberry Pie with Frozen Berries
This method ensures a flaky crust and perfectly set filling with minimal effort.
Step 1: Prepare the Pie Crust Dough
In a large bowl, combine the 2.5 cups All-Purpose Flour with the 0.25 tsp Salt. Cut in the 1 cup Unsalted Butter (chilled and cubed) using a pastry cutter or your fingers until the mixture resembles coarse crumbs with some pea-sized butter pieces visible.
Gradually add the 0.5 cup Ice Water, 1 tablespoon at a time, mixing gently with a fork until the dough just comes together. I use my hands to press the dough into a ball—it should hold when squeezed but not be sticky. Divide into two equal portions, flatten into discs, wrap in plastic, and refrigerate for 1 hour.
Step 2: Make the Blueberry Filling
In a large bowl, gently toss the 6 cups Frozen Blueberries with the 0.75 cup Granulated Sugar, 0.25 cup Cornstarch, 2 tbsp Lemon Juice, 1 tbsp Lemon Zest, 0.5 tsp Ground Cinnamon, and 0.25 tsp Salt. The cornstarch will look clumpy at first—that’s normal.
Let the mixture sit for 15 minutes while you roll out the crust. This gives the berries time to release some juices and the cornstarch time to begin absorbing them, preventing a runny filling. Stir in the 1 tsp Vanilla Extract just before assembling the pie.
Step 3: Assemble and Crimp the Pie
On a lightly floured surface, roll one disc of dough into a 12-inch circle and transfer it to a 9-inch pie dish. Trim the edges, leaving a ½-inch overhang. Pour the blueberry filling into the crust, mounding slightly in the center.
Roll the second disc of dough into another 12-inch circle and place it over the filling. Trim the top crust, leaving a ½-inch overhang, then fold the edges of the top crust under the bottom crust and crimp decoratively with your fingers or a fork. Cut 4-5 slits in the top crust to allow steam to escape.
Step 4: Bake to Golden Perfection
Preheat your oven to 375°F. Brush the top crust with a light coating of the 1 whole Large Egg beaten with 1 tablespoon of water. Place the pie on a baking sheet to catch any drips and bake for 50-60 minutes.
The pie is done when the crust is deep golden brown and the filling is bubbling visibly through the vents. If the edges begin to brown too quickly, cover them with aluminum foil or a pie shield. Let the pie cool for at least 2 hours before slicing—this allows the filling to set completely.
Pro Tips For Making Blueberry Pie Recipe Frozen Berries
- Thaw and Drain: Let the frozen blueberries thaw in a colander for 30 minutes, then gently press to drain excess liquid—this prevents a soggy pie filling.
- Toss Berries First: Mix the blueberries with sugar, cornstarch, lemon juice, and zest before adding to the crust, so the thickener coats every berry evenly.
- Avoid Overmixing: Stir the filling just until combined; overworking it breaks the berries and turns the filling muddy instead of chunky.
- Vent the Top: Cut a few small slits in the top crust or use a lattice design to let steam escape—otherwise, the filling can bubble over and stick to the oven.
Serving Suggestions for This Recipe
Warm with Ice Cream
Serve slices warm with a scoop of vanilla bean ice cream—the contrast of hot and cold is pure magic. I like Ben & Jerry’s for its rich texture. The ice cream melts slightly, creating a creamy sauce that complements the tart berries. 💛
Whipped Cream Option
For a lighter touch, top with freshly whipped cream. I whip 1 cup heavy cream with 2 tbsp powdered sugar and ½ tsp vanilla extract until soft peaks form. The subtle sweetness balances the pie’s tangy filling.
Lemon Zest Garnish
Sprinkle extra lemon zest over the top just before serving. This adds a bright, citrusy pop that enhances the berry flavors. It’s a simple touch that makes the pie look as good as it tastes.
Coffee Pairing
A hot cup of black coffee cuts through the richness beautifully. I prefer a medium roast like Peet’s Major Dickason’s Blend. The bitterness contrasts nicely with the sweet, jammy filling.
Lattice Crust Showcase
If you’ve made a lattice top, let the design shine by dusting with powdered sugar right before serving. This highlights the crust’s flakiness and adds a delicate sweetness. A sprinkle goes a long way.
Room Temperature Note
While warm pie is divine, it’s also delicious at room temperature. The flavors meld together after 1-2 hours of cooling, making the cinnamon and lemon notes more pronounced. Perfect for picnics or casual gatherings.
Nutrition Facts
Frequently Asked Questions
Should I thaw the berries first?
No, use them straight from the freezer. Thawing releases excess liquid, which can make your filling runny. Toss them with other ingredients while still frozen for best results.
Why is my filling too watery?
This usually means the cornstarch didn’t have enough time to thicken. Let the filling sit for 15 minutes before baking, and ensure it bubbles visibly during the full 50-60 minutes in the oven.
Can I use a store-bought crust?
A refrigerated pie crust works well. Just follow the same assembly and baking instructions. For extra flakiness, brush with egg wash before baking.
How do I prevent a soggy bottom crust?
Sprinkle 1 tablespoon of flour or breadcrumbs in the pie dish before adding the filling. This creates a barrier that absorbs excess moisture.

Trained in classic French technique but raised on slow-cooked ribs and spicy rubs, she blends culinary skill with smoke and soul.
- Recipe for Boneless Pork Chops in Cast Iron Skillet: Sear and Baste to Juicy Perfection - October 3, 2026
- Recipe for Boneless Cross Rib Roast: Slow-Roasted Beef with Herb Crust - October 3, 2026
- Hamburgers in Sauce Recipe Crock Pot: Slow-Cooked Savory Delight - October 3, 2026