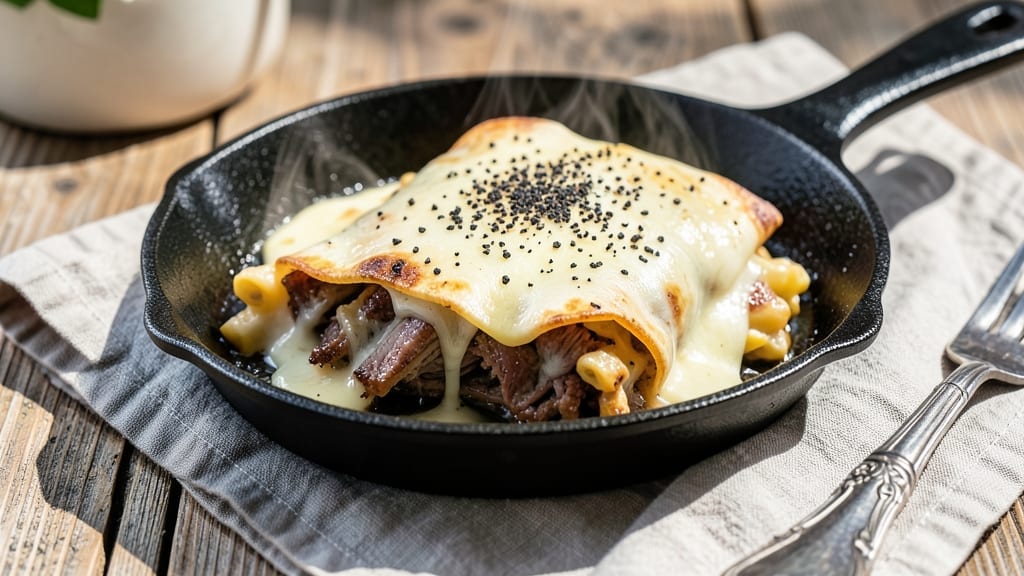
This brisket mac and cheese wrap recipe turns two crowd-pleasing favorites into one smoky, cheesy, pull-apart masterpiece. 🔥 The key? Slow-smoked brisket so tender it shreds at a touch, paired with a velvety mac and cheese that holds together in every bite of the tortilla.
I perfected this during a Texas heatwave when I needed comfort food that could be eaten with one hand—no plates required.
The method starts with a perfectly seasoned brisket, smoked until it falls apart, then sliced into thin strips that melt into the creamy cheese mixture. The mac and cheese uses a simple stovetop roux for that classic richness, with sharp cheddar and a touch of cream cheese for extra melt.
Assembly is where the magic happens—layering the filling between sturdy tortillas and pressing just enough to hold it together without crushing the textures.
What you end up with is a handheld dish that delivers restaurant-quality comfort in every bite: crispy tortilla edges, tender brisket, and pockets of gooey cheese that stretch with every pull. The smoky-sweet brisket cuts through the richness of the cheese, creating a perfect balance of flavors and textures.
Serve with a side of pickles or a drizzle of hot sauce for the full experience.
This recipe works equally well for game day gatherings, weeknight dinners, or even a satisfying lunch. The components can be prepped ahead and assembled quickly—ideal for feeding a crowd without spending hours in the kitchen. Let’s bring that smoky, cheesy comfort to your table.
Ingredients for brisket mac and cheese wrap
Smoky brisket meets cheesy mac and cheese in a handheld tortilla hug—just a handful of simple ingredients.
| Ingredient | Amount | Notes |
|---|---|---|
| Brisket 🥩 | 1 ½ lb | Slow-smoked, tender, sliced thin |
| Elbow Macaroni 🍝 | 12 oz | Uncooked, medium or elbow shape |
| Sharp Cheddar Cheese 🧀 | 2 cups | Shredded, block preferred |
| Cream Cheese 🧈 | 8 oz | Full-fat, softened |
| Unsalted Butter 🧈 | ½ cup | Cold, cubed |
| Heavy Cream 🥛 | ½ cup | Full-fat for creaminess |
| Flour 🌾 | ¼ cup | All-purpose, for roux |
| Milk 🥛 | 1 cup | Whole milk preferred |
| Large Eggs 🥚 | 2 whole | Room temperature |
| Flour Tortillas 🌯 | 4 whole | Large, 10-inch |
| Yellow Onion 🧅 | 1 whole | Diced, medium |
| Garlic Cloves 🧄 | 3 cloves | Minced, fresh |
| Smoked Paprika 🌶️ | 1 tbsp | For smoky depth |
| Ground Black Pepper 🌶️ | ½ tsp | Freshly ground |
| Salt 🧂 | 1 ½ tsp | Kosher or sea salt |
[recipe_ingredient_scaler]
The brisket is the star, so don’t cut corners. Look for a packer’s cut at Costco or your local butcher—it’s usually pre-smoked and ready to slice. If you’re smoking it yourself, aim for 225°F for 12-16 hours until it’s fork-tender. The tortillas? Mission brand holds up best—they’re sturdy but still soft enough to fold without cracking. Grab extra, because these disappear fast. For the cheese, sharp cheddar from a block makes all the difference—pre-shredded gets clumpy and lacks flavor. I always buy Kraft Natural for the mac and cheese, but any good sharp cheddar works.
No smoked brisket? Pulled pork or shredded chicken in a pinch, but the smoky flavor is key here. Short on sharp cheddar? Monterey Jack or pepper jack adds a nice kick. The cream cheese can be swapped for sour cream if you’re out, but trust me on the full-fat version—it’s what makes the filling stretchy. For the tortillas, low-carb or spinach wraps work too, just brush them with oil first to keep them pliable. The onion and garlic are non-negotiable for flavor, but if you’re in a rush, 1 tbsp onion powder and 1 tsp garlic powder will get you close.
The mac and cheese filling keeps for 4 days in the fridge, but it tastes even better the next day—all that smoky flavor melds together. Portion it into containers and freeze for up to 3 months if you’re prepping ahead. The tortillas stay fresh for 1 week if wrapped tightly in plastic. For game day, I like to assemble these ahead and bake them just before serving—keeps everything warm and crispy. Leftovers? Wrap them in foil and reheat in a 350°F oven for 10 minutes—the tortillas crisp up again, and the cheese gets all gooey.
Why You’ll Love This Recipe
- No Fuss Assembly: I love that these wraps come together in five minutes after the filling’s ready—just warm tortillas, spoon the mix, roll, and bake. No fancy folding skills needed, and my kids can handle it while I finish dinner.
- Smoky Cheesy Payoff: That smoked paprika and sharp cheddar combo? It’s like a hug for your taste buds. The brisket adds meaty depth, and the cream cheese keeps it ultra-smooth—no dry, powdery mac and cheese here.
- Leftover Hack Gold: The filling keeps for four days and freezes for three months—perfect for busy weeknights. Double the recipe, freeze half, and you’ve got a weeknight hero ready in minutes.
- Budget Meal Powerhouse: A 1.5 lb brisket and pantry staples like elbow macaroni and sharp cheddar make this a steal. Feeds four for less than a takeout run, and leftovers? Even better the next day.
Step-by-step instructions for brisket mac and cheese wraps
Here’s how to turn smoky brisket and creamy mac and cheese into handheld comfort food.
🍳 Step 1: Cook the Elbow Macaroni Al Dente
Bring a large pot of water to a rolling boil and add 1½ tsp salt. Toss in the 12 oz elbow macaroni and cook for 1 minute less than package directions—you want it al dente so it doesn’t turn mushy when wrapped. Drain the pasta in a colander and set aside, reserving ½ cup of the starchy pasta water.
Real talk: Don’t rinse the pasta. That starchy water is liquid gold for creating a silky sauce later. I like to shake the colander gently to remove excess water while keeping those flavorful starches clinging to the noodles.
🥘 Step 2: Build the Ultimate Cheesy Sauce
In a large skillet, melt the ½ cup unsalted butter over medium heat. Whisk in the ¼ cup flour and cook for 1-2 minutes until you smell that nutty, toasty aroma—this is your roux foundation. Slowly whisk in the 1 cup milk and ½ cup heavy cream until smooth.
Reduce heat to low and stir in the 8 oz cream cheese and 2 cups sharp cheddar cheese until completely melted and creamy. If the sauce gets too thick, add 1-2 tbsp of that reserved pasta water to reach your desired consistency. Here’s the thing—this sauce should be thick enough to coat the back of a spoon but still flow smoothly when you pour it.
🍳 Step 3: Sauté Onion and Garlic for Flavor
In the same skillet (no need to wash it—those browned bits add flavor), add the diced yellow onion and cook over medium heat for 5 minutes until softened. Add the 3 minced garlic cloves and 1 tbsp smoked paprika, stirring for 30 seconds until fragrant. This step adds that smoky depth that makes these wraps special.
Don’t walk away. Garlic burns fast, and you want it to just perfume the mixture, not turn bitter. You’ll know it’s perfect when your kitchen smells like a Texan roadside diner.
🥘 Step 4: Combine Everything and Fold in Brisket
Add the cooked elbow macaroni to the skillet and stir to coat everything in that cheesy sauce. Remove from heat and fold in the 1½ lb sliced brisket, making sure each piece gets coated in that rich, smoky goodness. Stir in the ½ tsp ground black pepper and give it one final taste—adjust seasoning if needed.
This is the moment that matters: the brisket should be warm but not reheated to the point of drying out. The macaroni should be fully coated in that creamy, cheesy sauce with visible brisket pieces throughout. If it’s too thick, add another splash of pasta water to loosen it up.
👨🍳 Step 5: Assemble and Warm the Wraps
Preheat your oven to 375°F. Warm the 4 flour tortillas in the oven for 2-3 minutes until pliable. Spoon about ¾ cup of the brisket mac and cheese mixture onto each tortilla, spreading it toward the edges but leaving about 1 inch bare around the perimeter.
Fold the sides inward first, then roll tightly from the bottom up. For extra crispiness, brush the outside of each wrap with a beaten egg (use the 2 large eggs) and bake for 5-7 minutes until golden brown and heated through. You’ve got this—just don’t overfill them or they’ll burst when you take a bite.
Pro Tips For Making Brisket Mac And Cheese Wrap
- Shake That Colander: After draining the elbow macaroni, give the colander a quick shake—this removes excess water while keeping those starchy noodles clinging to flavor. I learned this the hard way when my first batch turned out dry because I rinsed it like I do with salads.
- Whisk the Roux Fast: Cook that ¼ cup flour with the ½ cup unsalted butter for just 1-2 minutes—no longer, or it’ll turn bitter. I used to burn it every time until I realized the nutty aroma is the cue, not the color.
- Warm Tortillas First: Pop those 4 flour tortillas in the oven at 375°F for 2-3 minutes before filling. Cold tortillas tear when you wrap, and this step guarantees they’ll hold together like a pro’s.
- Brisket Last, Not Sooner: Fold in the 1.5 lb sliced brisket after everything else is off the heat—it reheats fast and stays tender. I ruined a batch by adding it too early, and the brisket turned rubbery. Trust the process.
Storing and reheating this recipe
Fridge Storage Secrets
Store your brisket mac and cheese filling in airtight containers—glass Pyrex works best to prevent flavor transfer. Let it cool for 2 hours before refrigerating to avoid condensation.
The flavors deepen overnight, making it even more delicious the next day. I always save the leftovers for lunch the following day—they taste like a restaurant meal! ❄️
Freezer Prep Tips
Portion the filling into quart-sized freezer bags and lay them flat to save space. Leave 1 inch headroom for expansion and squeeze out excess air to prevent freezer burn. Label with the date—it keeps for up to 3 months without losing texture. This is my go-to for game day prep!
Reheating Like a Pro
For stovetop reheating, use a heavy-bottomed pot and add ¼ cup water or beef broth to prevent sticking. Heat on medium-low for 10-15 minutes, stirring occasionally.
The tortillas? Warm them in the oven at 350°F for 5 minutes to keep them pliable. This method keeps the filling creamy and the tortillas crispy. 🔥
Oven Reheating Trick
If you prefer oven reheating, spread the filling on a baking sheet and bake at 350°F for 15 minutes. The heat will crisp the tortilla edges while warming the filling evenly. I like adding a sprinkle of smoked paprika before reheating for extra flavor.
Wrap Assembly Ahead
Assemble the wraps before reheating—just wrap them in foil and bake at 375°F for 10 minutes. This keeps the tortillas crispy and the filling hot. I often do this on Sundays to have ready-to-eat meals all week. No one will believe it’s prepped ahead!
Nutrition facts
Frequently asked questions
Why does the recipe call for al dente pasta?
The al dente pasta ensures it doesn’t turn mushy when wrapped and baked. This keeps the texture perfect—creamy cheese and tender brisket stay intact without soggy noodles. Trust me, that 1-minute less cook time makes all the difference for a satisfying bite!
Can I use pre-shredded cheese instead of block?
Pre-shredded cheese works in a pinch, but block cheese melts smoother and delivers better flavor. The sharp cheddar from a block creates that rich, gooey stretch you want in every pull of the wrap. If you must use pre-shredded, add an extra ¼ cup to compensate for moisture loss.
What if my tortillas tear when I roll them?
Tortillas tear because they’re not warm enough! Preheat them in the oven for 2-3 minutes before filling. Also, spread the filling toward the edges but leave a 1-inch border—this gives you extra material to fold and prevents bursting. Brush with egg wash for extra grip too!
How do I keep the brisket from drying out when reheating?
Reheat the brisket gently with the mac and cheese filling—never alone. Warm it on the stovetop with ¼ cup beef broth or pasta water for 10 minutes on low heat. This keeps the meat juicy while the cheese melts perfectly. Overheating turns it tough, so go slow!
Can I make these wraps ahead of time?
Assemble the wraps and refrigerate them wrapped in foil for up to 24 hours. When ready to serve, bake at 375°F for 10 minutes to crisp the tortillas. The flavors actually improve overnight as the brisket’s smokiness melds with the cheese. Perfect for game day prep!

Trained in classic French technique but raised on slow-cooked ribs and spicy rubs, she blends culinary skill with smoke and soul.
- Smoked Brisket Recipe: Low and Slow to Fall-Apart Tenderness - November 2, 2026
- Smoked Turkey Breast Recipe: Juicy Pink Center With Crispy Skin Every Time - November 2, 2026
- Leftover Smoked Pulled Pork Chili Recipe: Rustic Flavor Revival in One Pot - November 2, 2026