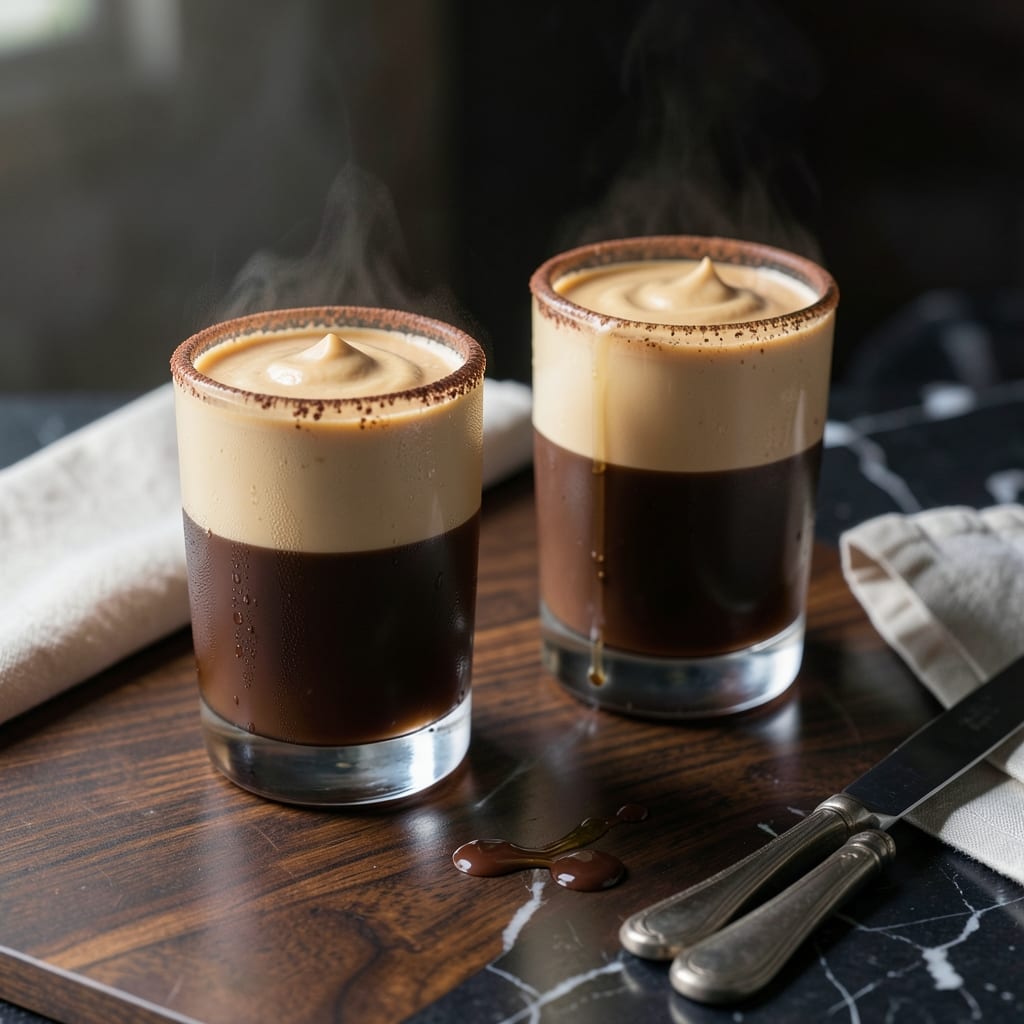
This layered shot captures the essence of buckeye candies in liquid form, combining rich chocolate and creamy peanut butter flavors in a single glass. The contrast between the two distinct layers creates a visually striking presentation that delights before the first sip.
What makes this drink special is its perfect balance of sweet and nutty flavors, achieved through careful layering of chocolate liqueur and peanut butter vodka. The smooth texture and complementary flavors make it a standout choice for dessert cocktails.
The result is a smooth, indulgent shot that tastes like a liquid version of the classic candy. Its simplicity and bold flavors make it a favorite for parties or as an after-dinner treat.
Serve chilled for the best experience, allowing the layers to remain distinct. This recipe delivers consistent, professional-quality results every time.
Ingredients for Buckeye Shot
A few quality ingredients create this layered shot with bold peanut butter and chocolate flavors.
| Ingredient | Amount | Notes |
|---|---|---|
| Peanut Butter Vodka 🥜 | 1 oz | Smooth peanut butter flavor preferred |
| Chocolate Liqueur 🍫 | 1 oz | Dark or milk chocolate variety |
| Heavy Cream 🥛 | 1 oz | Full-fat for richness |
| Simple Syrup 🍯 | ½ oz | Adjust sweetness to taste |
| Vanilla Extract 🌿 | ¼ tsp | Pure vanilla for depth |
| Ice ❄️ | 1 cup | Crushed or cubed for chilling |
| Whipped Cream 🥛 | 2 tbsp | Optional for garnish |
| Chocolate Syrup 🍫 | 1 tsp | For drizzling (optional) |
[recipe_ingredient_scaler]
The peanut butter vodka is essential here. Svedka or SKYY make reliable options, but any smooth peanut butter-flavored vodka works. The chocolate liqueur should be rich and syrupy—Godiva or Crème de Cacao are solid choices. Heavy cream adds the creamy layer that mimics buckeye candy filling. Look for organic or grass-fed for the best texture.
No peanut butter vodka? Regular vodka with a splash of peanut butter syrup gets you close. Chocolate liqueur can be swapped for chocolate syrup mixed with vodka in a pinch. For a lighter version, half-and-half instead of heavy cream works, but the layers won’t be as distinct. Vanilla extract is optional but adds depth—use pure vanilla, not imitation.
Chilled ingredients layer best. Keep everything in the fridge until ready to assemble. The shot holds its layers for 10-15 minutes if kept cold. For parties, prep components ahead and assemble just before serving.
Why You’ll Love This Recipe
- 5-Minute Mix: I shake everything in a cocktail shaker and it’s ready to pour—no fancy tools, just a quick stir of peanut butter vodka, chocolate liqueur, and cream.
- Like a Reese’s: The combo of creamy peanut butter and chocolate liqueur tastes just like the candy, but boozy and smooth.
- Party Starter: I bring these to gatherings and they’re always the first to disappear—great for game nights or holiday toasts.
- Budget Sip: A little heavy cream and simple syrup stretch the pricier liqueurs, so I can make a big batch without breaking the bank.
Step-by-Step Instructions for Chocolate-Peanut Butter Layered Delight
Master this technique and you’ll serve perfectly layered shots every time.
Step 1: Chill the Glass and Prepare the Base
Begin by placing 2 shot glasses in the freezer for 10 minutes to chill. Cold glasses help maintain the distinct layers of this drink. While they chill, fill a cocktail shaker with 1 cup ice—this ensures your ingredients stay properly chilled during mixing.
Add 1 oz Peanut Butter Vodka and 0.5 oz Simple Syrup to the shaker. The simple syrup balances the peanut butter vodka’s natural nuttiness with just the right amount of sweetness. Don’t skip this step—the syrup integrates seamlessly into the drink.
Step 2: Shake and Strain the Peanut Butter Layer
Secure the lid on the shaker and shake vigorously for 15-20 seconds. You’ll feel the outside of the shaker frost slightly—that’s how you know it’s properly chilled. The mixture should look slightly cloudy when ready.
Remove the glasses from the freezer and strain the peanut butter mixture evenly between them. Use a fine-mesh strainer to catch any ice shards. The layer should be smooth and slightly thick, sitting at the bottom of each glass.
Step 3: Create the Chocolate Layer
Rinse your shaker to remove any peanut butter residue, then add fresh 1 cup ice. Pour in 1 oz Chocolate Liqueur, 1 oz Heavy Cream, and 0.25 tsp Vanilla Extract. The vanilla extract enhances the chocolate’s depth without overpowering it.
Shake again for 15-20 seconds until the outside of the shaker frosts. This chocolate layer needs to be colder than the peanut butter layer to ensure it floats properly. Strain this mixture carefully over the back of a spoon held just above the peanut butter layer in each glass.
Step 4: Garnish and Serve Immediately
Drizzle 1 tsp Chocolate Syrup in a circular motion on top of each shot. The syrup’s viscosity creates an appealing web-like pattern that makes these shots as visually impressive as they are delicious.
Top each with a dollop of 2 tbsp Whipped Cream, dividing it evenly between the two glasses. The whipped cream adds a light, airy contrast to the rich layers below. Serve immediately while the layers are still distinct and the temperature contrast is at its peak.
Pro Tips For Making Buckeye Shot
- Chill the Cream: Heavy cream whips better when ice cold—I learned this the hard way after ending up with a sad, flat foam the first time. Pop it in the freezer for 10 minutes before mixing.
- Balance the Sweetness: Peanut butter vodka can be cloying, so cut the simple syrup by half and taste before adding more. Sounds weird, but it works.
- Shake, Don’t Stir: Use a cocktail shaker with ice to blend everything—it smooths out the textures and chills the drink fast. My grandmother swore by this, and she was right.
- Use Real Vanilla: Skip the imitation stuff. A splash of pure vanilla extract actually changes the outcome, giving the shot a deeper, warmer flavor.
Pro Cooking Tips for This Recipe
Chill Everything First
Cold is your best friend for distinct layers. I chill shot glasses in the freezer for 10 minutes and keep all ingredients refrigerated until use. This prevents the layers from bleeding together as you build them.
Layering Technique
Always pour the peanut butter vodka mixture first—it’s denser. Then slowly add the chocolate layer over the back of a spoon held just above the first layer. This controlled pour creates that perfect separation we all love. 💡
Shaking Time Matters
Don’t rush the shaking—15-20 seconds per layer is ideal. You’ll see frost forming on the shaker, which means it’s properly chilled. This ensures each layer has the right consistency to maintain its position in the glass.
Spoon Trick
Use the back of a spoon as a buffer when pouring the second layer. Hold it ½ inch above the first layer and let the chocolate mixture flow gently over it. This slows the pour and prevents mixing.
Serve Immediately
These shots hold their layers for 10-15 minutes if kept cold. I recommend assembling them right before serving. The contrast between the warm room and cold glass actually helps maintain the visual effect. 🔥
Quality Ingredients
For the cleanest layers, use full-fat heavy cream and premium chocolate liqueur. The higher fat content in quality ingredients creates better separation and a smoother texture in each distinct layer.
Nutrition Facts
Frequently Asked Questions
What’s the best way to layer these shots?
Pour the denser peanut butter mixture first. Then slowly add the chocolate layer over the back of a spoon held ½ inch above the first layer to prevent mixing.
Can I make this without peanut butter vodka?
Yes! Use regular vodka with a splash of peanut butter syrup as a substitute. The flavor will be slightly different but still delicious.
How long will the layers stay separated?
The layers hold for 10-15 minutes if kept cold. Assemble right before serving for the best visual effect.
Can I use milk instead of heavy cream?
You can, but the layers won’t be as distinct. Heavy cream creates the best separation due to its higher fat content.

Trained in classic French technique but raised on slow-cooked ribs and spicy rubs, she blends culinary skill with smoke and soul.
- Recipe For Fried Pork Chops In An Iron Skillet: Crispy Crust With Juicy Centers - October 3, 2026
- Recipe for Fully Cooked Spiral Ham: Sweet Glaze and Effortless Elegance - October 3, 2026
- Recipe for Cream of Rice: Silky Smooth Breakfast Comfort - October 3, 2026