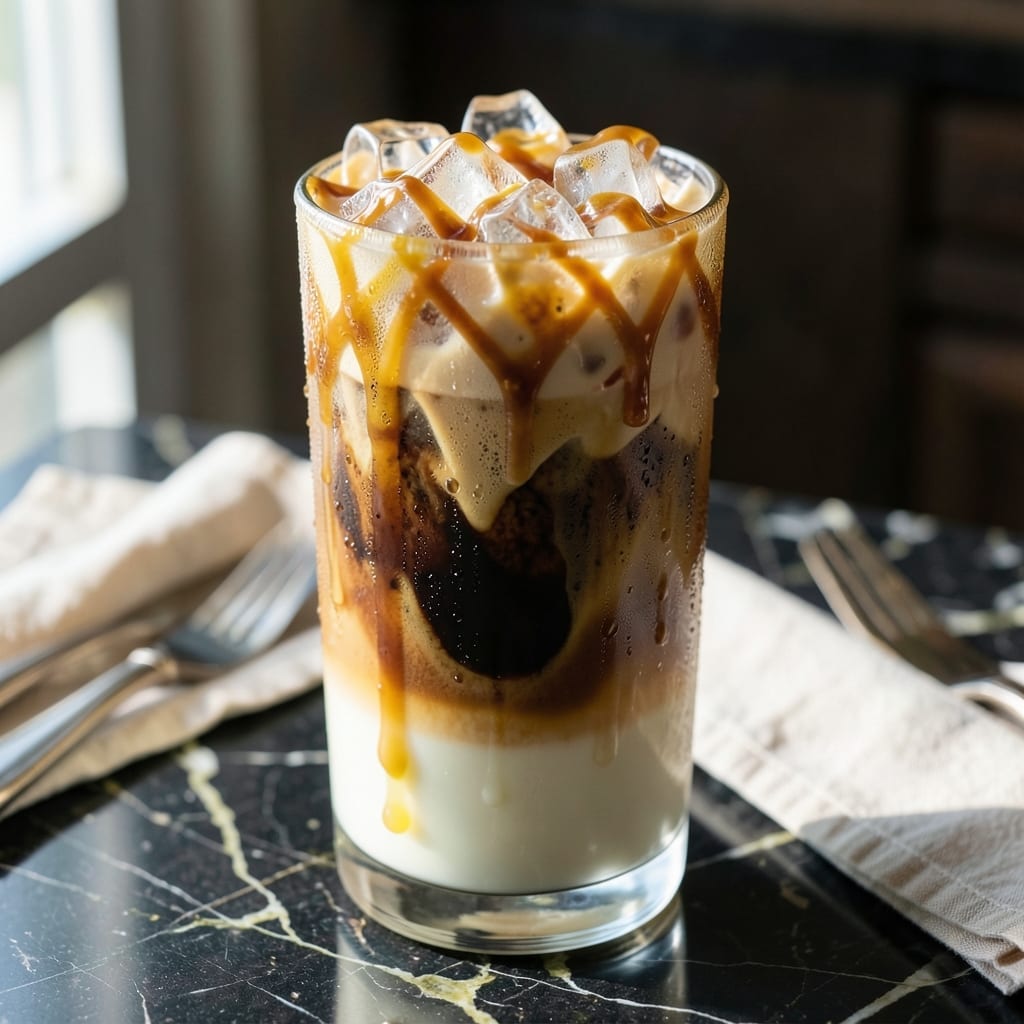
Creating a café-quality iced caramel macchiato at home is simpler than you think. This recipe delivers the perfect balance of espresso, milk, and vanilla sweetness, finished with a signature caramel drizzle.
The key is layering cold milk over sweetened vanilla syrup, then slowly pouring espresso through the center. This creates the distinctive “stained” look that defines a true macchiato.
What you get is a refreshing, creamy drink with bold coffee flavor and just the right amount of caramel. The contrast between the cold milk and warm espresso creates a satisfying complexity.
With just 5 ingredients and 5 minutes, you can skip the coffee shop line and enjoy barista-level indulgence anytime.
Ingredients for Iced Caramel Macchiato Starbucks Recipe Card
Five simple ingredients for a café-quality drink at home. Nothing fancy, just good stuff.
| Ingredient | Amount | Notes |
|---|---|---|
| Espresso ☕ | 2 oz | Freshly brewed, hot |
| Whole Milk 🥛 | 1 cup | Cold, for layering |
| Vanilla Syrup 🍯 | 2 tbsp | Store-bought or homemade |
| Caramel Sauce 🍫 | 2 tbsp | For drizzling |
| Ice Cubes ❄️ | 1 cup | Fresh, for serving |
[recipe_ingredient_scaler]
The espresso is non-negotiable here—use a dark roast for that bold base. Starbucks espresso pods work great if you don’t have a machine. The milk should be whole for that creamy texture (2% works in a pinch). Organic Valley or any local dairy brand is solid. Vanilla syrup can be found in the coffee aisle at Target or Walmart. Skip the sugar-free unless you’re into that.
No espresso maker? Strong brewed coffee at half the amount gets you close. Dairy-free? Oat milk or whole-fat coconut milk froths nicely. Vanilla syrup too sweet? Cut it to 1 tbsp. Caramel sauce can be swapped for homemade (sugar + butter + cream), but store-bought like Ghirardelli saves time. The ice? Filtered water cubes taste cleaner.
This tastes best fresh—espresso loses its punch after 30 minutes. Leftovers? Not ideal, but you can refrigerate the milk mixture for 1 day. Stir before using. The caramel sauce keeps in the fridge for 2 weeks.
Why You’ll Love This Recipe
- No Fuss Brew: I can make this in five minutes flat—just espresso, milk, syrup, and ice.
- Sweet Balance: The vanilla syrup and caramel sauce hit that perfect sweet spot without being cloying.
- Host Approved: I serve these at brunch and everyone thinks I slaved over them.
- Pocket Friendly: Skip the café line and make this at home for a fraction of the price.
Step-by-Step Instructions for Iced Caramel Macchiato
Master the layering technique that makes this drink so visually stunning and delicious.
Step 1: Prepare and Sweeten the Milk Base
Start by pouring the 1 cup Whole Milk into your serving glass. This cold milk forms the foundation of your drink and creates that beautiful layered effect when you add the other components.
Next, add the 2 tbsp Vanilla Syrup directly to the milk. I like to pour it slowly down the side of the glass to begin the layering process. Stir gently but thoroughly to combine—this ensures the sweetness is evenly distributed throughout the milk without disrupting the layers you’ll create next.
Step 2: Add Ice for Perfect Chill
Fill the glass to the top with the 1 cup Ice Cubes. The ice serves multiple purposes here: it chills the drink to the perfect temperature, dilutes the sweetness slightly as it melts, and most importantly, creates a barrier that helps maintain those distinct layers as you add the remaining ingredients.
Use fresh ice cubes rather than crushed ice for this drink. The larger surface area of whole cubes melts more slowly, preserving your beautiful presentation for longer. Pack them in firmly but don’t overfill—you need room for the final layers.
Step 3: Pour the Espresso for the Signature Layer
Now comes the moment that defines this drink: slowly pour the 2 oz Espresso over the ice. The key here is to pour gently and directly onto the ice cubes, not down the side of the glass. This creates that iconic dark espresso layer that floats between the milk below and the caramel topping you’ll add next.
Watch as the espresso begins to mix slightly with the milk at the edges while maintaining its distinct layer. The contrast between the dark espresso and creamy milk is what gives this drink its signature “macchiato” (Italian for “stained”) appearance. If your espresso is too hot, let it cool for 30 seconds first to prevent immediate melting of your ice.
Step 4: Finish with Caramel Drizzle
For the final touch, drizzle the 2 tbsp Caramel Sauce over the top of the drink. I recommend holding the bottle or spoon about 6 inches above the glass and moving in a circular motion to create an even, web-like pattern across the surface.
The caramel will initially float on top before slowly sinking through the layers, creating beautiful swirls as it mixes with the espresso and milk. This not only adds sweetness but also enhances the visual appeal that makes this drink so Instagram-worthy. For an extra touch, you can add a second drizzle in a crosshatch pattern for a more professional presentation.
Serve immediately with a wide straw so your guests can experience all the layers with each sip. The first taste should deliver the sweet caramel, followed by the rich espresso, and finally the creamy vanilla milk—a perfect balance in every mouthful.
Pro Tips For Making Iced Caramel Macchiato Starbucks Recipe Card
- Chill the Milk: Use ice-cold whole milk straight from the fridge—it keeps the drink crisp and prevents the espresso from melting the ice too fast.
- Layer Properly: Pour vanilla syrup first, then milk, then espresso last over ice. This creates the signature macchiato gradient instead of a muddy mix.
- Skip Pre-Made Syrup: Make your own vanilla syrup with equal parts sugar and water plus a split vanilla bean—it tastes richer than store-bought and actually changes the outcome.
- Drizzle Last: Add caramel sauce after the espresso has settled for 10 seconds, not before. I learned this the hard way—it sinks and gets lost in the ice if you rush it.
Make-Ahead Tips for This Dish
Prep Ahead Components
You can prepare the vanilla syrup and caramel sauce up to 1 week in advance. Store them in airtight containers in the fridge. I often make a double batch of both to have on hand for multiple drinks.
Espresso Prep
Brew your 2 oz espresso up to 30 minutes before assembling. Let it cool slightly at room temperature. This timing ensures it’s still warm enough to create the signature layered effect but won’t immediately melt your ice.
Milk Mixture
Combine the 1 cup whole milk and 2 tbsp vanilla syrup the night before. Store in a sealed jar in the fridge. Give it a quick stir before using to redistribute the sweetness evenly. 💡
Ice Strategy
Use fresh ice cubes made from filtered water for the cleanest taste. If making ahead, freeze the water in your ice cube trays 24 hours before serving. This ensures perfectly clear, slow-melting cubes.
For larger batches, prep all components separately and assemble just before serving. This maintains the drink’s integrity.
Assembly Timing
The actual layering should happen right before serving. Pour the milk mixture, add ice, then the espresso, and finish with 2 tbsp caramel sauce. The entire assembly takes less than 2 minutes per drink.
Nutrition Facts
Frequently Asked Questions
Can I use regular coffee instead of espresso?
Yes, but use 1/2 cup strong brewed coffee for the same intensity. The flavor won’t be as concentrated, but it works in a pinch. Avoid instant coffee—it lacks the depth needed.
Why does the espresso sink to the bottom?
This happens when poured too quickly. Slowly drizzle the 2 oz espresso over the ice to create the signature layered look. Warm espresso naturally rises through cold milk for that stained effect.
Can I make this dairy-free?
Swap the 1 cup whole milk for oat or almond milk. Use dairy-free caramel sauce too. The texture may be slightly thinner, but the flavor remains rich.

Trained in classic French technique but raised on slow-cooked ribs and spicy rubs, she blends culinary skill with smoke and soul.
- Recipe for Boneless Pork Chops in Cast Iron Skillet: Sear and Baste to Juicy Perfection - October 3, 2026
- Recipe for Boneless Cross Rib Roast: Slow-Roasted Beef with Herb Crust - October 3, 2026
- Hamburgers in Sauce Recipe Crock Pot: Slow-Cooked Savory Delight - October 3, 2026