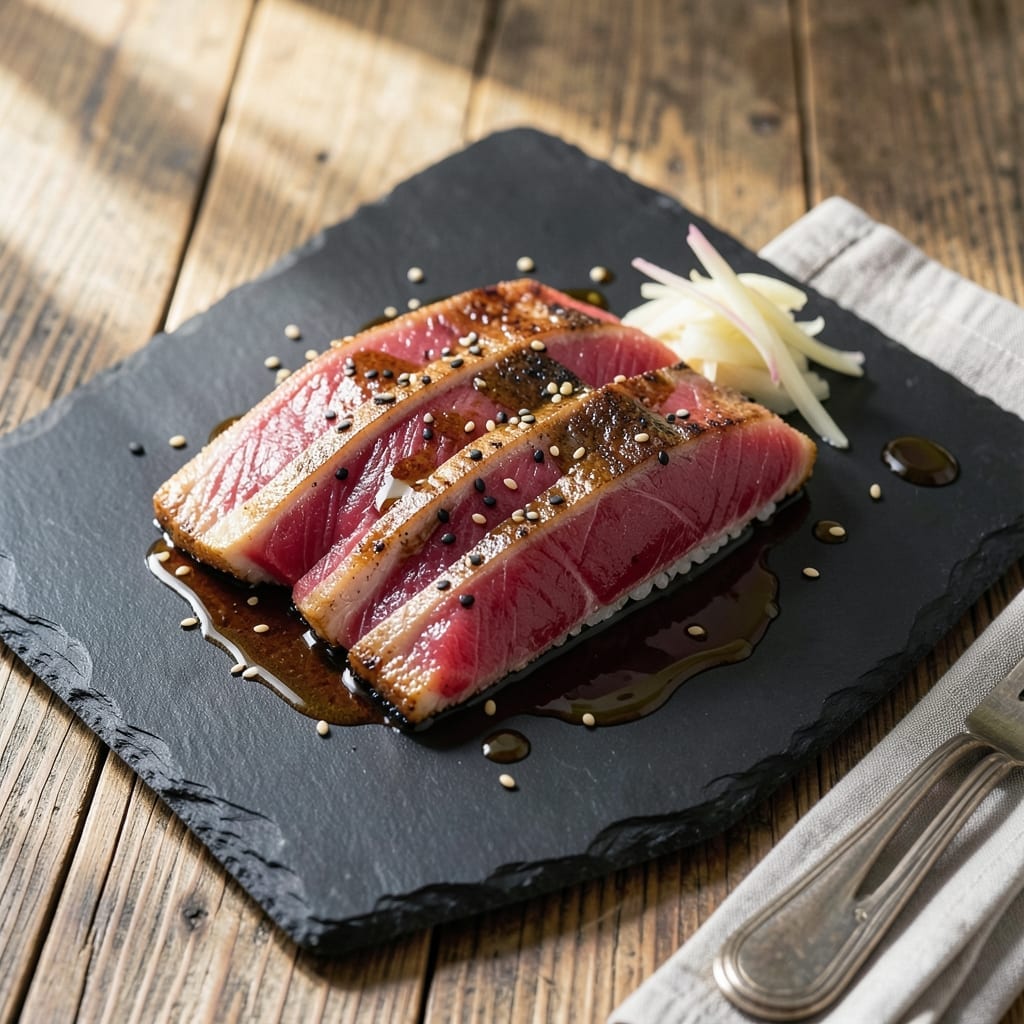
Achieving perfectly seared ahi tuna at home is simpler than most realize. The key lies in starting with sushi-grade fish and mastering the brief, high-heat sear.
This method delivers a restaurant-quality result with a warm, crusty exterior and cool, tender center that melts on the tongue. Precision in timing and temperature makes all the difference.
Ingredients for Recipe Ahi Tuna
Restaurant-quality seared ahi requires pristine fish and minimal ingredients for maximum impact.
| Ingredient | Amount | Notes |
|---|---|---|
| Sushi-Grade Ahi Tuna 🐟 | 1 ½ lb | Center-cut, skinless preferred |
| Sesame Seeds 🌰 | 2 tbsp | Toasted, black or white |
| Soy Sauce 🫒 | ¼ cup | Low-sodium preferred for control |
| Sesame Oil 🫒 | 1 tbsp | Toasted for depth of flavor |
| Rice Vinegar 💧 | 1 tbsp | Unseasoned variety |
| Fresh Ginger 🌿 | 1 tbsp | Peeled and finely grated |
| Garlic Cloves 🧄 | 2 cloves | Minced to fine paste |
| Green Onions 🧅 | 4 whole | Thinly sliced on diagonal |
| Neutral Oil 🫒 | 2 tbsp | High smoke point, avocado or grapeseed |
| Kosher Salt 🧂 | 1 tsp | Diamond Crystal preferred |
| Black Pepper 🌶️ | ½ tsp | Freshly cracked for best flavor |
| Wasabi Paste 🟢 | 1 tsp | Optional for serving |
| Pickled Ginger 🌸 | ¼ cup | For garnish and palate cleanser |
[recipe_ingredient_scaler]
The tuna is non-negotiable—sushi-grade ahi from a trusted fishmonger is essential. Look for vibrant red color with no brown discoloration, and ask when it was cut. Most Whole Foods locations carry it, or try a dedicated seafood market. Center-cut pieces ensure even searing. The sesame seeds should be freshly toasted—old seeds lose their aroma quickly.
No sesame oil? Skip it rather than substitute—it’s irreplaceable here. Tamari works in place of soy sauce at a 1:1 ratio. For the neutral oil, avocado oil’s high smoke point makes it ideal, but grapeseed or light olive oil work too. Fresh ginger is preferred, but ground ginger at one-third the amount can substitute in the marinade (though texture will differ).
Serve immediately after searing for best texture. Leftovers keep for 24 hours in the fridge but are best consumed fresh. The pickled ginger and wasabi can be stored separately for up to 1 month in the refrigerator. Never freeze the tuna after searing—it ruins the delicate texture.
Why You’ll Love This Recipe
- Ready in 15: I sear the ahi for just 90 seconds per side, then it’s straight to the plate—no long waits, no fuss.
- Umami Bomb: Honestly, the mix of soy sauce, sesame oil, and toasted sesame seeds makes every bite taste like it came from a high-end sushi bar.
- Date Night Ready: I serve this with a quick cucumber salad for a restaurant-worthy meal that feels special but takes zero effort.
- No Leftovers: Between us, this never lasts past dinner—my family devours it all, so no worries about storing raw fish.
Step-by-Step Instructions for Ahi Tuna
Master the searing technique and deliver restaurant-quality results with precision and control.
Step 1: Prepare the Sushi-Grade Ahi Tuna
Pat the 1.5 lb sushi-grade ahi tuna completely dry with paper towels. Any moisture will prevent proper searing and create steam instead of a crust. Season all sides evenly with the 1 tsp kosher salt and 0.5 tsp black pepper, pressing gently to ensure adhesion.
The center-cut pieces work best for even cooking. If your tuna has skin, leave it on for presentation but score it lightly to prevent curling during cooking. Let the seasoned tuna rest at room temperature for 10-15 minutes before searing—this promotes even cooking throughout.
Step 2: Sear the Tuna to Perfection
Heat the 2 tbsp neutral oil in a heavy skillet over high heat until it begins to shimmer but not smoke. Carefully place the tuna in the pan, leaving space between pieces to prevent steaming. Sear undisturbed for 1-2 minutes per side for medium-rare, or adjust based on your preferred doneness.
Watch for the edges to turn opaque and rise about ¼ inch up the sides—that’s your visual cue to flip. The exterior should develop a deep golden crust while the interior remains cool and raw. For consistent results, use tongs to flip rather than a spatula to avoid piercing the fish.
Step 3: Create the Ginger-Soy Finishing Sauce
In a small bowl, whisk together the 0.25 cup soy sauce, 1 tbsp sesame oil, 1 tbsp rice vinegar, 1 tbsp fresh ginger, and minced 2 cloves garlic cloves. The ginger and garlic should be finely grated or minced to a paste for smooth integration into the sauce.
Taste and adjust the balance if needed, though the low-sodium soy sauce allows the other flavors to shine. This sauce should be vibrant and aromatic, with the ginger providing a bright, slightly spicy note that complements the rich tuna without overpowering it.
Step 4: Slice, Garnish, and Serve
Transfer the seared tuna to a cutting board and let it rest for 2-3 minutes. Using a sharp knife, slice against the grain into ½-inch thick pieces. This cross-grain slicing shortens the muscle fibers for maximum tenderness.
Drizzle the ginger-soy sauce over the sliced tuna, then sprinkle with the 2 tbsp sesame seeds and thinly sliced 4 whole green onions. Serve immediately with the 0.25 cup pickled ginger and 1 tsp wasabi paste on the side for those who enjoy a spicy accent. The pickled ginger acts as a palate cleanser between bites.
Pro Tips For Making Recipe Ahi Tuna
- Chill the Tuna First: Pop the ahi in the freezer for 15-20 minutes before slicing—it firms up just enough to get clean, even cuts without mangling the fish.
- Toast the Seeds: Dry-toast the sesame seeds in a pan for 1-2 minutes until golden and fragrant; I learned this the hard way after using raw seeds that tasted bland.
- Skip Overcooking: Sear the ahi for 60-90 seconds per side max—any longer and you’ll lose that buttery, rare center that makes it special.
- Warm the Soy Sauce: Heat the soy sauce, sesame oil, and rice vinegar together for 30 seconds in the microwave before drizzling; it clings better and brings out the flavors.
Serving Suggestions for This Recipe
Elevated Plating
Arrange the sliced tuna on a chilled plate to maintain its cool center. Fan the pieces slightly for visual appeal, creating a beautiful gradient from seared crust to raw center. I love using white plates to highlight the vibrant red of the fish. ✨
Sauce Drizzle
Use a spoon to artfully drizzle the ginger-soy sauce in a zigzag pattern across the plate. This technique adds restaurant-style presentation without much effort. The sauce should pool slightly around the tuna, ready for dipping.
Garnish Placement
Sprinkle the toasted sesame seeds directly over the tuna slices, letting some spill onto the plate for texture contrast. Scatter the thinly sliced green onions diagonally across the arrangement for a pop of color.
Accompaniment Pairing
Place a small mound of pickled ginger on the side of the plate, and add a pea-sized dollop of wasabi paste next to it. These traditional elements complete the presentation while offering flavor contrast between bites. 💡
Serving Temperature
Serve immediately while the exterior is still warm and the center remains cool. I always remind guests to use chopsticks or a fork to maintain the integrity of the slices. The temperature contrast is part of what makes this dish special.
Optional Additions
For a complete meal, pair with steamed jasmine rice and a simple cucumber salad. The neutral base of rice allows the tuna flavors to shine, while the cool crunch of cucumber balances the richness.
Nutrition Facts
Frequently Asked Questions
What’s the best way to store leftover seared tuna?
Store in an airtight container in the fridge for up to 24 hours. Avoid freezing, as it ruins the delicate texture. Reheat gently or serve cold.
Can I use regular tuna instead of sushi-grade?
No. Sushi-grade is a must for raw or lightly seared preparations. Regular tuna may contain parasites or bacteria unsafe for undercooking.
How do I know when the tuna is done searing?
Look for a ¼-inch opaque band around the edges. The center should stay cool and raw. Sear for 1-2 minutes per side for medium-rare.
What can I substitute for sesame oil?
Skip it entirely—it has a unique flavor that’s hard to replicate. If needed, add a touch of toasted sesame seeds for similar aroma.

Trained in classic French technique but raised on slow-cooked ribs and spicy rubs, she blends culinary skill with smoke and soul.
- Recipe for Boneless Pork Chops in Cast Iron Skillet: Sear and Baste to Juicy Perfection - October 3, 2026
- Recipe for Boneless Cross Rib Roast: Slow-Roasted Beef with Herb Crust - October 3, 2026
- Hamburgers in Sauce Recipe Crock Pot: Slow-Cooked Savory Delight - October 3, 2026