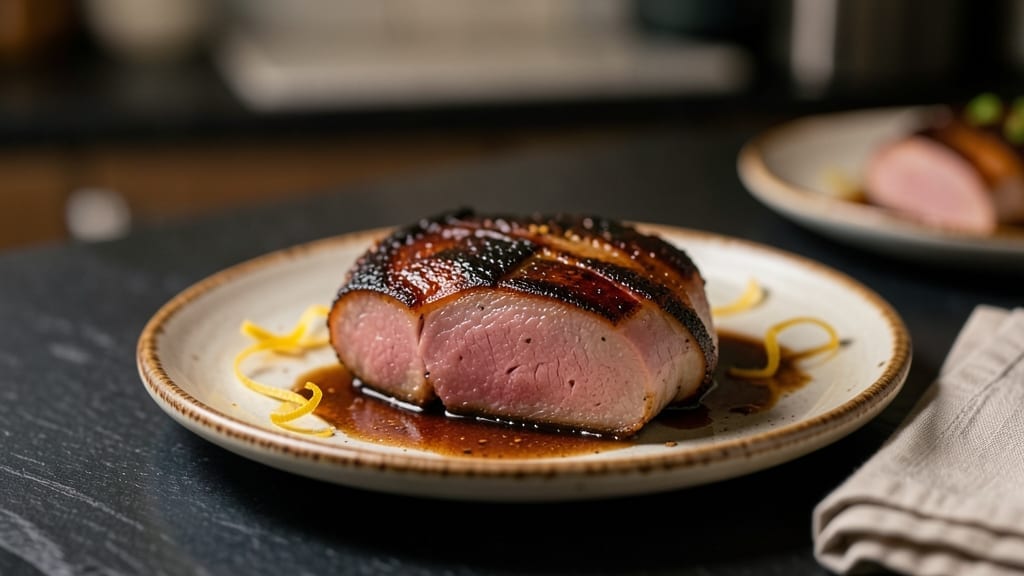
This smoked ham recipe not sweet delivers deep, savory flavor—just bold spices, slow-smoked perfection, and a dry cure that transforms tough cuts into melt-in-your-mouth tenderness. The day I realized French technique could elevate my rubs changed everything, and this method builds on that precision.
No honey, no sugar, just pure, smoky intensity that stands up to rich sides like mustard sauce or pickled vegetables.
The secret lies in a dry cure of coarse salt, black pepper, juniper berries, and coriander—rubbed into the ham before a low-and-slow smoke for 12-16 hours. I use hickory wood for its classic depth, but applewood adds a subtle fruitiness if you prefer.
The key is patience; rushing the process sacrifices flavor for speed. This isn’t just ham—it’s a centerpiece that commands attention at any table.
By the time it emerges from the smoker, your ham will have a deep amber crust and a texture so tender it nearly falls apart. The spices infuse the meat with layers of warmth—earthy juniper, bright coriander, and a peppery kick that lingers.
Serve it sliced thin with a sharp mustard sauce or alongside roasted root vegetables to let the flavors shine. Every bite is a testament to what happens when tradition meets technique.
For those who love leftovers, this ham reheats beautifully—just warm it gently in its juices. The dry cure keeps it moist without needing glaze, and the smoky aroma will have everyone asking for seconds.
Whether you’re hosting a holiday feast or craving a weeknight centerpiece, this method delivers restaurant-quality results at home. Let’s get started.
Ingredients for smoked ham recipe not sweet
Bold spices and slow smoke transform tough ham into melt-in-your-mouth perfection.
| Ingredient | Amount | Notes |
|---|---|---|
| Bone-In Ham Hock 🥓 | 2 lb | Tough cut with bone for flavor |
| Coarse Sea Salt 🧂 | ½ cup | Diamond Crystal preferred |
| Freshly Ground Black Pepper 🌶️ | 1 tbsp | Cracked, not powdered |
| Juniper Berries 🌿 | 1 tbsp | Crushed lightly, not powdered |
| Ground Coriander 🌶️ | 1 tbsp | Freshly ground preferred |
| Hickory Wood Chips 🌳 | 2 cups | Unsoaked, food-grade |
| Applewood Chips 🍎 | 1 cup | Optional for fruitiness |
| Yellow Mustard 🍯 | 2 tbsp | For post-smoke glaze |
| Apple Cider Vinegar 🍏 | 1 tbsp | For glaze balance |
| Garlic Cloves 🧄 | 4 cloves | Smashed for aroma |
| Fresh Thyme Sprigs 🌿 | 4 whole | For smoker aroma |
| Bay Leaves 🍃 | 2 whole | Dried, for depth |
| Olive Oil 🫒 | 1 tbsp | For rub adhesion |
[recipe_ingredient_scaler]
The ham hock is non-negotiable here—its bone and connective tissue create the richest flavor. Look for bone-in cuts at your butcher or grocery store’s meat counter. I always grab mine from Whole Foods or a local specialty shop where they can source high-quality, fresh cuts. The salt needs to be coarse—Diamond Crystal is my go-to—it clings better to the meat and dissolves slowly. Juniper berries? Penzeys Spices sells them whole, and you can crush them lightly with a mortar and pestle or the flat side of a knife. Freshly cracked pepper makes all the difference, so don’t use pre-ground. For wood chips, Traeger or Cookshack brands are reliable, and always check they’re food-grade.
No juniper berries? Allspice berries at half the amount work in a pinch, though the flavor will be slightly different. Short on time? Pre-crush the juniper and coriander in a spice grinder before mixing with salt. The wood chips can be swapped—mesquite for intensity or cherry for sweetness, though hickory remains my classic choice. For the glaze, if you can’t find apple cider vinegar, white wine vinegar or lemon juice will do. The mustard adds tang without sweetness, so don’t substitute with honey-based varieties. And if you’re feeling fancy, add a pinch of cayenne to the rub for a subtle kick.
This ham keeps beautifully—3-4 days in the fridge once smoked, or freeze for up to 3 months. Wrap it tightly in butcher paper first, then foil, to preserve moisture. For reheating, low oven (275°F) with a splash of water keeps it juicy. The rub itself? Store any leftover spices in an airtight container for up to 6 months. I always make extra—it’s perfect for other meats too. And trust me, the aroma from the smoker will have your neighbors asking what’s cooking.
Why You’ll Love This Recipe
- No-Sugar Needed: Honestly, I never thought I’d crave a ham that wasn’t drowning in brown sugar, but this one? That crispy bark with the creamy center? Chef’s kiss. The juniper berries and coriander give it a piney, earthy punch that’s way more interesting than the usual sweet stuff.
- Smoke Magic: The hickory and applewood combo is pure genius—smoky depth meets just a whisper of fruitiness, and the garlic and thyme sprigs? They make every bite smell like a cozy kitchen. No fancy tools, just good wood and patience.
- Leftovers That Win: This ham keeps for days, and reheating it in the oven with a splash of water? Game over. I slice it for sandwiches, toss it into grain bowls, or even just eat it straight with a fork. My kids fight over the last piece, and honestly, that’s the best compliment.
- Budget-Friendly Powerhouse: A bone-in ham hock is cheaper than you’d think, and with just a few pantry staples—like that coarse sea salt and crushed juniper—I’m getting restaurant-quality flavor without breaking the bank. Plus, it feeds a crowd for under $15. No excuses.
Step-by-step instructions for smoked ham recipe not sweet
Here’s how to transform your ham hock into a deeply savory, aromatic centerpiece.
Prepare the Dry Cure for Maximum Flavor Penetration
Start by combining the ½ cup coarse sea salt, 1 tablespoon freshly ground black pepper, 1 tablespoon crushed juniper berries, and 1 tablespoon ground coriander in a small bowl. Mix thoroughly until the spices are evenly distributed through the salt. This dry cure is your flavor foundation—don’t skip the crushing of juniper berries, as whole berries won’t release their piney aroma properly.
Place the 2 lb bone-in ham hock on a wire rack set over a baking sheet. This elevation is crucial—it allows air to circulate on all sides during curing. Using your fingers, gently press the dry cure mixture into every crevice of the ham hock, including inside the cavity. The bone helps conduct flavor throughout the meat, so don’t neglect the areas around it. Wrap the ham hock tightly in plastic wrap and refrigerate for 24 hours, turning it once halfway through to ensure even curing.
Set Up the Smoker for Low-and-Slow Cooking
While the ham hock cures, prepare your smoker by combining the 2 cups hickory wood chips and 1 cup applewood chips in the smoke box. The hickory provides that classic smoky depth while the applewood adds subtle fruitiness that complements the savory profile. Soak the wood chips only if your smoker requires it—most modern smokers work perfectly with dry chips. Light the chips and let the smoker preheat to 225°F for at least 30 minutes before adding the ham.
Once the smoker reaches temperature, remove the ham hock from the refrigerator and let it sit at room temperature for 30 minutes. This prevents temperature shock when it hits the smoker. Place the ham hock fat-side up on the smoker grate. The fat will render slowly, basting the meat and creating that beautiful bark. Insert a meat probe thermometer into the thickest part of the meat, avoiding the bone. Smoke the ham hock for 6-8 hours, maintaining the 225°F temperature. You’ll notice the bark developing a deep mahogany color—this is your visual cue that the smoky flavors are penetrating deeply.
Create the Savory Glaze and Finish the Ham
After the initial smoke, prepare the glaze by combining the 2 tablespoons yellow mustard, 1 tablespoon apple cider vinegar, and 1 tablespoon olive oil in a small bowl. Whisk until smooth—this glaze will balance the smoky depth with tangy brightness. While the ham continues to smoke, crush the 4 garlic cloves and remove the leaves from the 4 fresh thyme sprigs, keeping the stems intact for garnish. Add the garlic and 2 bay leaves to the smoker along with the ham hock.
Continue smoking for an additional 2-3 hours until the internal temperature reaches 195-200°F. The ham should have a firm, springy texture when pressed gently with your finger. Remove the ham from the smoker and let it rest for 15 minutes before applying the glaze. Brush the glaze generously over the entire surface of the ham, including the cavity. Return it to the smoker for 15-20 minutes to let the glaze caramelize slightly, creating a glossy finish.
Rest and Serve for Optimal Texture
Transfer the smoked ham hock to a cutting board and let it rest for 30 minutes before slicing. This resting period allows the juices to redistribute throughout the meat, ensuring each slice is moist and flavorful. The bark should be crisp enough to hold its shape but still tender enough to slice cleanly. Use a sharp carving knife to slice against the grain into ¼-inch thick pieces. Garnish each serving with the reserved thyme sprigs for an aromatic finish.
Serve immediately with the pan juices reduced by half for a rich, savory sauce. The ham should deliver layers of smoky depth from the hickory, subtle sweetness from the applewood, and bright acidity from the vinegar glaze. Each bite should be tender yet firm, with a crispy bark that contrasts beautifully against the juicy interior. This method guarantees a ham that’s boldly savory—not sweet—with complex flavors that stand up to any meal.
Pro Tips For Making Smoked Ham Recipe Not Sweet
- Crush Juniper Properly: I learned this the hard way—whole juniper berries just sit there like tiny marbles. Lightly crush them with the flat of a knife or mortar and pestle until you can see a few cracks; this releases their piney aroma into the salt rub without turning it into bitter dust. The recipe calls for 1 tablespoon crushed, not powdered, so don’t overdo it—just enough to break the skins.
- Fat-Side Up Always: That rendered fat isn’t just for flavor—it’s your built-in basting sauce. Placing the ham hock fat-side up on the smoker grate lets the fat slowly melt and drip down, creating that mahogany bark while keeping the meat moist. Flip it only if you’re desperate for even bark, but trust the process—this is how the bone conducts heat and flavor.
- Don’t Rush the Rest: The 30-minute rest after smoking isn’t optional—it’s when the juices stop pooling in the center and spread evenly. I used to slice too soon and ended up with dry, stringy pieces. Let it sit on the cutting board, tented loosely with foil, and you’ll get clean slices with that perfect contrast between crisp bark and juicy meat.
- Whisk That Glaze: The glaze isn’t just mustard and vinegar—it’s the bright counterpoint to all that smoky depth. Whisk the 2 tablespoons yellow mustard, 1 tablespoon apple cider vinegar, and 1 tablespoon olive oil until it’s completely smooth. Lumps in the glaze mean uneven caramelization, and you’ll end up with sticky spots instead of a glossy finish. Trust me, a few extra strokes make a real difference.
Pro cooking tips for perfect results
Mastering Smoke Control
Temperature consistency is everything when smoking ham—225°F is non-negotiable for that perfect balance of bark and tenderness. I use a Traeger Pro 575 with its built-in thermometer, but even a basic pellet smoker will work if you monitor closely.
The key is patience: 6-8 hours of steady smoke develops that deep mahogany crust without drying out the meat. I always check the bark color—it should look rich and glossy, not dried or grayish.
If your smoker struggles with temperature swings, add a second heat source like a propane burner for backup. 🌡️
Fat Rendering Secrets
Placing the ham fat-side up on the smoker grate is critical—it creates a beautiful, crispy bark while rendering fat that bastes the meat throughout the cook. The fat should be about ¼ inch thick on the surface.
If your ham hock has less fat, pat it dry before smoking to encourage better bark formation. I like to flip it halfway through the cook to ensure even rendering, but avoid disturbing it too much—this can break the developing crust.
The rendered fat also adds incredible flavor to your smoker’s drip pan, so don’t skip this step!
Resting Like a Pro
The 30-minute rest after smoking is where the magic happens—it lets juices redistribute and prevents that “dry slice” disappointment. I always cover the ham loosely with foil to retain heat while resting. This is also when I check the internal temperature again—it should hit 195-200°F for perfect doneness.
If you slice too soon, you’ll lose all those tenderizing juices. Pro tip: Use a meat thermometer to verify doneness in the thickest part of the meat, avoiding the bone. 💡
Knife Work Matters
Slicing against the grain is non-negotiable for tenderness—this breaks up the muscle fibers for that melt-in-your-mouth texture. Use a sharp carving knife (I swear by my Dexter-Russell 12-inch slicer) and cut into ¼-inch thick slices.
For extra presentation, slice the ham into ½-inch thick medallions and arrange them on a platter. Don’t forget to save those thyme sprigs—their aroma makes the perfect garnish. The crispy bark should hold its shape, but still yield slightly when pressed gently.
Wood Chip Swaps
While hickory is my go-to for classic smoky depth, you can experiment with wood chip blends to suit your taste. Applewood adds subtle fruitiness that pairs beautifully with the savory spices, while mesquite brings bold intensity. I avoid cherry wood—it can make the ham taste overly sweet.
If you’re using a charcoal smoker, soak the wood chips for 30 minutes before lighting, but skip soaking for pellet smokers. Always use food-grade chips—never treated lumber! The wood choice completely transforms the final flavor profile, so don’t be afraid to test different combinations. 🔥
Nutrition facts
Frequently asked questions
Why does this recipe use a bone-in ham hock instead of pre-cooked ham?
The bone-in ham hock is essential for maximum flavor development. The bone conducts heat and spices evenly, creating a deeply savory result that pre-cooked hams simply can’t match. Plus, the connective tissue in the bone-in cut becomes tender and richly flavored during the 6-8 hours of smoking. This method transforms tough cuts into melt-in-your-mouth perfection—something pre-cooked hams can’t achieve!
Can I skip the 24-hour curing step if I’m short on time?
While tempting, skipping the 24-hour dry cure will leave your ham lacking depth. The salt and spices need that time to penetrate deeply—especially into the bone and connective tissue. If you’re pressed, reduce it to 12 hours, but don’t skip it entirely. The flavor won’t be as rich, and the bark will develop less character. Patience here makes all the difference!
What if my smoker struggles to maintain 225°F consistently?
Most smokers have temperature fluctuations, but you can stabilize it by adding a secondary heat source like a propane burner. Keep an eye on the thermometer and adjust as needed—this 225°F is crucial for that perfect balance of bark and tenderness. If your smoker runs cooler, extend the cooking time slightly to reach 195-200°F internally. Consistency is key for that restaurant-quality result!
How do I know when the ham is done without a thermometer?
Press the thickest part of the ham gently with your finger—it should feel firm yet yield slightly, like the tip of your nose. The bark should develop a deep mahogany color, and the meat should pull away cleanly from the bone. While not as precise, these visual cues work well when you can’t use a thermometer. For best results, always use a meat probe for accuracy!
Can I make this ham ahead of time and reheat later?
This ham keeps beautifully for 3-4 days in the fridge or up to 3 months frozen. To reheat, place it in a low oven at 275°F with a splash of water in the pan to keep it moist. The flavors actually deepen over time, so it tastes even better the next day! Just add fresh thyme sprigs when serving for that aromatic finish.

Trained in classic French technique but raised on slow-cooked ribs and spicy rubs, she blends culinary skill with smoke and soul.
- Smoked Brisket Recipe: Low and Slow to Fall-Apart Tenderness - November 2, 2026
- Smoked Turkey Breast Recipe: Juicy Pink Center With Crispy Skin Every Time - November 2, 2026
- Leftover Smoked Pulled Pork Chili Recipe: Rustic Flavor Revival in One Pot - November 2, 2026