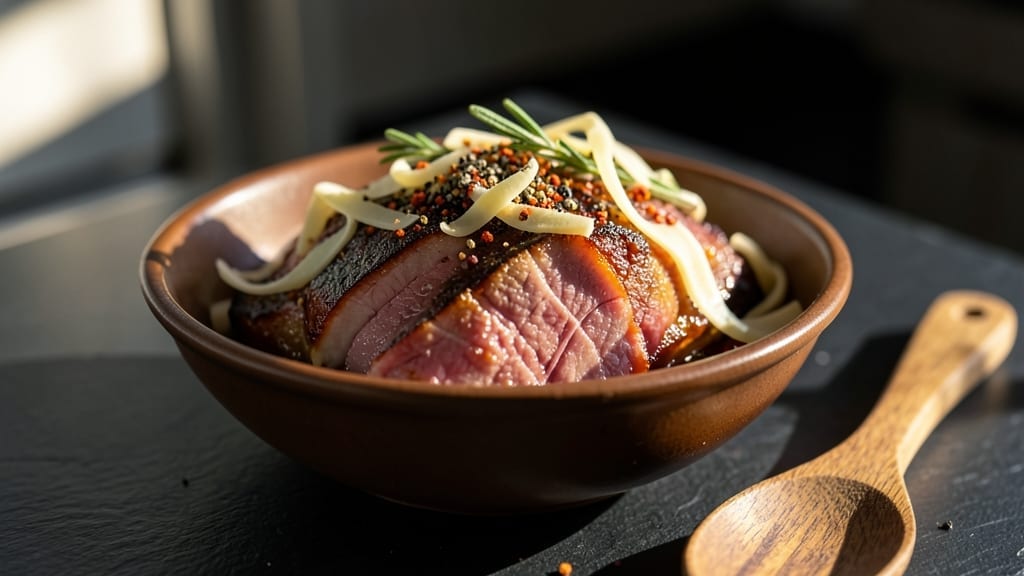
Transforming a simple ham into a showstopper requires patience and precision—this smoked ham recipe delivers tender, flavor-packed meat with a slow-cooked glaze that carries deep smoky notes. The process begins with a dry brine that enhances moisture retention, followed by a low-and-slow smoke that develops rich, complex flavors.
What sets this apart is the glaze, a perfect balance of sweet and tangy elements that clings beautifully to the meat.
This method ensures the ham remains juicy and tender throughout, with a crisp exterior that contrasts perfectly against the melt-in-your-mouth interior. The smoking process, typically around 225°F for 6-8 hours, allows the flavors to meld seamlessly, while the glaze adds a glossy finish that elevates presentation.
Whether serving for a holiday gathering or a special dinner, this ham becomes the centerpiece of any meal.
Once smoked, the ham rests to redistribute juices before glazing, ensuring every slice is succulent. The glaze, made from a blend of brown sugar, mustard, and honey, caramelizes beautifully during the final 30 minutes of cooking, locking in those smoky flavors.
The result is a ham that’s impossible to resist—rich, aromatic, and perfectly balanced.
Pair with classic sides like roasted potatoes and a fresh coleslaw to complete the meal. The presentation is just as important as the flavor, so consider slicing the ham at an angle for an elegant display.
This recipe is designed to impress, whether you’re feeding a crowd or treating yourself to a special meal.
Ingredients for smoked ham
A center-cut ham, dry-brined and slow-smoked, transforms into a showstopper with this rich glaze.
| Ingredient | Amount | Notes |
|---|---|---|
| Bone-In Ham (Fresh or Frozen) 🐷 | 8 lb | Center-cut, 3-4 inches thick |
| Kosher Salt 🧂 | ½ cup | For dry brine, coarse grain preferred |
| Black Peppercorns 🌶️ | 2 tbsp | Freshly cracked, coarse grind |
| Brown Sugar 🍚 | 1 cup | Light or dark, packed |
| Honey 🍯 | ½ cup | Wildflower preferred for depth |
| Dijon Mustard 🍯 | 2 tbsp | High-quality, no additives |
| Apple Cider Vinegar 🍏 | 1 tbsp | Balances sweetness |
| Smoked Paprika 🌶️ | 1 tbsp | For glaze depth |
| Wood Chips (Hickory or Oak) 🌳 | 2 cups | Soaked 1 hour minimum |
| Fresh Rosemary 🌿 | ¼ cup | Chopped, for rub |
| Fresh Thyme 🌿 | ¼ cup | Chopped, for rub |
| Unsalted Butter 🧈 | ¼ cup | Softened, for finishing |
| Garlic Cloves 🧄 | 4 cloves | Minced, for glaze |
[recipe_ingredient_scaler]
The ham is the foundation—center-cut, bone-in cuts deliver the best texture and flavor. Look for fresh hams at Whole Foods or your local butcher, where they can guide you to the thickest, most even-cut pieces. If using frozen, thaw in the refrigerator for 48 hours—never at room temperature. The dry brine (kosher salt and cracked peppercorns) is non-negotiable; it ensures moisture retention and deep flavor penetration. For the glaze ingredients, brown sugar and honey should be high-quality—Whole Foods or Trader Joe’s carry excellent options. The Dijon mustard should be 100% mustard seed-based, like Maille, to avoid additives that can alter the glaze’s texture.
No smoked paprika? Substitute 1 tbsp regular paprika plus 1 tsp liquid smoke—though fresh wood chips are always better. For the wood chips, hickory dominates but oak adds complexity; avoid fruit woods like cherry, which can overpower. Short on fresh herbs? Dried rosemary and thyme at half the amount work, but fresh is ideal. The glaze can be prepped ahead—store in an airtight container in the fridge for up to 1 week, then reheat gently before applying. If you’re short on time, brown sugar and honey alone still create a delicious glaze, though the mustard and vinegar elevate it to restaurant-quality.
This ham reheats beautifully—rest at room temperature for 30 minutes before slicing to maintain juiciness. Store leftovers in the fridge for up to 5 days, wrapped tightly in plastic. For longer storage, freeze portions for 3 months—wrap each slice individually to prevent freezer burn. The glaze hardens when chilled, so reheat gently before serving. For presentation, slice at a 45-degree angle for elegant, uniform pieces. Pair with roasted potatoes and a tangy coleslaw to complement the smoky-sweet flavors.
Why You’ll Love This Recipe
- I’ll be real: this ham is so good, you’ll have leftovers. And here’s the thing—it’s even better the next day. Slice it thin, wrap it in foil, and reheat in the oven for 10 minutes. Boom. A meal for lunch, a sandwich filling, or even a quick breakfast scramble with eggs. No waste, just deliciousness.
- No-Fuss Feast: Honestly, this ham doesn’t need fancy prep—just a little salt, cracked peppercorns, and herbs rubbed in while you sip coffee. The dry brine step might sound intimidating, but it’s honestly just letting the ham sit overnight while you live your life. No chopping, no stress, just flavor building in the background.
- Smoky-Sweet Perfection: That glaze with brown sugar, honey, and Dijon mustard? It’s the kind of balance that makes your taste buds do a happy dance. The smoky depth from the hickory wood chips pairs perfectly with the caramelized sweetness, and the garlic in the glaze gives it a little extra zing. Trust me, it’s not just “good”—it’s the kind of ham that makes people ask for seconds.
- Leftovers That Never Bore: I’ll be real: this ham is so good, you’ll have leftovers. And here’s the thing—it’s even better the next day. Slice it thin, wrap it in foil, and reheat in the oven for 10 minutes. Boom. A meal for lunch, a sandwich filling, or even a quick breakfast scramble with eggs. No waste, just deliciousness.
Step-by-step instructions for smoked ham with glaze
Master this technique for a ham with crispy bark, tender meat, and a glaze that balances sweetness and smoky depth.
Prepare the Dry Brine and Rub
Remove the ham from the refrigerator and place it fat-side up on a wire rack set over a baking sheet. In a small bowl, combine the ½ cup kosher salt and 2 tablespoons freshly cracked black peppercorns. Gently rub this mixture all over the ham, including inside the cavity if your ham has one. The salt will penetrate the meat, enhancing flavor and texture.
Next, mix the ¼ cup chopped fresh rosemary, ¼ cup chopped fresh thyme, and 1 tablespoon smoked paprika in a separate bowl. Sprinkle this herb blend evenly over the salted ham, pressing it into the meat so it adheres. This rub will create an aromatic crust during smoking. Place the ham uncovered in the refrigerator for 12 to 24 hours to dry brine. This step is crucial—it ensures the ham develops a deep flavor and crispy exterior.
Smoke the Ham Low and Slow
Soak the 2 cups wood chips (hickory or oak) in water for at least 1 hour to prevent burning. Set up your smoker to maintain a steady 225°F temperature. Once the smoker reaches temperature and you see clean, blue smoke, place the ham fat-side up on the smoker grates. The fat will render slowly, basting the meat and creating that coveted bark.
Smoke the ham for 12 to 14 hours, or until the internal temperature reaches 160°F when measured at the thickest part of the ham. Avoid opening the smoker frequently—each time you do, you release heat and moisture, extending the cooking time. The ham is ready when the bark is deep mahogany in color and the meat pulls away from the bone with slight resistance. This low-and-slow approach guarantees tender, juicy meat with a rich, smoky flavor.
Prepare and Apply the Glaze
While the ham smokes, prepare the glaze by combining the 1 cup packed brown sugar, ½ cup honey, 2 tablespoons Dijon mustard, 1 tablespoon apple cider vinegar, and 4 minced garlic cloves in a saucepan. Cook over medium heat, stirring constantly, until the mixture reaches 230°F on a candy thermometer. This should take about 10 to 12 minutes. The glaze should thicken slightly but remain pourable—like a thin syrup.
Once the ham reaches 160°F, remove it from the smoker and place it on a cutting board. Brush the softened ¼ cup unsalted butter evenly over the ham to add richness. Then, immediately brush the prepared glaze over the entire surface, working quickly so it doesn’t set too fast. Return the ham to the smoker for an additional 30 to 45 minutes to let the glaze caramelize and form a sticky, glossy crust. The glaze should darken slightly and develop a glossy sheen.
Rest and Serve
Once the glaze is deeply caramelized and the ham reaches 165°F, remove it from the smoker and transfer it to a warm serving platter. Let it rest for 15 to 20 minutes before slicing. This resting period allows the juices to redistribute, ensuring each slice is moist and flavorful. The glaze will continue to set slightly as it cools, creating a perfect balance of sweetness and smokiness.
Slice the ham against the grain into ½-inch thick portions and serve immediately. The result should be a ham with a crispy, caramelized exterior, tender meat, and a glaze that carries layers of smoky depth. Pair it with roasted vegetables or a fresh green salad to complement its rich flavors. The glaze will cling beautifully to each slice, making every bite memorable.
Pro Tips For Making Smoked Ham
- Crack Those Peppercorns: DESCRIPTION: Don’t just toss whole peppercorns on the ham—crack them first with a mortar and pestle or the flat side of a knife. I learned this the hard way after my first batch tasted like I’d sprinkled tiny marbles on the meat. Coarse grind means flavor clings to every bite, not just the surface.
- Don’t Rush the Glaze: DESCRIPTION: That 230°F candy thermometer reading isn’t optional—it’s the difference between a sticky mess and a glossy masterpiece. I used to eyeball it and ended up with glaze that either burned or dripped off. Stir like you’re stirring oatmeal, and keep the heat medium. Patience here makes all the difference.
- Butter First, Glaze Second: DESCRIPTION: Brush the softened butter over the ham before the glaze—yes, even if it feels like an extra step. The butter creates a barrier so the glaze doesn’t pool in one spot and burn. I skipped this once, and half my ham ended up with a charred syrup river. Trust me, it’s worth the 30 seconds.
- Soak Wood Chips Properly: DESCRIPTION: Dumping dry wood chips into your smoker is begging for acrid smoke. Soak those 2 cups for at least an hour—preferably overnight if you’re planning ahead. I once forgot, and my kitchen smelled like a campfire gone wrong. The extra moisture = cleaner, smoother smoke every time.
Storing and reheating your leftovers
Fridge Storage Tips
After smoking and glazing, let your ham rest for 15-20 minutes before storing. Wrap it tightly in plastic wrap or aluminum foil, then place it in an airtight container to maintain moisture and flavor. I use Glasslock containers for this—no plastic odors or freezer burn.
Store at 40°F or below for up to 5 days for best quality. The glaze will set slightly but remains delicious when reheated. ❄️
Freezing for Later
For longer storage, freeze individual slices wrapped in plastic wrap with parchment paper between each. I like using quart-sized freezer bags to save space. Label with the date—this ham stays great for 3 months without quality loss.
Thaw overnight in the fridge for even reheating. The glaze may harden but softens beautifully when warmed.
Reheating Like a Pro
For stovetop reheating, place slices in a skillet with 1 tbsp water or broth over medium-low heat for 5-7 minutes, flipping occasionally. This prevents drying. Microwave reheating works too—cover with a damp paper towel and heat on 50% power for 2-minute intervals until warmed through.
Always check internal temp reaches 165°F.
Glaze Revival Tricks
If your stored ham’s glaze has hardened, gently warm it in a saucepan with 1 tbsp apple cider vinegar over low heat until pourable. This restores that perfect sticky consistency.
For extra shine, brush with a little unsalted butter right before serving. The glaze’s sweet-smoky balance always comes back to life with this simple touch.
Presentation Perfection
Slice your reheated ham at a 45-degree angle for elegant, uniform pieces. Arrange on a warm platter with crispy bacon bits or toasted almonds scattered around for texture contrast. I like adding a sprig of fresh rosemary or thyme for that aromatic connection to the original rub.
Garnish with a drizzle of extra glaze for that restaurant-worthy finish. 💫
Nutrition facts
Frequently asked questions
Why does the recipe call for a dry brine instead of just seasoning the ham?
The dry brine with ½ cup kosher salt and 2 tablespoons cracked peppercorns penetrates the meat deeply, enhancing both flavor and moisture retention. This step creates a crispy exterior while keeping the ham juicy—unlike surface seasoning, which can create a dry crust. The 12-24 hour dry brine also helps tenderize the meat for that melt-in-your-mouth texture.
What if I don’t have a smoker—can I still achieve this flavor?
Use a grill with indirect heat or an oven set to 275°F with a foil-lined tray filled with water for moisture. Place soaked 2 cups wood chips in a mesh bag on the grill grate to mimic smoke. Just monitor the ham closely to avoid overcooking. The key is maintaining low, even heat for 12-14 hours.
How do I know when the glaze is ready to apply?
Check the glaze with a candy thermometer—it should reach 230°F and thicken slightly but stay pourable, like thin syrup. The ham must also hit 160°F internally before glazing. Apply the glaze quickly after removing the ham from the smoker, then return it for 30-45 minutes to caramelize. The glaze will darken and develop a glossy sheen when done.
Can I make the glaze ahead of time?
Yes! Store the prepared glaze in an airtight container in the fridge for up to 1 week. Reheat gently in a saucepan until pourable before applying. If it thickens too much, stir in 1 teaspoon apple cider vinegar to restore its consistency. This saves time on the day you serve the ham.

Trained in classic French technique but raised on slow-cooked ribs and spicy rubs, she blends culinary skill with smoke and soul.
- Smoked Brisket Recipe: Low and Slow to Fall-Apart Tenderness - November 2, 2026
- Smoked Turkey Breast Recipe: Juicy Pink Center With Crispy Skin Every Time - November 2, 2026
- Leftover Smoked Pulled Pork Chili Recipe: Rustic Flavor Revival in One Pot - November 2, 2026