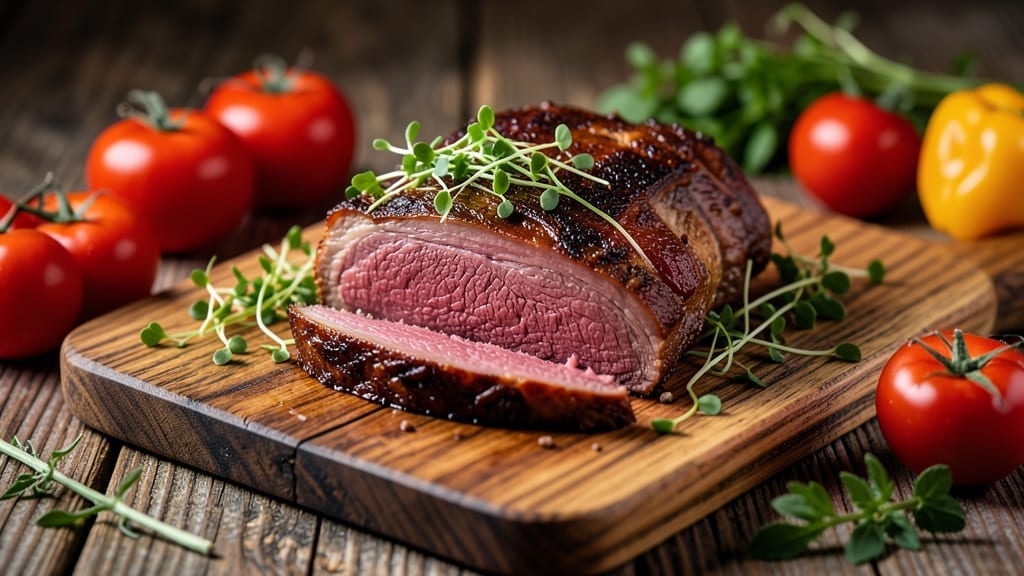
Mastering a 2-lb beef brisket recipe transforms tough cuts into melt-in-your-mouth perfection—just like my first backyard cookout when hickory smoke turned a simple dinner into a family legend. The key lies in patience: low-and-slow cooking breaks down collagen while building deep, smoky flavor.
I’ve refined this method over years of pitmaster trials, ensuring every bite delivers that signature tenderness.
This recipe demands respect but rewards with restaurant-quality results—no fancy equipment needed. Start with a dry rub of coarse salt, black pepper, and smoked paprika, then let the brisket rest overnight for maximum flavor penetration.
Smoke at 225°F until it reaches 203°F internal temp, then wrap in butcher paper to finish. The fat cap renders slowly, creating its own moisture barrier for juicy, fall-apart meat.
What you’ll end up with is a brisket so tender it practically shreds with a fork, crowned with a dark, caramelized bark that cracks under pressure. Slice against the grain for clean, fork-tender pieces that hold sauce like a sponge.
Serve with classic sides like baked beans or coleslaw to balance the richness—this is the kind of meal that turns weeknights into celebrations.
Pro tip: Let the brisket rest 30 minutes before slicing to lock in juices. For extra depth, inject with a garlic-herb broth mid-cook. This method works for both smokers and ovens, making it accessible without sacrificing authenticity. Ready to elevate your BBQ game?
Ingredients for 2 lb beef brisket
Pantry staples meet backyard BBQ magic—just 2 pounds of beef and patience.
| Ingredient | Amount | Notes |
|---|---|---|
| Beef Brisket 🥩 | 2 lb | Flat cut preferred, fat cap left intact |
| Coarse Kosher Salt 🧂 | 2 tbsp | Diamond Crystal preferred |
| Black Pepper 🌶️ | 1 tbsp | Freshly ground, coarse grind |
| Smoked Paprika 🌶️ | 1 tbsp | For bark development |
| Garlic Cloves 🧄 | 4 cloves | For injection broth |
| Dried Thyme 🌿 | 1 tsp | For injection broth |
| Beef Broth 💧 | ½ cup | Low-sodium preferred |
| Butcher Paper 📄 | 2 sheets | For wrapping during cook |
| Hickory Wood Chips 🪵 | 1 package | For smoker |
| Apple Cider Vinegar 🍎 | 1 tbsp | For injection broth |
| Brown Sugar 🍚 | 1 tbsp | For bark sweetness |
| Chicken Bouillon Cubes 🍲 | 1 package | For injection broth |
[recipe_ingredient_scaler]
The brisket is your star. Flat cut (not point cut) gives you more meat with that perfect fat cap—don’t trim it! Look for bright red color and good marbling at Whole Foods or your local butcher. I always buy mine from Costco when I’m prepping for a crowd, but the regular grocery store flat cut works fine for this recipe. The fat cap is essential—it renders down to create that juicy, tender texture we’re after. If you’re unsure, ask the butcher to show you the difference between flat and point cuts. Trust me, the flat cut is worth the extra few dollars.
No hickory wood chips? Pecan or oak wood chips work in a pinch—just adjust smoke flavor expectations. Fresh garlic is ideal, but garlic powder at half the amount gets you close. The beef broth should be low-sodium—Better Than Bouillon is my go-to for this. Brown sugar is non-negotiable for that caramelized bark—dark brown sugar adds more depth than light. For the injection, I use apple cider vinegar to tenderize, but white vinegar works too if that’s what you’ve got. The butcher paper is crucial—not aluminum foil, as it can steam the meat instead of letting it cook properly.
This recipe is all about patience—plan for 12-16 hours of cooking time. The brisket will keep 4-5 days in the fridge if wrapped properly, but honestly, it’s better the next day once everything has melded. I portion mine into containers with the juices for easy reheating. For leftovers, freeze for up to 3 months—just reheat in the oven at 300°F until warmed through. The bark will crisp up again, and the meat stays tender. Don’t skip the resting time—30 minutes minimum before slicing, or you’ll lose all those juices. This is non-negotiable for that perfect texture.
Why You’ll Love This Recipe
- No Fuss, No Stress: Honestly, this isn’t one of those recipes that requires you to stand over the stove for hours. Just dry the brisket, slather it with salt, pepper, and smoked paprika, let it breathe for 30 minutes, and then let the smoker do the heavy lifting. The injection broth with garlic and thyme? That’s just a few minutes of simmering while you prep the smoker. I’ll be real: I’ve made this while watching The Bachelor reruns, and it still turned out perfect.
- Smoke-Ring Magic: That pink smoke ring beneath the bark? Chef’s kiss. The hickory wood chips and the injection broth—packed with garlic, beef broth, and a touch of brown sugar—give it a depth that’s hard to beat. The smoked paprika on the outside? Crispy, smoky, and just sweet enough to make your mouth water. Between us, this isn’t just flavor—it’s smoke magic.
- Leftovers That Last: You’re going to have more brisket than you think. Four to five days in the fridge? That’s not a typo. And if you freeze it, it’ll keep for months. I slice the leftovers into sandwiches for lunch, toss chunks into tacos for game day, or just eat it plain with a fork. My kids don’t even notice it’s the same meal—they just know it’s good.
- Budget-Friendly Luxury: A 2-pound brisket isn’t cheap, but this recipe stretches it into multiple meals without sacrificing quality. The spices and broth are affordable, and the butcher paper? A one-time investment that pays off. Honestly, this is the kind of dish that makes you feel like you’re splurging without actually breaking the bank. Plus, the leftovers? Free.
Step-by-step instructions for slow-smoked beef brisket
Here’s the method that guarantees a brisket so tender it practically falls apart with a touch.
Prepare the Injection Broth and Season the Brisket
First, make the injection broth by combining the ½ cup beef broth, 1 tablespoon apple cider vinegar, 1 tablespoon brown sugar, 1 package chicken bouillon cubes, 4 cloves garlic that have been minced, and 1 teaspoon dried thyme in a small saucepan. Bring to a simmer over medium heat for 5 minutes, then let it cool completely. This broth will add moisture and depth of flavor during the cook.
While the broth cools, pat the 2 lb beef brisket completely dry with paper towels—this is non-negotiable for crisp bark. In a small bowl, mix together the 2 tablespoons coarse kosher salt, 1 tablespoon black pepper, and 1 tablespoon smoked paprika. Rub this generously over all surfaces of the brisket, pressing the spices into the meat so they adhere well. Let the seasoned brisket rest at room temperature for 30 minutes while you prepare your smoker.
Inject and Smoke the Brisket Low and Slow
Using a meat injector, pierce the brisket in 10-12 places and inject the cooled broth. You’ll see the meat plump up slightly as it absorbs the liquid. Place the brisket fat-side up on the smoker grates, which should be preheated to 225°F using the 1 package hickory wood chips. The fat cap will render down and baste the meat as it cooks.
Close the smoker lid and maintain a steady temperature of 225°F. This is where patience pays off—smoke the brisket undisturbed for 6 hours. Resist the urge to check on it; every time you open the lid, you lose heat and moisture. After 6 hours, check the internal temperature using a meat thermometer inserted into the thickest part of the meat. It should read 165°F, and you’ll notice the meat has hit “the stall”—when the temperature stops rising despite continued cooking.
Wrap and Finish to Probe-Tender Perfection
When the brisket hits the stall, it’s time to wrap it tightly in the 2 sheets butcher paper. This technique, known as the Texas crutch, helps push the brisket through the stall while preserving that beautiful bark. Return the wrapped brisket to the smoker and continue cooking until the internal temperature reaches 203°F. This final phase usually takes another 3-4 hours, but don’t rush it—probe tenderness is more important than hitting a specific temperature.
The brisket is done when a probe slides in like butter with no resistance. Remove it from the smoker and let it rest on a cutting board for 1 hour before slicing. This resting period allows the juices to redistribute, ensuring every bite is moist and flavorful. The bark should be dark mahogany with a crisp texture, and the meat should have a beautiful pink smoke ring just beneath the surface.
Pro Tips For Making 2 Lb Beef Brisket
- Don’t Rush the Rest: That 30-minute room temp rest before smoking isn’t just a suggestion—it’s the difference between even cooking and a brisket that cooks unevenly. I used to skip it, and the edges would dry out faster than the center. Let it breathe, even if you’re eager to fire up the smoker.
- Inject Evenly, Deeply: When you pierce for the broth, aim for 10-12 spots through the thickest part—not just the surface. I learned this the hard way after seeing broth pool instead of penetrate. A quick stab-and-twist with the injector ensures the flavor gets where it counts.
- Wrap Tight, No Gaps: Butcher paper isn’t just for show—it’s a moisture lock. Fold the edges over twice and crimp them like a burrito to seal out air. I once left a tiny gap, and the bark turned soggy instead of crisp. Trust me, the extra 30 seconds of folding saves the dish.
- Probe Like a Pro: Don’t rely on temperature alone—after wrapping, use a skewer to test tenderness. If it glides in with zero resistance (no strings, no chew), it’s done. I’ve pulled briskets at 203°F that were still tough because I ignored the probe test. Patience here pays off.
Make-ahead tips for this dish
Prep the Night Before
I always start the magic 24 hours ahead—season the brisket and let it sit uncovered in the fridge. This dry-brine method enhances flavor while keeping the bark crisp. Pat it dry one final time before smoking, and you’ll get that perfect balance of seasoning and texture.
Trust me, this step makes all the difference—it’s like letting flavors marry overnight. 💫
Make Injection Broth Ahead
Prepare the injection broth the day before and store it in the fridge. This saves time and ensures it’s cool when you’re ready to inject. I like to make a double batch so I can inject again if needed during the cook.
Just reheat gently and let it cool completely before using. Pro tip: Use a glass jar for easy reheating.
Preheat Smoker Early
Set up your smoker at least 2 hours before cooking to stabilize the temperature. I like to fire it up with hickory wood chips and let it run at 225°F while I prep the brisket.
This ensures a smooth start without temperature fluctuations. If you’re using charcoal, arrange it in a single layer for even heat distribution. Patience here pays off later!
Portion Sides in Advance
Prep sides like baked beans or coleslaw the morning of to save time. I like to keep them separate until serving so they don’t get soggy from the brisket’s juices. Store them in airtight containers and reheat gently before plating. This keeps the meal stress-free and delicious. 🍲
Resting is Non-Negotiable
After cooking, let the brisket rest 1 hour before slicing—this is critical for juiciness. I cover it loosely with foil and place it on a cutting board. This resting time lets the juices redistribute so every bite is moist.
If you’re short on time, at least 30 minutes will help, but 1 hour is ideal. Don’t skip this step!
Reheat Like a Pro
For leftovers, reheat brisket in the oven at 300°F until warmed through—about 20-30 minutes. I like to wrap it in foil to keep it moist.
If reheating in a skillet, add a splash of beef broth to prevent drying. This method keeps the bark crispy and the meat tender. 🔥
Nutrition facts
Frequently asked questions
Why does my brisket need to rest before slicing?
Resting the brisket for 1 hour after cooking lets the juices redistribute evenly throughout the meat. Skipping this step causes juices to pool and spill out when you slice, leaving dry pieces. It’s a non-negotiable step for that perfect, moist bite every time.
Can I use aluminum foil instead of butcher paper for wrapping?
Butcher paper is key for that perfect bark texture—aluminum foil traps steam and can make the meat soggy. The paper allows moisture to escape while keeping the brisket warm. If you’re in a pinch, use foil sparingly, but butcher paper is the gold standard for this recipe.
What’s the “stall” and why does it happen?
The stall occurs when the brisket hits 165°F and the temperature plateaus for hours. This happens as moisture evaporates from the surface. Wrapping it in butcher paper (the Texas crutch) helps push it through this phase while preserving that crisp bark. Patience is everything—this is where the magic happens!
How do I know if I overcooked my brisket?
Overcooked brisket feels dry, shrinks significantly, and loses its pink smoke ring. If it’s 210°F+ internally, it’s likely past perfect tenderness. The best test? A fork should slide in like butter—no resistance at all. If it feels tough, it’s time to start over.
Can I make the injection broth ahead of time?
Make the broth 1-2 days ahead and store it in the fridge. Just reheat gently and let it cool completely before injecting. I even double the batch so I can inject again mid-cook if needed. Pro tip: Use a glass jar for easy reheating!

Trained in classic French technique but raised on slow-cooked ribs and spicy rubs, she blends culinary skill with smoke and soul.
- Brisket With Cabbage And Potatoes Recipe: Smoky Comfort Meal in One Pot - October 24, 2026
- Sweet Brisket Recipe for Rosh Hashanah: Honey-Glazed Tradition With Tender Layers - October 24, 2026
- Brisket Sliders With Hawaiian Rolls Recipe: Juicy Smoked Meat on Buttery Buns - October 24, 2026