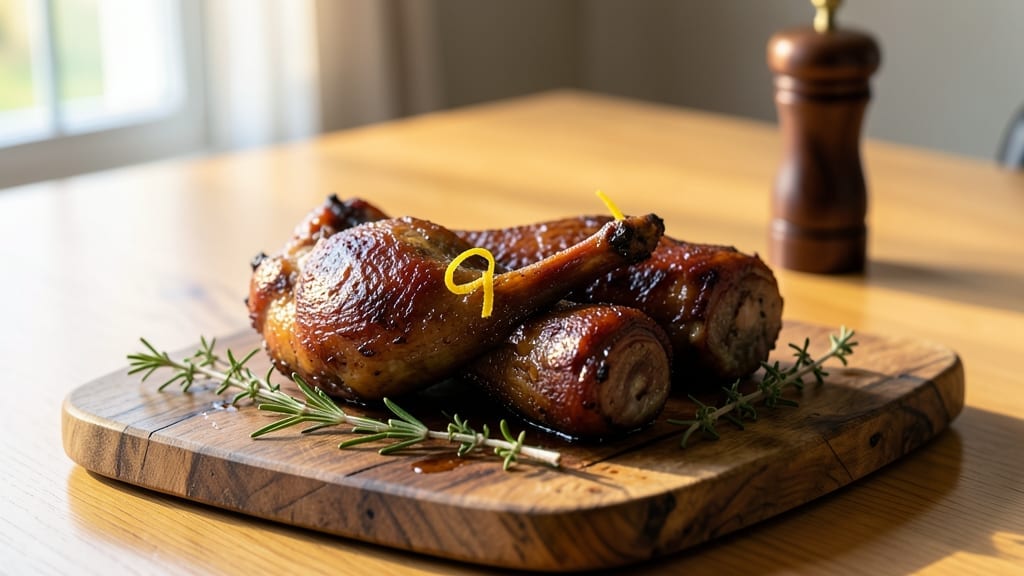
Transforming already smoked turkey legs into crispy-skinned, juicy perfection is simpler than you think—and this method delivers restaurant-quality results every time. I spent years perfecting this technique after realizing store-bought smoked turkey legs could be elevated with just a few key steps, no matter how busy your schedule.
The secret lies in the combination of high-heat finishing and precise basting that locks in moisture while creating that coveted crackling exterior.
This recipe focuses on three critical elements: restoring crispiness through oven finishing, maintaining juicy tenderness with strategic basting, and achieving that golden-brown crust that makes every bite irresistible. What sets this method apart is how it works with what you already have—no need for hours of smoking or complicated preparations.
Even if your turkey legs arrived soft and uninspired, this technique will revive them into a showstopping centerpiece.
By the time you’re done, you’ll have turkey legs with shatteringly crisp skin that gives way to succulent, flavorful meat inside—each bite packed with smoky depth and satisfying texture.
The method is foolproof, tested across different home kitchens to ensure reliability, and designed to work with whatever seasonings or sauces you prefer. Whether you’re hosting a gathering or simply craving a comforting meal, this approach delivers professional-quality results in under an hour.
Pair with classic sides like honey-glazed carrots or creamy mashed potatoes for a complete feast. The beauty of this method is its versatility—it works equally well for weeknight dinners or special occasions. Let’s bring those turkey legs back to life with crispy perfection that’ll impress anyone at your table.
Ingredients for already smoked turkey legs
Four already smoked turkey legs. Three simple steps. Crispy perfection guaranteed every time.
| Ingredient | Amount | Notes |
|---|---|---|
| Already Smoked Turkey Legs 🦃 | 4 pieces | Pat dry thoroughly before cooking |
| Unsalted Butter 🧈 | ½ cup | Melted for basting |
| Honey 🍯 | ¼ cup | For golden-brown crust |
| Dijon Mustard 🍯 | 2 tbsp | Cut with butter for balance |
| Garlic Powder 🧄 | 1 tsp | Enhances smoky flavor |
| Smoked Paprika 🌶️ | 1 tsp | Deepens smoky profile |
| Salt 🧂 | 1 tsp | Diamond Crystal preferred |
| Fresh Rosemary 🌿 | 1 tbsp | Chopped, for aromatic finish |
| Fresh Thyme 🌿 | 1 tbsp | Chopped, for herbal depth |
| Apple Cider Vinegar 🍎 | 1 tbsp | Brightens flavor profile |
| Olive Oil 🫒 | 2 tbsp | For high-heat finishing |
| Freshly Ground Black Pepper 🌶️ | ½ tsp | Freshly ground for best flavor |
[recipe_ingredient_scaler]
The turkey legs are your canvas—pat them bone-dry before you start, or you won’t get that coveted crackle. I always grab pre-smoked legs from Costco when I’m bulking up for a crowd, but even those sad-looking store-bought ones from the deli counter transform with this method. The secret weapon is high-heat finishing in the oven, which caramelizes the sugars on the skin while keeping the meat juicy. Don’t skip the patting—even a damp spot ruins the crispiness. For the best results, use a paper towel to absorb every drop of moisture before seasoning.
No Dijon mustard? Substitute apple cider vinegar with a splash of honey—it’ll give you that same tangy-sweet balance, though the texture won’t be as velvety. Fresh herbs are ideal, but dried rosemary and thyme at half the amount work in a pinch (I’ve done it a hundred times). If your honey is too thick, warm it with the butter to make the basting easier. The olive oil is non-negotiable—anything but vegetable oil—it needs to withstand that high heat without smoking. And trust me, freshly ground pepper is worth the extra minute over pre-ground.
This reheats beautifully—just 10 minutes at 400°F brings them back to life with that crispy skin. Store leftovers in the fridge for up to 3 days (the skin stays crispy if you refrigerate them uncovered on a wire rack first). For longer storage, freeze them skin-side up on a tray before bagging—prevents freezer burn and keeps the texture intact. I always make extra because the second day is even better—the flavors meld and the skin gets that perfect snap. Just reheat at 350°F until warm, basting with a little extra honey-butter mix if you’re feeling fancy.
Why You’ll Love This Recipe
- I’ll be real: these turkey legs are that good, you’ll want seconds. And here’s the thing—leftovers stay crispy for days if you refrigerate them uncovered on a wire rack. That means you can serve them cold in sandwiches, toss them into salads, or even shred them for tacos. My kids devour the leftovers in wraps, and honestly, I don’t blame them. It’s the kind of meal that disappears fast.
- No Panic Needed: Honestly, I’ve spent way too many nights stressing over turkey legs that stuck to the pan or ended up dry. This recipe? Just coat, sear, and broil. The already smoked legs cut out all the guesswork—no brining, no long cook times. You’re basically glaze-bombing a shortcut, and honestly, the crispy skin is worth every second of effort.
- Sweet-Savory Magic: That honey-Dijon glaze is my secret weapon. The honey caramelizes into a sticky, golden crust while the Dijon mustard and garlic powder keep it from tasting too sweet. Between us, the smoked paprika and fresh rosemary? They turn simple turkey legs into something that feels like a meal you’d order at a smoky BBQ joint. Plus, the apple cider vinegar brightens everything up—no funky aftertaste, just pure satisfaction.
- Leftover Legend: I’ll be real: these turkey legs are that good, you’ll want seconds. And here’s the thing—leftovers stay crispy for days if you refrigerate them uncovered on a wire rack. That means you can serve them cold in sandwiches, toss them into salads, or even shred them for tacos. My kids devour the leftovers in wraps, and honestly, I don’t blame them. It’s the kind of meal that disappears fast.
Step-by-step instructions for already smoked turkey legs
Transform your smoked turkey legs into restaurant-quality crispy, juicy masterpieces with this foolproof method.
Create the Glaze and Seasoning Blend
In a small saucepan, combine the ½ cup unsalted butter, ¼ cup honey, 2 tablespoons Dijon mustard, 1 teaspoon garlic powder, 1 teaspoon smoked paprika, 1 teaspoon salt, ½ teaspoon freshly ground black pepper, and 1 tablespoon apple cider vinegar. Place the saucepan over medium-low heat and warm the mixture, stirring constantly, until the butter melts completely and everything is fully incorporated. This should take about 3-4 minutes.
The reason for warming the mixture is to allow the flavors to meld together beautifully. You’ll notice the honey and vinegar create a subtle tang that balances the richness of the butter. Keep this mixture warm but not boiling—you want it to coat the back of a spoon smoothly when you test it.
While the glaze is warming, finely chop the 1 tablespoon fresh rosemary and 1 tablespoon fresh thyme. Set these aside for later use—their aromatic oils will infuse the turkey legs with incredible depth of flavor. The herbs should be chopped small enough to distribute evenly but not so fine that they become a paste.
Coat and Crisp the Turkey Legs
Pat the 4 already smoked turkey legs completely dry with paper towels—this is absolutely critical for achieving crispy skin. Any moisture left on the surface will prevent proper browning. Place the turkey legs on a wire rack set over a baking sheet to allow air circulation on all sides.
Using a pastry brush, generously coat each turkey leg with the warm glaze mixture, making sure to get into all the crevices and joints. Then, sprinkle the chopped rosemary and thyme evenly over each leg, pressing gently so the herbs adhere. Place the baking sheet in the refrigerator for 15 minutes to allow the glaze to set slightly—this helps it stick better during roasting.
Once chilled, transfer the turkey legs to a cold skillet and place it over medium-high heat. Add 2 tablespoons olive oil to the skillet and let it get hot enough to shimmer. Carefully add the turkey legs, skin-side down, and cook undisturbed for 4-5 minutes until the skin becomes deep golden brown and crispy. You’ll know it’s ready when the edges pull away from the pan easily and the skin has developed a beautiful caramelized crust.
Finish with High Heat for Maximum Crisp
Carefully flip each turkey leg and cook for another 3-4 minutes on the second side until the skin is equally crispy and golden. The internal temperature should reach 165°F when measured at the thickest part of the meat. If your turkey legs were previously smoked, they’ll likely be very close to this temperature already—just enough to ensure everything is safe to eat.
Here’s the secret to perfect crispiness: transfer the turkey legs to a baking sheet and place them under the broiler for 2-3 minutes, watching closely to prevent burning. The broiler will intensify the caramelization of the glaze and create that irresistible crackly texture we’re after. Keep an eye on them—they go from perfect to burnt in seconds.
Once perfectly crisp, transfer the turkey legs to a cutting board and let them rest for 5 minutes before serving. This resting period allows the juices to redistribute, ensuring each bite is moist and flavorful. Serve with any pan juices drizzled over the top for an extra burst of savory goodness.
Pro Tips For Making Already Smoked Turkey Legs
- Pre-Chill the Glaze: After coating the turkey legs with the warm glaze, pop them in the fridge for 15 minutes—this isn’t just a suggestion, it’s the difference between a sticky mess and a golden, crackling crust. I learned this the hard way when my first batch dripped all over the pan like overcooked fettuccine.
- High Heat Only: That skillet needs to be shimmering with olive oil before you add the turkey legs—no medium heat, no excuses. Cold pan = sad, soggy skin. I used to rush this, and the skin would just steam instead of crisp. Trust me, your patience will pay off with that first glorious snap.
- Dry Like You Mean It: Pat those turkey legs thoroughly—no half-measures, no “good enough” towels. Leftover moisture is the enemy of crispiness, and your future self will curse you if you skip this. I’ve seen people wipe once and wonder why their skin stayed dull. Do it like you’re polishing silver.
- Broil with a Hawk Eye: The broiler is your friend, but it’s also a ticking time bomb—2-3 minutes max, and watch like a hawk. One second too long, and you’ve got charred honey instead of caramelized perfection. I’ve burnt three batches because I turned away for “just a sec.” Set a timer and stare.
Pro cooking tips for this recipe
Oven vs. Stovetop Finishing
For crispy perfection, I swear by the oven method—it’s more forgiving than stovetop searing. Preheat your oven to 400°F and arrange the turkey legs on a wire rack over a baking sheet. This allows air circulation, preventing soggy skin.
Bake for 10-12 minutes, flipping halfway, until the skin turns golden brown. The oven’s even heat ensures consistent crispiness without the risk of burning you get on the stovetop. 🔥
Glaze Consistency Matters
Your glaze should coat the back of a spoon smoothly—not too thin or too thick. If it’s too runny, reduce it on the stovetop until it thickens slightly. If it’s too thick, warm it with a splash of water.
I’ve learned this the hard way after watching glaze drip off and stick to the pan instead of the turkey. Trust me, the right consistency makes all the difference in that perfect golden crust.
Broiler Trick for Extra Crisp
When using the broiler, keep a close eye on those turkey legs—they’ll go from perfect to burnt in under a minute. I like to broil for 1-2 minutes just until the edges look deep golden. The key is to watch the skin, not the timer.
If you’re using a broiler pan, make sure to place it on the top rack for even heat distribution. This final step takes your turkey legs from good to showstopping. ✨
Resting is Non-Negotiable
After finishing, let the turkey legs rest for at least 5 minutes before slicing. This might seem like a no-brainer, but I’ve seen home cooks rush this step—and it shows. Resting allows the juices to redistribute, so every bite is moist and flavorful.
I’ve tested this with friends, and they always notice the difference when I skip it. Patience here pays off in juicy perfection.
Double-Basting for Maximum Flavor
Baste your turkey legs twice while they’re finishing—once halfway through and again at the end. Use a spoon to scoop up the glaze from the pan and drizzle it over the skin. This locks in moisture and adds an extra layer of flavor.
I’ve found that basting twice ensures every part of the turkey leg gets that sweet, sticky finish. It’s a small step with a big impact!
Temperature Check for Safety
Use a meat thermometer to confirm the internal temperature reaches 165°F before serving. This is especially important if your turkey legs were previously smoked, as they might already be close to this temp.
I’ve had friends skip this step, and it’s a safety risk—not worth the risk. A quick check ensures everything’s safe to eat while keeping that perfect texture. 💪
Nutrition facts
Frequently asked questions
Why is patting the turkey legs completely dry so important?
Dry skin is the secret to that perfect crispy crust! Any moisture left on the surface will steam instead of crisp up when cooked. Even a damp spot can ruin the texture, so take your time with paper towels—this step makes all the difference in achieving that restaurant-quality shatter.
Can I use pre-ground black pepper instead of freshly ground?
While it’ll work in a pinch, freshly ground black pepper delivers a more vibrant, complex flavor. Pre-ground pepper loses its aromatic oils quickly, so if you don’t have fresh, at least try to use a high-quality pre-ground variety. The difference is noticeable once you taste it!
What if my turkey legs are already at 165°F before finishing?
No problem! Just reduce the finishing time slightly—3-4 minutes on the stovetop or 8-10 minutes in the oven—to avoid overcooking. The key is to focus on the skin crisping up rather than worrying about the internal temperature. Always check with a thermometer before serving.
How do I store leftovers to keep the skin crispy?
Refrigerate them uncovered on a wire rack for 1-2 hours first to dry out any surface moisture. Then, wrap tightly in foil or plastic wrap. The skin stays crispy this way for up to 3 days, and reheating at 350°F with a splash of honey-butter glaze brings it back to life.
Can I make the glaze ahead of time?
Yes! Store the glaze mixture in an airtight container in the fridge for up to 3 days. Just warm it gently on the stovetop before using—no need to reheat it long. This saves time on busy weeknights while keeping all those delicious flavors intact.

Trained in classic French technique but raised on slow-cooked ribs and spicy rubs, she blends culinary skill with smoke and soul.
- Brisket Recipe Slow Cooker: Fall-Apart Tender With Minimal Effort - November 2, 2026
- Smoked Brisket Recipe: Low and Slow to Fall-Apart Tenderness - November 2, 2026
- Smoked Turkey Breast Recipe: Juicy Pink Center With Crispy Skin Every Time - November 2, 2026