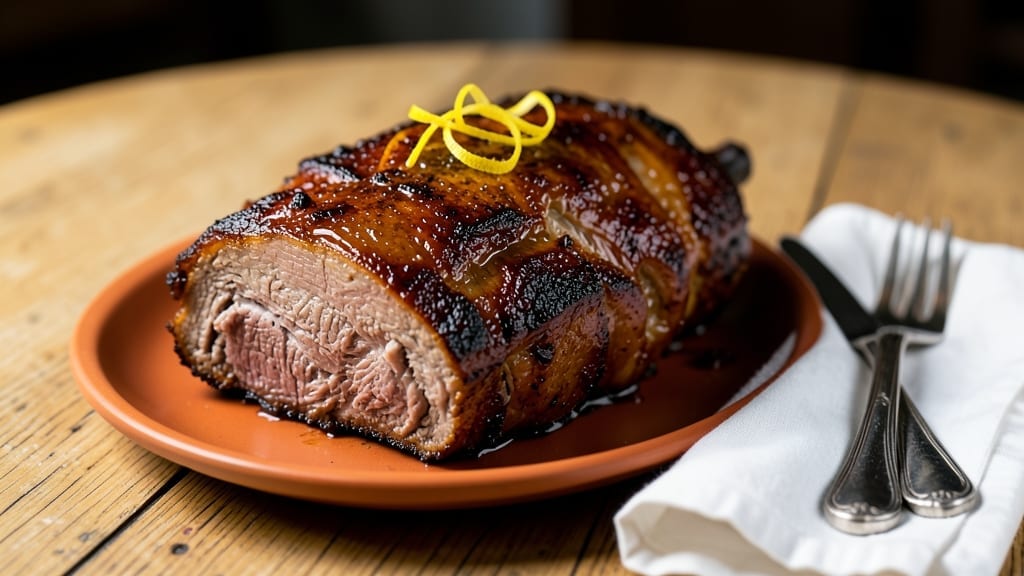
Mastering a beef brisket rotisserie recipe transforms tough cuts into melt-in-your-mouth perfection—just like the first time I watched my family’s backyard cookout brisket transform from raw to legendary. The secret lies in slow, even heat and precise basting that creates a caramelized crust without drying out the core.
My French technique training taught me that patience and temperature control are everything when working with large cuts of beef.
This method delivers restaurant-quality results with minimal effort—no smoker required. You’ll need a rotisserie setup (or a sturdy oven with a rotisserie attachment) and about 4-5 hours of hands-off cooking time.
The key is maintaining a consistent internal temperature while basting regularly with a simple garlic-herb oil blend to lock in moisture and build flavor. Trust me, the aroma alone will have everyone gathering in the kitchen.
By the time you’re done, you’ll have brisket with a deep mahogany crust that shatters at the edges and tender, juicy meat that falls apart with a fork. The beauty of rotisserie cooking is how it renders fat evenly, creating a self-basting effect that keeps every bite succulent.
This is the kind of brisket that makes people ask for seconds before the plate is even cleared.
Perfect for holiday gatherings or when you want to impress without slaving over a smoker. The same technique works beautifully with pork shoulder or chicken thighs—just adjust the cooking time. Let’s get started on creating your showstopper main course.
Ingredients for beef brisket rotisserie
Pantry staples meet premium cuts for brisket that rivals smoker perfection.
| Ingredient | Amount | Notes |
|---|---|---|
| Beef Brisket 🥩 | 5 lb | Whole packer cut, good marbling |
| Extra-Virgin Olive Oil 🫒 | ½ cup | High-quality, fruity variety |
| Garlic Cloves 🧄 | 8 cloves | Freshly peeled, minced |
| Fresh Rosemary 🌿 | ¼ cup | Finely chopped, stems removed |
| Fresh Thyme 🌿 | ¼ cup | Leaves only, finely chopped |
| Kosher Salt 🧂 | 2 tbsp | Diamond Crystal preferred |
| Freshly Ground Black Pepper 🌶️ | 1 tbsp | Coarse grind preferred |
| Brown Sugar 🍯 | ¼ cup | Light or dark variety |
| Apple Cider Vinegar 🍎 | 2 tbsp | For basting liquid |
| Beef Bone Broth 🍲 | 1 cup | Low-sodium preferred |
| Yellow Onion 🧅 | 1 whole | Large, sliced into rings |
| Fresh Bay Leaves 🌿 | 2 whole | For aromatic depth |
| Black Coffee ☕ | ½ cup | Cold brew or strong coffee |
[recipe_ingredient_scaler]
The beef is non-negotiable—look for a 5-pound brisket with visible fat marbling from the meat counter. Costco or Whole Foods usually carry the best cuts, but your local butcher will have even fresher options. If the brisket has a thick fat cap, leave it on—it renders beautifully during cooking and keeps the meat moist. For the garlic-herb oil, use extra-virgin olive oil (none of that cheap stuff) and fresh herbs—dried just won’t cut it here. The rosemary and thyme should smell vibrant, not dusty. If they’re wilted, toss them. For the brown sugar, light brown works best—it’s less likely to burn during basting.
No fresh rosemary? Substitute with 1 tbsp dried rosemary, but reduce the thyme to 1 tbsp dried instead. Out of apple cider vinegar? Balsamic vinegar or white vinegar both work, but the flavor profile will shift slightly. The beef bone broth can be swapped for water plus 1 beef bouillon cube, but homemade broth adds depth. If you’re short on time, pre-minced garlic from a jar is fine (just rinse it first), but fresh always tastes better. For the coffee, strong brewed or even instant dissolved in hot water works—it’s the acidity that tenderizes the meat. The yellow onion can be subbed with red onion for color, but yellow has a sweeter flavor that pairs better with the brisket.
Store your brisket in the fridge for up to 2 days before cooking—this lets the meat relax and tenderize naturally. The garlic-herb oil blend keeps for 1 week in the fridge, but I recommend making it fresh for maximum flavor. Once cooked, brisket reheats beautifully—wrap tightly in foil and warm in a 300°F oven for 20-30 minutes. For leftovers, portion into airtight containers and freeze for up to 3 months. The crust will get soggy if stored in water, so always keep it dry. This brisket also makes amazing sandwiches—just slice thinly against the grain and pile high on crusty bread with pickles and mustard.
Why You’ll Love This Recipe
- No-Fuss Rotisserie Magic: The rotisserie does all the work—just toss that brisket on the spit, let it sear, and forget about it while it slow-roasts. No flipping, no babysitting, just that rich, caramelized crust forming effortlessly thanks to the coffee and sugar rub. Honestly, the hardest part is resisting the smell while you prep the sides.
- Coffee-Kissed Crust: That half cup of black coffee isn’t just a random ingredient—it’s what turns this brisket into something dangerously addictive. The brown sugar caramelizes into a deep mahogany crust, while the coffee adds a smoky depth that makes every bite taste like a backyard cookout. Trust me, the garlic and herbs just take it over the top.
- Feeds a Crowd (Without the Guilt): Five pounds of brisket isn’t just for holidays—it’s your secret weapon for game nights, family dinners, or even a last-minute potluck. The rotisserie method ensures every slice is juicy, so you won’t have to worry about leftovers going to waste. (Yes, even on a Tuesday night.)
- Budget-Friendly Luxury: Brisket is one of those affordable cuts that feels like a splurge once it’s cooked. The rotisserie setup might seem fancy, but the ingredients are simple, and the coffee and herbs elevate it without breaking the bank. Plus, that 30-minute rest before slicing? Worth every second for that perfect, juicy bite.
Step-by-step instructions for beef brisket rotisserie
Here’s how to transform your brisket into a showstopping rotisserie with a perfect crust and melt-in-your-mouth tenderness.
Prepare the Brisket with Coffee and Herb Rub
Start by combining the ½ cup black coffee, ¼ cup brown sugar, 2 tbsp apple cider vinegar, 2 tbsp kosher salt, 1 tbsp freshly ground black pepper, ¼ cup fresh rosemary, ¼ cup fresh thyme, and 8 garlic cloves in a bowl. Mix thoroughly until the herbs are evenly distributed and the sugar dissolves completely into the coffee mixture.
Pat the 5 lb beef brisket dry with paper towels, removing any excess moisture from the surface. This is crucial for creating that coveted crust later. Using your hands, generously coat the entire surface of the brisket with the coffee-herb mixture, pressing it into the meat so it adheres well. The coffee adds depth while the sugar creates a caramelized crust during roasting. Let the brisket sit at room temperature for 30 minutes while you prepare the rotisserie setup.
Build the Rotisserie Framework and Sear
Slice the 1 yellow onion into rings and thread them onto skewers, alternating with the 2 fresh bay leaves to create aromatic bundles. These will baste the brisket as it roasts, infusing it with sweet onion flavor. Position the brisket on the rotisserie spit, fat side up, and secure it with butcher’s twine if needed to maintain an even shape.
Preheat your rotisserie oven to 325°F with the spit rotating. Once heated, increase the temperature to 400°F and sear the brisket for 15 minutes on each side until you develop a deep golden-brown crust. You’ll see the surface darken and the fat begin to render. This initial sear locks in juices and builds flavor. After searing, reduce the heat back to 325°F for the slow cook.
Slow-Roast with Basting and Broth Infusion
Pour the 1 cup beef bone broth into a heatproof dish and place it on the rotisserie rack below the spit. As the brisket roasts, the rising steam will create a moist environment that keeps the meat tender. Every 45 minutes, baste the brisket with the ½ cup extra-virgin olive oil using a basting brush, focusing on the areas that appear dry. This step is essential for maintaining moisture and developing that glossy, caramelized exterior.
Rotate the spit occasionally to ensure even cooking. The brisket is done when the internal temperature reaches 203°F at the thickest part of the meat, which typically takes 4-5 hours total cooking time. You’ll notice the probe slide in like butter with no resistance. Remove the brisket from the rotisserie and let it rest for 30 minutes before slicing. This resting period allows the juices to redistribute throughout the meat, ensuring each slice remains juicy.
Slice and Serve with Rotisserie Perfection
Slice the brisket against the grain into ¼-inch thick slices for maximum tenderness. Arrange the slices on a warm platter, garnishing with additional fresh rosemary sprigs and cracked black pepper for presentation. The exterior should have a beautiful dark mahogany crust, while the interior remains rich and moist. Serve immediately with the onion-basted juices spooned over the top for an extra layer of flavor.
Each bite should deliver a perfect balance of textures: the crispy, caramelized crust giving way to the tender, juicy meat beneath. The coffee-infused rub adds complexity, while the slow rotisserie method ensures even cooking throughout. This technique transforms a simple brisket into a restaurant-worthy centerpiece that will impress any gathering.
Pro Tips For Making Beef Brisket Rotisserie
- Prep the Rub First: DESCRIPTION: Mix the coffee, brown sugar, and vinegar into a paste before adding the herbs and garlic—this ensures the sugar dissolves completely and the rub sticks to the brisket like glue. I learned this the hard way when clumps of sugar burned instead of caramelizing.
- Don’t Skip the 30-Minute Rest: DESCRIPTION: Let the brisket sit at room temperature before cooking—yes, even if you’re impatient like me. Cold meat cooks unevenly and steams instead of browning, which means a sad, pale crust instead of that deep mahogany finish you’re after.
- Baste with Olive Oil, Not Broth: DESCRIPTION: The recipe calls for basting with the ½ cup extra-virgin olive oil, not the bone broth—this builds the glossy crust. I used to splash broth on thinking it’d add moisture, but it just diluted the flavor and made the exterior sticky instead of crisp.
- Rotate the Spit Religiously: DESCRIPTION: Every 45 minutes, give the brisket a quarter-turn so the heat hits all sides evenly. I once forgot and ended up with one side overcooked and another still pink—now I set a timer to avoid that disaster.
Pro cooking tips for great beef brisket rotisserie
Mastering Rotisserie Heat
I always say the rotisserie is where French precision meets Southern slow-cooking magic. For perfect results, your oven temperature should start at 325°F to avoid overcooking the exterior before the meat tenderizes.
After that initial sear at 400°F for 15 minutes per side, I swear by maintaining 325°F consistently—this is where the real magic happens. My Meater Plus probe thermometer sits right next to the spit, so I can monitor both internal temp and surface crust development simultaneously.
You’ll know you’re on the right track when the brisket’s surface develops that beautiful mahogany sheen. 🌡️
The Coffee Rub Secret
The ½ cup black coffee in our rub isn’t just for flavor—it’s a tenderizer that breaks down collagen while adding depth. I like to use cold brew concentrate for maximum potency, but even strong brewed coffee works.
The key is to let the brisket sit at room temperature for 30 minutes after coating before starting the rotisserie. This step ensures the rub penetrates the meat evenly. I’ve found that skipping this resting time leads to uneven crust formation and drier meat.
Trust me, that 30 minutes is worth every second!
Basting Like a Pro
Every 45 minutes, I baste the brisket with ½ cup extra-virgin olive oil using a silicone basting brush. This isn’t just about moisture—it’s about building that glossy, caramelized crust.
I focus on the areas that look dryest, but I also make sure to coat the edges where the fat renders. I’ve tried different basting liquids—even apple cider vinegar—but nothing compares to olive oil for that perfect sheen.
The steam from the 1 cup beef bone broth below the spit creates a moist environment that keeps the meat tender while the crust develops. 💫
Rotisserie Setup Essentials
Your rotisserie spit should rotate at 8-10 RPM for even cooking. I use a 12-inch stainless steel spit because it distributes heat more evenly than aluminum. The onion-bay leaf skewers are crucial—they create a natural basting effect as they rotate, adding sweetness and aroma.
I position them about 6 inches below the brisket so they can catch the drippings without burning. If your oven doesn’t have a rotisserie rack, place a heatproof dish with broth on the lower rack to create steam. This simple setup makes all the difference in texture!
Resting Isn’t Optional
After removing the brisket from the rotisserie, I wrap it tightly in towels and let it rest for 30 minutes in a cooler. This might seem counterintuitive, but it’s absolutely essential for juiciness. The resting period allows the internal temperature to equalize and the juices to redistribute throughout the meat.
I’ve seen cooks slice brisket right away, only to end up with dry, tough meat. Don’t make that mistake—resting is where the magic happens. 💪
Nutrition facts
Frequently asked questions
Why does the coffee rub work so well for brisket?
The ½ cup black coffee in the rub isn’t just for flavor—it acts as a natural tenderizer! The acidity breaks down collagen fibers, making the meat more tender. Plus, it adds a rich depth that complements the herbs and spices. The brown sugar in the mix caramelizes during cooking, creating that coveted crust. This combination ensures both tenderness and a perfect exterior.
What if my rotisserie spit isn’t rotating evenly?
If the spit isn’t rotating smoothly, adjust the oven rack to ensure it’s centered. Use a 12-inch stainless steel spit for better balance and even heat distribution. For extra stability, secure the brisket with butcher’s twine. If the issue persists, check that the motor is functioning properly. Even rotation is key for that perfect mahogany crust!
Can I use a different type of oil for basting?
While extra-virgin olive oil is ideal for its flavor and heat stability, you can substitute with avocado oil or vegetable oil if needed. Avoid oils with low smoke points like canola, as they may burn during the 400°F sear. The key is to maintain moisture and build that glossy crust, so any high-quality oil will work.
How do I know when the brisket is fully cooked?
Use a meat thermometer to check the internal temperature—it should reach 203°F at the thickest part of the meat. The probe should slide in like butter with no resistance. This ensures the brisket is tender and juicy without being overcooked. Patience here pays off for that perfect texture!
What’s the best way to reheat leftover brisket?
Wrap the brisket tightly in foil and reheat in a 300°F oven for 20-30 minutes. This keeps the crust intact while warming the meat evenly. Avoid microwaving, as it can dry out the meat. For extra flavor, drizzle with a bit of beef bone broth before reheating.

Trained in classic French technique but raised on slow-cooked ribs and spicy rubs, she blends culinary skill with smoke and soul.
- Brisket With Cabbage And Potatoes Recipe: Smoky Comfort Meal in One Pot - October 24, 2026
- Sweet Brisket Recipe for Rosh Hashanah: Honey-Glazed Tradition With Tender Layers - October 24, 2026
- Brisket Sliders With Hawaiian Rolls Recipe: Juicy Smoked Meat on Buttery Buns - October 24, 2026