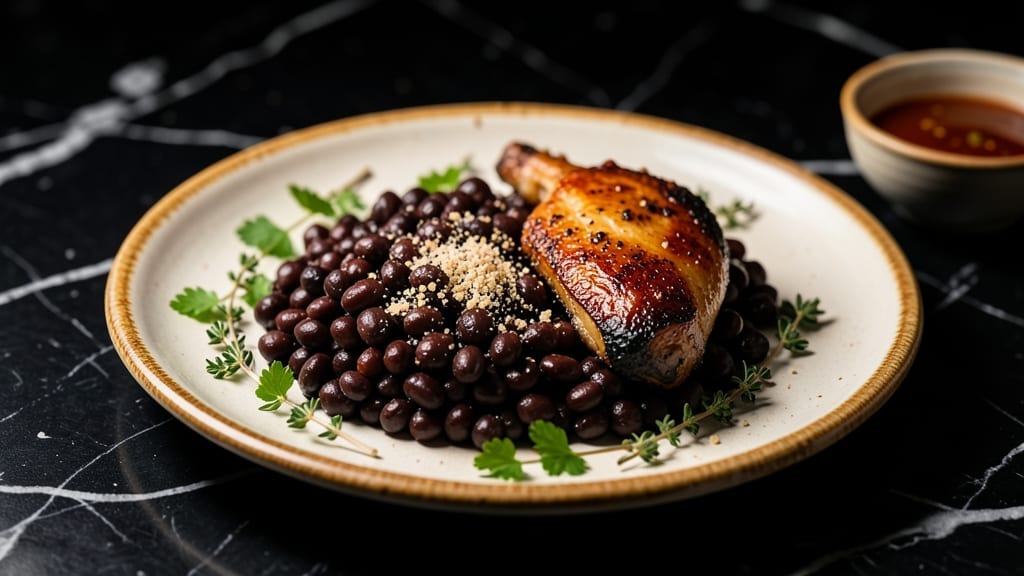
This black-eyed peas with smoked turkey leg recipe transforms a simple side into a showstopping Southern meal that feels like a hug in a bowl.
After years of perfecting my grandmother’s Sunday dinner techniques, I’ve developed a method that delivers crispy, golden turkey skin and tender peas simmered in rich, smoky broth—no shortcuts, just deep flavor.
The secret lies in slow-braising the turkey leg with the peas, letting the meat fall apart while infusing every bite with that unmistakable smoked aroma.
The beauty of this recipe is its simplicity: just a few pantry staples and 30 minutes of hands-on time before letting everything simmer together. You’ll start with a smoked turkey leg (pre-cooked for convenience but packed with flavor) and black-eyed peas, then build layers of taste through slow cooking.
The result? A dish that’s hearty enough to stand alone but works perfectly alongside cornbread or collard greens for a full Southern spread.
By the time you’re done, you’ll have tender turkey meat that practically melts in your mouth, black-eyed peas with a satisfying bite, and a broth so flavorful it deserves its own bowl.
The crispy skin on the turkey leg adds texture that contrasts beautifully with the soft peas, making this more than just a side—it’s a centerpiece. This is the kind of meal that tastes like home, no matter what day it is.
Serve with warm cornbread to soak up every last drop of that smoky, savory broth. The combination of crispy turkey skin, tender peas, and rich seasoning creates a dish that’s both comforting and impressive—perfect for family gatherings or a cozy weeknight dinner. Let’s get cooking!
Ingredients for black eyed peas with smoked turkey leg
Pantry staples and that unmistakable smoky turkey flavor. Simple ingredients, big Southern comfort.
| Ingredient | Amount | Notes |
|---|---|---|
| Smoked Turkey Leg 🦃 | 1 lb | Bone-in for best flavor |
| Dried Black-Eyed Peas 🌱 | 1 ½ cups | Rinsed before cooking |
| Onion 🧅 | 1 whole | Yellow or white, chopped |
| Garlic Cloves 🧄 | 4 cloves | Peeled and minced |
| Celery Stalks 🥬 | 2 whole | Chopped, with leaves |
| Carrots 🥕 | 2 whole | Medium, chopped |
| Smoked Paprika 🌶️ | 1 tbsp | For deep smoky flavor |
| Ground Black Pepper 🌶️ | ½ tsp | Freshly cracked |
| Dried Thyme 🌿 | 1 tsp | Or 1 tbsp fresh |
| Bay Leaves 🍃 | 2 whole | For aromatic depth |
| Chicken Broth 💧 | 3 cups | Low-sodium preferred |
| Apple Cider Vinegar 🍏 | 1 tbsp | For tangy brightness |
| Salt 🧂 | 1 ½ tsp | Adjust to taste |
| Honey 🍯 | 1 tbsp | For subtle sweetness |
| Fresh Parsley 🌿 | ¼ cup | Chopped for garnish |
[recipe_ingredient_scaler]
The smoked turkey leg is the star here. Look for one with crispy skin—Costco or Whole Foods usually have the best options, but check the deli section at your local grocery store. If you can’t find smoked turkey, brine a regular turkey leg with apple cider vinegar and smoked salt for 24 hours first. The black-eyed peas should be dried, not canned—Bob’s Red Mill or Anthony’s Goods are solid brands. For the vegetables, don’t skip the celery leaves—they add extra flavor. I always chop everything roughly so it cooks evenly, but no need to go too small.
No smoked paprika? Substitute with a mix of regular paprika and a pinch of liquid smoke—just a few drops. Fresh thyme is ideal, but dried works at one-third the amount. If your broth is high-sodium, reduce it by half and add extra water. The apple cider vinegar might sound odd, but it cuts through the richness and brightens everything. For a sweeter touch, maple syrup works too. If you’re short on time, pre-cooked turkey leg from the deli section (look for smoked or honey-glazed) saves hours. Just pat it dry before adding to the pot for better browning.
This dish tastes even better the next day—make extra and freeze portions. The turkey skin stays crispy if you reheat it covered, then uncover for the last 5 minutes. Store the broth separately if you want to use it for other meals—it freezes beautifully for up to 3 months. For serving, I like to tear the turkey into bite-sized pieces over the peas, then sprinkle with fresh parsley. The crispy skin is the best part, so don’t skip the final crisping step—it’s what makes this dish special.
Why You’ll Love This Recipe
- Turkey Leg Crisp Magic: That crispy skin on the smoked turkey leg? It’s non-negotiable—just 25 minutes in the pan, skin-side down, and you’ve got golden, crackling perfection. No fancy tools, just a heavy skillet and patience. The kind of texture that makes people pause mid-bite and ask, “How’d you do that?”
- Flavor Bomb Combo: The smoked paprika and thyme in the beans? They’re like a hug for your taste buds. Then there’s the apple cider vinegar cutting through the richness, the honey adding a whisper of sweetness, and that shredded turkey soaking up all the sauce—it’s a flavor party in every spoonful. Honestly, I’ve never had black-eyed peas taste this good.
- Leftovers That Win: This dish gets better the next day. The turkey shreds even easier, the beans mellow into creamy perfection, and the broth? Freezes like a dream for up to 3 months. I’ve got a habit of making this on Sunday and stretching it into lunches all week—no one even notices it’s leftovers.
- Budget-Friendly Feast: Dried black-eyed peas are dirt cheap, and a smoked turkey leg (especially bone-in) stretches farther than you’d think. You’re getting a full meal with crispy turkey, hearty beans, and veggies for less than what a takeout burrito costs. Plus, the chicken broth left over? Repurpose it into soup or risotto—zero waste, maximum flavor.
Step-by-step instructions for black eyed peas with smoked turkey leg
Here’s how to transform smoked turkey leg into crispy perfection while creating a rich, hearty bean stew.
Prepare the Smoked Turkey Leg for Crispy Skin
Pat the smoked turkey leg completely dry with paper towels, focusing on the skin. Any moisture will prevent that beautiful crispy texture we’re after. Place it skin-side down in a cold, heavy skillet over medium heat. You want the fat to render slowly and the skin to crisp without burning.
Cook undisturbed for 15 minutes until the skin is golden brown and crispy. Flip the turkey leg and cook another 10 minutes on the other side. The skin should be deep mahogany color and crackling when you press it gently with tongs. If it’s browning too quickly, reduce the heat slightly to prevent burning. Remove the turkey leg and set it aside on a plate, skin-side up, to rest while we prepare the beans.
Build the Flavorful Bean Base
In a large Dutch oven, combine the chopped onion, celery stalks, carrots, and minced garlic cloves. Cook over medium heat for 8-10 minutes until the vegetables soften and the onion becomes translucent. This forms the aromatic foundation for our dish.
Add the smoked paprika, dried thyme, ground black pepper, and bay leaves. Stir for 30 seconds to toast the spices and release their essential oils. This step intensifies their flavors and prevents them from tasting raw. Then add the rinsed dried black-eyed peas and stir to coat them with the spiced vegetables. Pour in the chicken broth and bring to a gentle simmer.
Simmer the Beans Until Tender
Add the apple cider vinegar and honey to the simmering bean mixture. Stir well to combine, then add the salt. The vinegar adds brightness while the honey balances the flavors and helps tenderize the beans. Cover the Dutch oven and simmer gently for 45-50 minutes, stirring occasionally, until the black-eyed peas are tender but still hold their shape.
Here’s the thing – you want them to be just tender enough to eat but still have a slight bite. If they become too mushy, they’ll lose their texture. Taste a pea after 40 minutes to check for doneness. If they’re still firm, continue cooking for another 5-10 minutes.
Finish with the Turkey and Garnish
Return the crispy turkey leg to the Dutch oven with the beans. Spoon some of the bean liquid over the turkey to keep it moist. Cover and simmer on low heat for 20-25 minutes, turning the turkey leg occasionally. This allows the turkey to finish cooking while absorbing the rich bean flavors.
Use two forks to shred the turkey meat directly in the pot, discarding the skin and bones. Stir the shredded turkey into the beans until evenly distributed. The turkey should be fork-tender and easily pull apart. Taste and adjust seasoning with additional salt if needed, remembering that the turkey already contributes significant flavor.
Serve with Fresh Herbs
Remove the bay leaves and transfer the black-eyed peas and turkey mixture to a serving bowl. Garnish with the chopped fresh parsley just before serving. The parsley adds a fresh, bright contrast to the rich, smoky flavors of the dish. Serve immediately while the turkey is still warm and the beans have reached their perfect texture.
Each bite should deliver crispy, flavorful turkey with tender beans in a sauce that’s rich from the rendered turkey fat and brightened by the vinegar and herbs. The combination of textures and flavors makes this a truly satisfying Southern-style meal.
Pro Tips For Making Black Eyed Peas With Smoked Turkey Leg
- Toast Your Spices: That 30-second stir for the smoked paprika, thyme, and black pepper isn’t just busywork—it’s where the magic happens. I used to skip it, and the spices always tasted dull. Toasting them wakes up their flavors and cuts through the richness of the turkey fat. Think of it as giving them a little head start in the race.
- Don’t Crowd the Turkey: If you’re using a skillet that’s too small for the turkey leg, you’ll steam it instead of crisp it. I learned this the hard way after my first batch came out soggy. A heavy skillet with just enough space for the leg to lie flat is non-negotiable. If your pan’s too crowded, walk it—your future crispy skin will thank you.
- Taste the Beans Early: The recipe says to check the black-eyed peas at 40 minutes, but I’ve found they’re often ready sooner—especially if you’re using younger peas. A quick taste test saves you from overcooking and turning them into mush. If they’re still firm, they’ll soften in the remaining time. If they’re perfect? You just saved yourself cleanup.
- Save the Broth: That chicken broth you simmer the beans in? It’s liquid gold after the turkey’s done. Strain it into a container, label it, and freeze it—it’s perfect for future soups or grains. I used to pour it down the drain, thinking it was just “cooking water.” Now I hoard it like it’s the last cup of coffee in the house.
Regional styles of this black eyed peas with smoked turkey leg
Classic Southern Style
This recipe channels the soul of Southern cooking, where black-eyed peas and smoked turkey leg have been a New Year’s Eve tradition for generations. The key is slow-cooking the turkey leg until it falls apart, infusing the peas with deep, smoky flavor.
I remember my grandmother always served this with collard greens and cornbread—simple but unforgettable. The crispy skin adds that perfect crunch that Southern comfort food demands. 🌟
Carolina Lowcountry Twist
In the Lowcountry region of South Carolina and Georgia, black-eyed peas are often cooked with shrimp or sausage, but I swap in smoked turkey leg for a heartier meal. The technique is similar, but I add 1 tbsp of hot sauce like Crystal to the broth for a spicy kick.
This version keeps the rich, smoky essence while adding a bit of heat that works beautifully with the turkey’s natural flavors.
Appalachian Mountain Style
Up in the Appalachian Mountains, you’ll find a simpler approach where the turkey leg is often boiled with the peas and vegetables until the meat is tender. I use this method but add 2 slices of bacon to the pot for extra depth.
The bacon renders fat that crisps the turkey skin while adding a smoky, salty contrast to the sweet peas. This rustic version feels like a mountain cabin dinner.
Texas-Style Smoked Beans
In Texas, black-eyed peas often get a chili-inspired twist, so I incorporate 1 tsp chili powder and ½ tsp cumin into the spice mix. I also add ½ cup of diced tomatoes to the pot for acidity.
The result is a slightly spicy, earthy flavor that pairs perfectly with the smoky turkey. This version feels like a cross between a chili and a traditional Southern dish. 🔥
Cajun Creole Fusion
For a Louisiana-inspired take, I add 1 tsp Creole seasoning (like Tony Chachere’s) and ½ tsp cayenne pepper to the beans. The Creole seasoning brings a mix of herbs and spices that complement the turkey’s smokiness.
I also serve it with sausage links simmered in the broth for an extra layer of flavor. This version feels like a festive Creole feast.
Nutrition facts
Frequently asked questions
Why is crispy turkey skin so important in this recipe?
The crispy skin adds a delightful texture contrast to the tender beans! It forms during the 15-minute searing step on medium heat, where fat renders slowly without burning. This step is key—it makes every bite more satisfying with that perfect crunch. Don’t skip it, or you’ll miss the dish’s signature Southern touch!
Can I use canned black-eyed peas instead of dried?
Stick with dried for the best texture and flavor. Canned peas lack the satisfying bite and absorb flavors differently during simmering. Dried beans cook down to a perfect 45-50 minutes and hold their shape beautifully. If you’re short on time, soak dried peas overnight for faster cooking.
What if my turkey leg isn’t fully cooked after simmering?
Check the internal temperature—it should reach 165°F in the thickest part. If not, simmer another 5-10 minutes covered. The turkey absorbs flavors from the broth during this time, so patience pays off. Overcooking makes the meat dry, so use a meat thermometer for accuracy.
How do I make this dish ahead of time?
This tastes even better reheated! Make it 2 days ahead and store in the fridge. Reheat on low heat, covered, then uncover for the last 5 minutes to crisp the skin. The broth concentrates slightly, making flavors richer. Freeze portions without the parsley for up to 3 months—just add fresh herbs when serving.

Trained in classic French technique but raised on slow-cooked ribs and spicy rubs, she blends culinary skill with smoke and soul.
- Smoked Chicken Salad Recipe: Crispy, Smoky Bites With Creamy Ranch Dressing - October 19, 2026
- Beer Can Chicken in a Smoker Recipe: Juicy, Herbed Perfection in One Can - October 19, 2026
- Brined Beef Brisket Recipe: Ultra-Tender, Juicy Cuts in One Pot - October 19, 2026