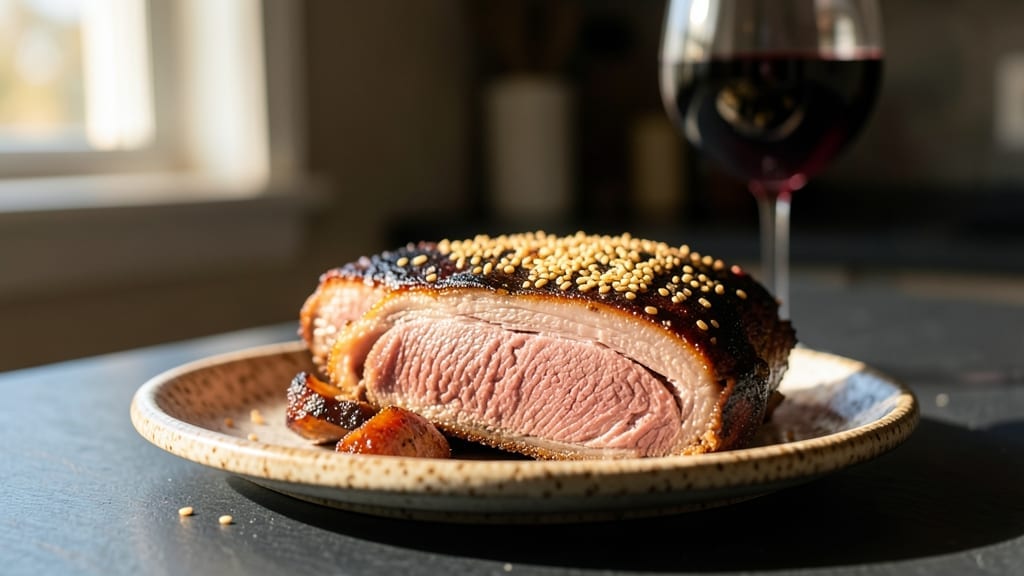
This chuck roast smoker recipe turns tough cuts into irresistible, fall-apart tenderness that’ll leave everyone clamoring for more. The key lies in low-and-slow precision—maintaining 225°F for six hours while the wood smoke works its magic.
I perfected this method after years of backyard cookouts, where the first whiff of hickory smoke still makes my mouth water.
This recipe delivers restaurant-quality results with minimal effort: a simple dry rub of salt, pepper, and smoked paprika creates a flavorful bark, while the slow cook ensures the meat falls apart at the touch of a fork.
The secret weapon? A two-stage smoke—start with hickory for depth, then finish with applewood for subtle sweetness that pairs beautifully with the rich beef.
By the time you pull it from the smoker, you’ll have a roast so tender it practically dissolves on your tongue, with a smoky crust that adds texture to every bite. The aroma alone will have everyone gathering around the table, and the leftovers?
Even better the next day when the flavors have fully melded. Serve with classic sides like mashed potatoes or roasted vegetables to complete the meal.
Whether you’re feeding a crowd or meal prepping for the week, this chuck roast delivers foolproof tenderness that’s worth the wait. The technique is straightforward, but the results are undeniably impressive—proof that slow cooking transforms ordinary ingredients into something extraordinary.
Ingredients for chuck roast smoker
Pantry staples meet smoky magic—just a handful of ingredients for restaurant-quality chuck roast.
| Ingredient | Amount | Notes |
|---|---|---|
| Chuck Roast 🥩 | 4 lb | Bone-in preferred for flavor |
| Kosher Salt 🧂 | 1 ½ tbsp | Diamond Crystal preferred |
| Ground Black Pepper 🌶️ | 1 ½ tbsp | Freshly ground for best flavor |
| Smoked Paprika 🌶️ | 1 tbsp | For deep smoky bark |
| Garlic Powder 🧄 | 1 tbsp | Not garlic salt |
| Onion Powder 🧅 | 1 tbsp | For sweet depth |
| Hickory Wood Chips 🌳 | 1 lb | Soaked for 30 minutes |
| Applewood Wood Chips 🍎 | ½ lb | For finishing sweetness |
| Beef Broth 🥫 | 1 cup | Low-sodium preferred |
| Yellow Onion 🧅 | 1 whole | Quartered for aromatics |
| Carrots 🥕 | 4 whole | Whole for easy handling |
| Celery Stalks 🥬 | 4 whole | Cut into 2-inch pieces |
| Fresh Thyme 🌿 | 4 sprigs | Or 1 tsp dried thyme |
| Fresh Rosemary 🌿 | 1 sprig | For aromatic depth |
| Olive Oil 🫒 | 2 tbsp | For basting |
[recipe_ingredient_scaler]
The chuck roast is the star, so pick one with good marbling—the fat renders down during smoking, keeping the meat juicy. Most butchers will cut it for you, but if buying whole, ask for a 3-4 lb roast with a thick cut. Costco or local butchers often have the best selection, and their vacuum-sealed packages stay fresher longer. For wood chips, Traeger or Cookshack brands are reliable, but any food-grade chips work. Soak them for at least 30 minutes before using—they’ll smoke longer and produce more flavor.
No smoked paprika? Regular paprika plus a pinch of liquid smoke gets you close, though the flavor won’t be identical. Fresh herbs? Dried thyme works at one-third the amount, but fresh has that bright aroma you can’t replicate. Short on beef broth? Water plus a bouillon cube is fine, but add an extra splash of balsamic vinegar for depth. The aromatics—onion, carrots, celery—are traditional for a reason: they sweeten the meat and add complexity. Baby carrots or pre-cut celery save time if you’re in a hurry, but whole veggies hold up better during long smokes.
This roast tastes even better the next day, so double the batch if you can. Store leftovers in the fridge for 5-6 days or freeze for up to 3 months—wrap tightly in foil first to lock in moisture. For meal prep, portion into individual containers with a little extra broth to keep it tender. The smoky crust? Worth saving a few slices for sandwiches later in the week. If you’ve got extra wood chips, save them in an airtight container for your next cook.
Why You’ll Love This Recipe
- No-Fuss Smoking: I pat the roast dry, slap on that bold rub of smoked paprika and onion powder, and let it sit while I soak the wood chips—no fancy prep, just straightforward action. The aromatics in the drip pan (onion, carrots, thyme) add flavor without extra work.
- Smoky Perfection: That crispy bark from the smoked paprika and hickory-applewood combo? Chef’s kiss. The garlic powder and rosemary infuse the meat with depth, while the low-and-slow cook turns tough chuck into melt-in-your-mouth magic.
- Leftover Hero: You’ll have enough for three meals—sandwiches, tacos, or just a hearty plate with the smoky veggies from the pan. Wrap leftovers tightly in foil, and they stay juicy for days (or freeze for months).
- Budget-Friendly Feast: A 4-pound chuck roast feeds a crowd without breaking the bank, and the spices (especially the smoked paprika) pack serious flavor punch. Plus, the wood chips and aromatics turn simple ingredients into a restaurant-worthy meal.
Step-by-step instructions for smoked chuck roast
Here’s how to transform a tough cut into melt-in-your-mouth perfection using just your smoker.
Prepare the Chuck Roast with Dry Rub
Pat the 4 lb chuck roast completely dry with paper towels—this is non-negotiable for bark development. In a small bowl, combine 1½ tablespoons kosher salt, 1½ tablespoons ground black pepper, 1 tablespoon smoked paprika, 1 tablespoon garlic powder, and 1 tablespoon onion powder. Rub this mixture all over the roast, pressing firmly so it adheres to every crevice. The reason for this aggressive seasoning? These spices create a flavor crust while the salt helps tenderize the meat during the long cook.
Let the seasoned roast sit at room temperature for 30 minutes before smoking. This step ensures even cooking from edge to center. While it rests, soak the 1 lb hickory wood chips and ½ lb applewood wood chips in water for 30 minutes—this prevents them from burning and gives you consistent, clean smoke. Real talk: Skipping the soak leads to acrid smoke that overpowers the meat.
Build the Smoker and Add Aromatics
Set up your smoker for 225°F using the soaked wood chips. I like to split the wood between the smoker box and a small water pan—this maintains moisture while creating that signature smoke ring. Once the temperature stabilizes and you see steady blue smoke (not white vapor), it’s time to add the aromatics. Place the 1 yellow onion (quartered), 4 carrots, 4 celery stalks (cut into 2-inch pieces), 4 sprigs fresh thyme, and 1 sprig fresh rosemary in the smoker’s drip pan. These vegetables act as a natural flavor conduit, infusing the smoke with their own subtle sweetness.
Add the chuck roast to the smoker, placing it fat-side up if possible. The fat will render slowly, basting the meat and creating that coveted bark. Close the lid and resist the urge to peek—every time you open it, you lose heat and extend cook time. This is where patience pays off: The roast needs 6 hours to reach 170°F internal temperature, where it’ll hit “the stall” and begin breaking down collagen into gelatin.
Wrap and Finish for Maximum Tenderness
When the internal temperature hits 170°F, remove the roast from the smoker and wrap it tightly in butcher paper (not foil). This “Texas crutch” technique traps steam while allowing the bark to remain intact. Return it to the smoker and continue cooking until the internal temperature reaches 205°F—this is where the magic happens. The meat will probe like butter, with no resistance, and pull apart effortlessly. Total cook time should be around 8-9 hours, depending on your smoker’s efficiency.
Here’s the thing—don’t rush this step. The roast needs time at 205°F to fully transform its texture. If you pull it too early, you’ll end up with meat that’s still tough. The key is trusting the probe test over the thermometer. When the meat reaches this temperature, remove it from the smoker and let it rest in the butcher paper for 1 hour before slicing. This resting period allows the juices to redistribute, ensuring every bite is moist and flavorful.
Slice and Serve with Basting Sauce
After resting, slice the chuck roast against the grain into ¼-inch thick pieces. The grain runs lengthwise, so you’ll need to adjust your angle for the flat and point cuts. While the roast rests, make a simple basting sauce by combining 1 cup beef broth and 2 tablespoons olive oil in a small saucepan. Simmer for 5 minutes until slightly reduced, then strain out any solids. Drizzle this sauce over the sliced roast before serving.
Each slice should be fork-tender, with a dark mahogany bark on the outside and a pink, smoke-ringed interior. The meat should pull apart with minimal effort, delivering that fall-apart tenderness you’re after. Serve with the smoked vegetables from the drip pan (they’ll be perfectly tender) and crusty bread to soak up every last bit of that smoky, savory sauce.
Pro Tips For Making Chuck Roast Smoker
- Soak the Wood: DESCRIPTION: I learned this the hard way—skipping the 30-minute soak for the 1 lb hickory and 0.5 lb applewood chips turns your smoker into a smoke bomb. The chips burn fast, filling your food with bitter ash instead of clean flavor. Trust me, the extra 30 minutes upfront saves you from scrapping a whole cook.
- Salt Like It’s Your Job: DESCRIPTION: That 1.5 tbsp kosher salt and 1.5 tbsp black pepper isn’t just seasoning—it’s the difference between tough and tender. Press it hard into every crevice, especially the flat sides. I used to half-ass it, and the roast never got that deep, crackling bark. (Yes, even if you’re impatient like me.)
- Don’t Rush the Stall: DESCRIPTION: When the roast hits 170°F, it’ll stall—temperature drops, cook slows. That’s exactly when collagen turns to gelatin, making the meat melt. Wrapping in butcher paper at this point isn’t cheating; it’s physics. If you pull it early, you’ll regret it. (I did. Twice.)
- Slice Against the Grain—Really: DESCRIPTION: The grain runs lengthwise, so you’ve got to angle your knife for the flat and point cuts. Cutting with the grain gives you chewy, stringy slices. Against it? Clean, fork-tender pieces. I finally got this right after watching a butcher do it—now my roast falls apart like it’s supposed to.
Make-ahead tips for chuck roast smoker
Pre-Smoke Prep
I always do my prep work the night before—this is where the magic starts. After seasoning the 4 lb chuck roast with that perfect dry rub, wrap it tightly in plastic wrap and refrigerate overnight. The cold slows down any bacterial growth while the flavors meld.
This is my secret to restaurant-quality results with minimal last-minute stress. Just pull it out 30 minutes before smoking to bring it to room temperature. 💡
Smoker Pre-Heat
Set up your smoker the day before if possible. I like to pre-soak the 1 lb hickory and ½ lb applewood wood chips and store them in a sealed container with water.
This way, you’re ready to go—just drain and load them into your smoker box. A pre-heated smoker means less time fiddling with temperature fluctuations when you’re ready to cook.
Portion Ahead
Prepare all your sides the day before and store them separately. I make a big batch of my garlic mashed potatoes and smoked apple cider glaze to drizzle over the roast later. Store the potatoes in an airtight container with a sprinkle of butter on top to keep them creamy.
The glaze can go in a small jar in the fridge—just give it a quick stir before serving. This way, you’re only focused on the roast when it’s time to cook.
Wood Chip Rotation
If you’re cooking for more than one meal, split your wood chips into portions. Store them in labeled bags in the freezer—they’ll keep for months. Just thaw them in water for 30 minutes before using.
I like to keep a few bags on hand so I can alternate between hickory for depth and applewood for that finishing sweetness. This way, you always have the right wood ready for your next smoke session.
Resting Strategy
After your roast reaches 205°F, wrap it in butcher paper and let it rest while you prep the rest of the meal. I use this time to make the beef broth sauce and set the table. The resting period is crucial—it’s when the meat really comes together.
If you’re making multiple servings, slice the roast against the grain and store the slices separately in containers with a little extra sauce. This keeps everything fresh and ready to serve.
Make-Ahead Sauce
Make your sauce the night before and refrigerate it. I like to add a splash of balsamic vinegar to the beef broth mixture for depth. Store it in a small jar and just reheat it gently on the stove when you’re ready to serve.
The flavors develop even more overnight, and you’ll have one less thing to worry about on cook day. This is my go-to trick for stress-free meal prep! 🍽️
Nutrition facts
Frequently asked questions
Why does the chuck roast need to rest before slicing?
Resting for 1 hour after cooking is essential—it lets the meat’s juices redistribute from the center to the edges. This ensures every bite stays juicy and tender, not just the outer layers. Skipping this step can leave you with dry slices despite the perfect internal temperature.
Can I use foil instead of butcher paper for wrapping?
Butcher paper is the better choice because it allows the bark to stay intact while trapping steam. Foil creates a moisture barrier that can make the crust soggy. If you’re in a pinch, use foil sparingly—just wrap the edges to retain heat, leaving the top exposed. The key is balancing steam and texture.
What if my smoker runs hotter than 225°F?
Adjust your air vents to lower the temperature—most smokers let you control airflow. If you can’t dial it back, reduce the cook time slightly. The goal is steady 225°F for even cooking. A hotter smoker risks drying out the meat before it reaches tenderness. Always use a reliable thermometer to monitor temps.
How do I know when the roast is fully tender?
Check for 205°F internal temperature and test with a fork—it should slide through with minimal resistance. The meat should pull apart easily when sliced. If it feels firm, return it to the smoker for another 30-60 minutes. Patience here pays off for that melt-in-your-mouth result.
Can I make the beef broth sauce ahead of time?
Simmer the 1 cup beef broth and 2 tablespoons olive oil ahead, then refrigerate. Just reheat gently before serving. Adding a splash of balsamic vinegar the night before enhances the flavor even more. Store it in a jar—ready to drizzle when you slice the roast.

Trained in classic French technique but raised on slow-cooked ribs and spicy rubs, she blends culinary skill with smoke and soul.
- Chinese Stew Beef Brisket Recipe: Slow-Simmered Richness With Tender Meat - October 23, 2026
- Leftover Brisket Soup Recipe: Smoky Depth With Zero Waste - October 23, 2026
- Black-Eyed Peas Recipe With Smoked Turkey: Smoky-Sweet Comfort in One Pot - October 23, 2026