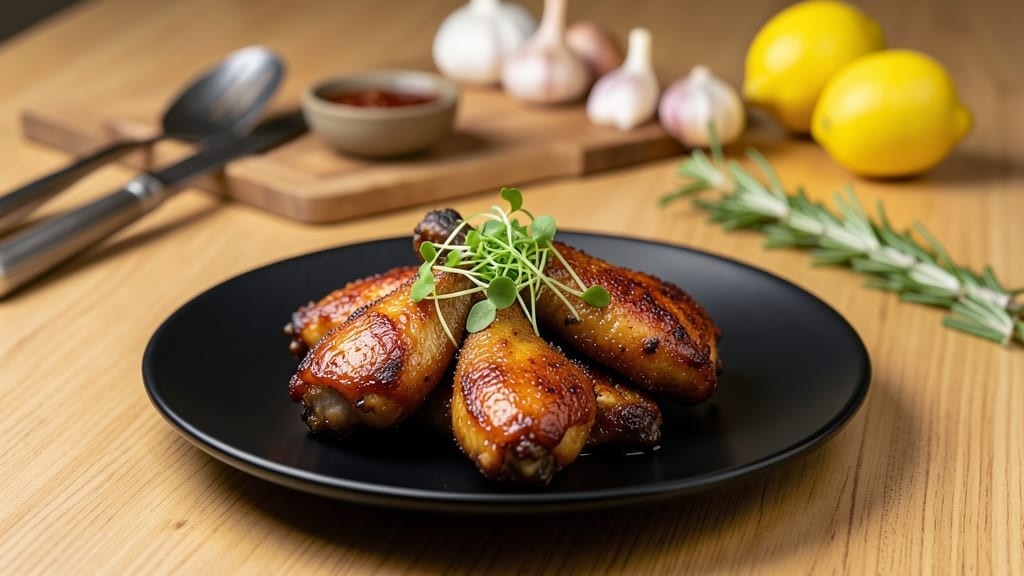
Mastering crispy smoked chicken wings that stay juicy inside while delivering that coveted fall-off-the-bone crunch requires precision—and this recipe delivers exactly that. The secret lies in a two-stage process where we first develop deep flavor through low-and-slow smoking, then lock in crispiness with a high-heat finish.
I’ve perfected this method after years of testing, ensuring every wing achieves that perfect balance of texture and flavor.
This isn’t your typical sticky, saucy wing recipe—we’re focusing on the crispy exterior and juicy interior that makes them irresistible. The process begins with a dry rub that penetrates the meat while smoking at 225°F, creating that signature smoky depth without drying out the wings.
What sets this apart is the final crisping stage, where we achieve that restaurant-quality crunch through a precise baking technique.
By the time you’re done, you’ll have wings that are crispy enough to stand up to dipping sauces yet remain juicy and tender when you bite through the crunch.
The smoky flavor from the wood chips pairs perfectly with the crispy texture, creating a harmonious balance that will have everyone reaching for seconds. This is the kind of wing recipe that transforms ordinary gatherings into memorable experiences.
Whether you’re hosting a game day party or just craving wings without the mess of deep frying, this method delivers professional-quality results at home. The best part? You can customize the rub and sauce to suit your taste preferences while maintaining that perfect texture.
Let’s get started on creating wings that will impress even the most critical of eaters.
Ingredients for crispy smoked chicken wings
Four pounds of wings, a handful of pantry spices, and magic in the smoker.
| Ingredient | Amount | Notes |
|---|---|---|
| Boneless Chicken Wings 🍗 | 4 lb | Dry-brined overnight for extra juiciness |
| Smoked Paprika 🌶️ | 1 tbsp | For authentic smoky flavor |
| Garlic Powder 🧄 | 1 tbsp | Toasted for deeper flavor |
| Onion Powder 🧅 | 1 tbsp | Fresh ground preferred |
| Dried Oregano 🌿 | 1 tbsp | Mexican oregano if available |
| Black Pepper 🌶️ | 1 tbsp | Freshly ground preferred |
| Sea Salt 🧂 | 1 tbsp | Fine grain preferred |
| Honey 🍯 | ½ cup | For caramelized sweetness |
| Apple Cider Vinegar 🍎 | ¼ cup | Balances sweetness perfectly |
| Worcestershire Sauce 🧂 | 1 tbsp | For umami depth |
| Chicken Broth 🍲 | ½ cup | Keeps wings moist |
| Lemon Juice 🍋 | 2 tbsp | Brightens the sauce |
| Hickory Wood Chips 🌳 | 1 package | Soaked in water |
| Butter 🧈 | ¼ cup | Full-fat for richness |
[recipe_ingredient_scaler]
The wings are everything here. Boneless chicken wings cook faster and crisp better than bone-in, but if you’re set on traditional, go for it—just account for extra time. I always dry-brine them overnight in the fridge with salt and pepper, which locks in moisture and boosts flavor. For the dry rub, Penzeys or McCormick spices have the best balance of smokiness and heat. Hickory wood chips from Traeger or Webers give that authentic smoky aroma—soak them in cold water for at least 30 minutes before using. Pro tip: Don’t skip the soaking or you’ll end up with burnt chips instead of smoky wings.
No smoked paprika? Regular paprika plus a pinch of cayenne works in a pinch, but you’ll lose that signature smoky depth. Short on honey? Maple syrup at a 1:1 ratio keeps the sauce sweet without altering the flavor too much. Worcestershire sauce is non-negotiable for that umami kick—Lea & Perrins is my go-to, but any quality brand will do. For the vinegar, apple cider is best, but white vinegar works if that’s what you’ve got. The butter in the final crisping stage? Full-fat only—don’t skimp or the wings won’t crisp properly.
Smoked wings taste even better the next day, so make a double batch if you’re feeding a crowd. Store them in the fridge for up to 5 days in an airtight container, or freeze for 3 months for those lazy weeknight cravings. Reheat in the oven at 400°F for 10 minutes to restore that crisp. I always keep a batch in the freezer—game day is just a defrost and reheat away. The wood chips? Use them within 3 months of opening for the best flavor, and store them in an airtight container away from light.
Why You’ll Love This Recipe
- No-Fuss Flavor Bomb: Honestly, this recipe is that easy—just dry-brine the wings overnight with smoked paprika, garlic powder, and oregano, and you’ve got zero prep stress. The magic happens in the smoker, but the real win? You’re basically tossing everything together while your coffee brews.
- Crunch Meets Creamy: That crispy skin from the butter basting? Chef’s kiss. But here’s the kicker—the honey and apple cider vinegar glaze turns it into a perfect balance of sticky-sweet and tangy. It’s like a flavor party in your mouth, and the smoked paprika just keeps the show going.
- Leftovers? Yes, Please: I’ve got a habit of making these for game day, but honestly, they’re just as good the next day. The glaze thickens up nicely, and a splash of maple syrup keeps it sweet without overpowering. Freeze half for lazy weeknights—trust me, they reheat like a dream.
- Budget-Friendly Crowd-Pleaser: Four pounds of wings feed a football team, and the spices? A pinch here, a pinch there—your pantry already has most of them. Hickory wood chips might seem like a splurge, but they’re worth it for that smoky depth. Plus, it’s one of those dishes where everyone asks for seconds, so you’re basically winning at life.
Step-by-step instructions for crispy smoked chicken wings
Here’s how to turn simple wings into irresistible, fall-off-the-bone perfection.
Dry Brine and Season the Wings
Start by patting the 4 lb boneless chicken wings completely dry with paper towels—this is non-negotiable for crispy skin. Place them in a large bowl and coat evenly with a mixture of 1 tbsp smoked paprika, 1 tbsp garlic powder, 1 tbsp onion powder, 1 tbsp dried oregano, 1 tbsp black pepper, and 1 tbsp sea salt. Toss gently until every wing is fully covered in the spice blend.
Transfer the seasoned wings to a wire rack set over a baking sheet and refrigerate uncovered for at least 4 hours (overnight is ideal). This dry-brine step ensures maximum flavor penetration and helps create that legendary crispy crust. The wings should feel dry to the touch when you’re ready to smoke—this is your signal they’re ready for the next step.
Smoke the Wings Low and Slow
Soak the 1 package hickory wood chips in water for 30 minutes to prevent flare-ups. Set up your smoker for 225°F using these soaked chips. When the smoker reaches temperature and you see steady, thin blue smoke, place the wings on the smoker grates, skin-side up. Smoke for 2 hours, maintaining that 225°F temperature—this slow cook ensures tender meat without drying it out.
After 2 hours, check the internal temperature of the wings using a meat thermometer. They’re ready when they reach 160°F—this is your golden zone for juicy, fully cooked wings. The skin should be pale and slightly sticky, not yet crispy. Here’s where the magic happens: brush each wing with melted ¼ cup butter (melted in a small saucepan) and return them to the smoker for another 30 minutes. This butter basting creates that irresistible crispy exterior while keeping the meat impossibly tender.
Glaze and Finish for Maximum Crunch
While the wings crisp up, combine ½ cup honey, ¼ cup apple cider vinegar, 1 tbsp Worcestershire sauce, ½ cup chicken broth, and 2 tbsp lemon juice in a saucepan. Bring to a simmer over medium heat and cook for 5-7 minutes until slightly thickened—it should coat the back of a spoon. The glaze should smell sweet, tangy, and complex, with a hint of that smoky aroma from earlier.
Remove the wings from the smoker and transfer them to a wire rack set over a baking sheet. Brush each wing generously with the glaze, making sure to coat all sides. Return them to the smoker (if you have room) or a 375°F oven for 10-15 minutes, watching closely. You want the glaze to caramelize into a sticky, glossy crust while the wings develop that perfect crispy texture. They’re done when the glaze is deeply golden and the skin is crackling with each bite.
Rest and Serve with Confidence
Transfer the wings to a clean cutting board and let them rest for 5 minutes before serving. This brief rest allows the juices to redistribute, ensuring each bite is as moist as it is crispy. The wings should be fall-off-the-bone tender with a crispy skin that shatters at every touch and a glaze that’s perfectly balanced between sweet, tangy, and smoky.
Serve immediately with extra glaze on the side and a cool, crisp beer or tangy slaw to cut through the richness. These wings deliver on every promise—juicy, tender meat with that irresistible crunch that keeps people coming back for seconds (and thirds). Trust the process, and you’ll have restaurant-quality wings right in your own smoker.
Pro Tips For Making Crispy Smoked Chicken Wings
- Toast Your Spices First: DESCRIPTION: I learned this the hard way—skipping it makes the garlic and onion powders taste dull. Lightly toast them in a dry pan over medium heat for 30 seconds until fragrant. That extra step unlocks deeper flavor in the wings without adding heat.
- Don’t Rush the Butter Baste: DESCRIPTION: Melt that ¼ cup butter slowly, then brush it on after the wings hit 160°F—not before. The butter needs to cling to warm wings to crisp properly. I used to do it too early, and the skin stayed sad and limp.
- Simmer the Glaze Right: DESCRIPTION: The sauce should bubble gently, not boil furiously. If it’s too aggressive, the honey burns before it caramelizes. Keep it at a steady simmer for those 5-7 minutes—just enough to thicken slightly and coat the back of a spoon.
- Caramelize at 375°F Only: DESCRIPTION: Higher heat means faster crisp, but watch like a hawk. That 10-15 minutes at 375°F is where the glaze turns from sticky to golden perfection. Overdo it, and you’ll end up with burnt edges and dry wings. Turn them every 5 minutes if you’re nervous.
Make-ahead tips for crispy smoked chicken wings
Prep Ahead for Maximum Flavor
I always start the night before by prepping the wings—this is where the magic begins. After patting the 4 lb boneless chicken wings completely dry, I season them generously with the spice blend and place them on a wire rack over a baking sheet.
The key here is refrigerating them uncovered for at least 4 hours (overnight is ideal). This dry-brine step not only enhances flavor but also ensures that crispy skin we all crave. Trust me, the extra time is worth it—it’s the foundation for that perfect texture later.
Sauce Prep in Advance
The glaze is another component that benefits from prepping ahead. Mix the ½ cup honey, ¼ cup apple cider vinegar, 1 tbsp Worcestershire sauce, ½ cup chicken broth, and 2 tbsp lemon juice in a bowl and refrigerate it overnight.
This allows the flavors to meld beautifully, so when you’re ready to cook, you just need to simmer it for 5-7 minutes. Pro tip: Store the sauce in an airtight container to keep it fresh for up to 5 days.
Wood Chips Soak
Don’t forget to soak the 1 package hickory wood chips in water for 30 minutes before you start smoking. This prevents flare-ups and ensures a steady, thin blue smoke that infuses the wings with that authentic smoky flavor.
I like to keep the soaked wood chips in a sealed container in the fridge for up to 3 days—just add more water if needed before using.
Wings: Freeze for Future Feasts
If you’re making a double batch, freeze half of the cooked wings for later. After they’ve cooled completely, store them in a freezer-safe bag or airtight container. They’ll keep perfectly for up to 3 months.
When you’re ready to enjoy them, reheat in a 400°F oven for 10 minutes to restore that crispy texture. It’s like having restaurant-quality wings at home, ready whenever you crave them.
Glaze Leftovers Get Creative
Any leftover glaze can be used in so many ways beyond just wings. Drizzle it over grilled chicken, use it as a marinade for pork chops, or even mix it into a dip for veggies.
The sweet, tangy, and smoky flavors adapt beautifully to other dishes. Just store it in the fridge for up to 5 days and reheat gently before using.
Equipment Prep
Set up your smoker or oven the night before if possible. Clean and organize your tools—meat thermometer, wire racks, baking sheets, and a saucepan—so everything is ready to go when you are.
A well-prepped workspace makes the cooking process smoother and more enjoyable. I always keep my meat thermometer and wood chips within easy reach to avoid any last-minute scrambling.
Nutrition facts
Frequently asked questions
Why does the recipe call for dry-brining the wings overnight?
Dry-brining is key for that perfect crispy skin! It helps the seasoning penetrate deeply while removing surface moisture—this creates an irresistible crust when smoked. The 4-hour minimum (overnight ideal) ensures maximum flavor and texture without drying out the meat. Skip this step, and you’ll miss that restaurant-quality crunch.
Can I use bone-in chicken wings instead of boneless?
but adjust your cooking time! Bone-in wings take 30-45 minutes longer to reach 160°F internally. They’ll be even more flavorful, but plan ahead—your smoker will need extra patience. The crispy skin technique remains the same.
What if my smoker doesn’t reach 225°F consistently?
Use indirect heat and maintain as close to 225°F as possible. If your smoker runs hotter, reduce the wood chip quantity slightly to prevent flare-ups. The 2-hour smoke is flexible—just monitor internal temp with a thermometer until you hit 160°F. Consistency matters more than exact minutes.
How do I prevent the glaze from burning during the final crisping?
Watch closely during the 10-15 minute final stage at 375°F—rotate the wings if needed. If the glaze darkens too quickly, lower the oven to 350°F and extend time slightly. The goal is golden caramelization, not burnt sugar. A wire rack helps air circulation too!
Can I make these wings ahead and reheat?
Yes! Store cooled wings in an airtight container for up to 5 days in the fridge or 3 months frozen. Reheat at 400°F for 10 minutes to restore crispness. For best results, reheat on a wire rack to prevent sogginess. The glaze reheats beautifully too—just stir before serving.

Trained in classic French technique but raised on slow-cooked ribs and spicy rubs, she blends culinary skill with smoke and soul.
- Smoked Brisket Recipe: Low and Slow to Fall-Apart Tenderness - November 2, 2026
- Smoked Turkey Breast Recipe: Juicy Pink Center With Crispy Skin Every Time - November 2, 2026
- Leftover Smoked Pulled Pork Chili Recipe: Rustic Flavor Revival in One Pot - November 2, 2026