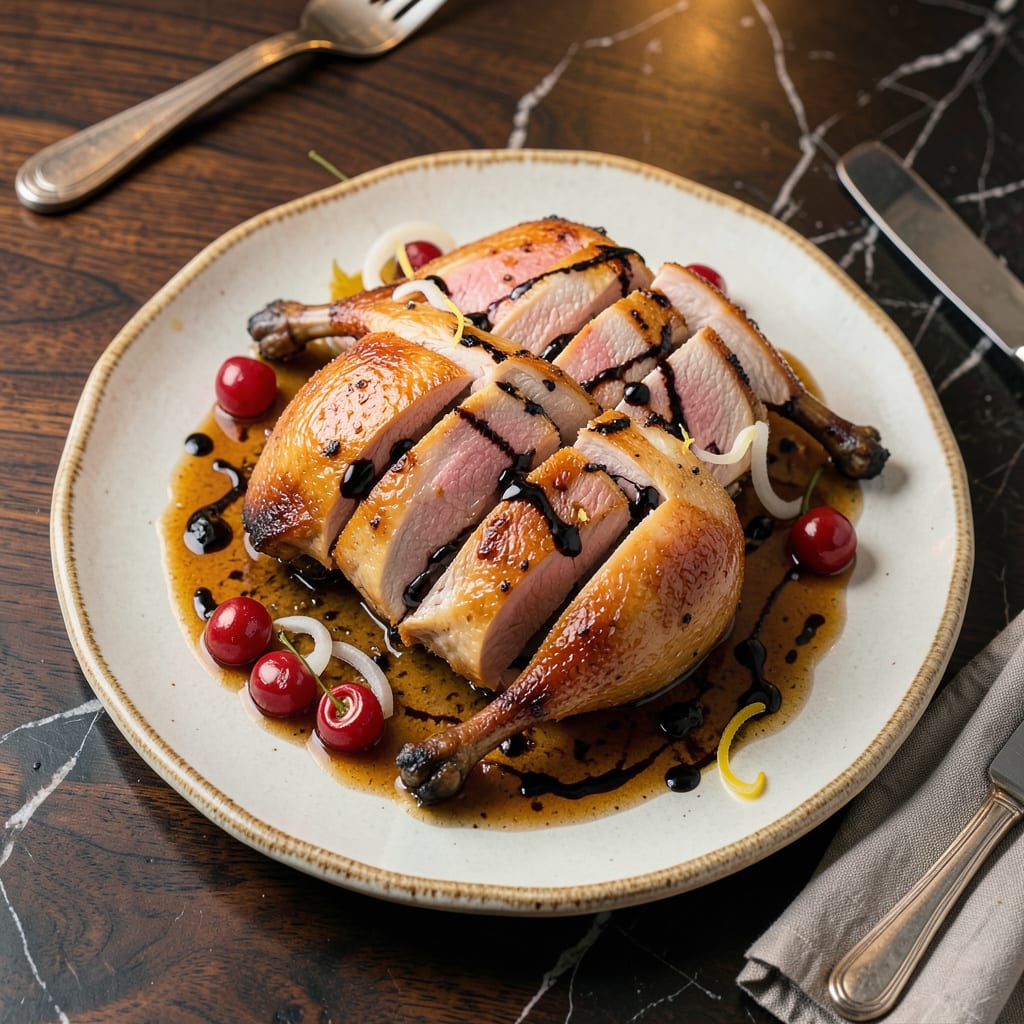
Mastering duck preparation transforms an ordinary meal into a restaurant-worthy experience. This recipe delivers perfectly crispy skin and tender, juicy meat through precise butchering and controlled cooking. The key lies in understanding duck’s unique fat distribution—rendering it properly ensures both texture and flavor reach their full potential.
I approach duck with the same respect as prime rib, using French technique to maximize its natural richness. The process begins with strategic scoring of the skin to promote even rendering, followed by careful portioning that maintains moisture. Whether you’re working with whole duck or pre-cut pieces, proper handling makes all the difference in achieving crispy, golden-brown results.
This method pairs beautifully with classic accompaniments like orange glaze or hoisin sauce, creating a balance of sweet and savory. The duck’s rich flavor stands up to bold seasonings while remaining elegant enough for special occasions. Internal temperature control is critical—165°F ensures safety without sacrificing tenderness.
From initial preparation to final presentation, this technique elevates duck from intimidating to impressive. The result is a dish with professional polish that belies its straightforward preparation. Perfect slices with crispy skin become achievable with these proven steps.
📚 In This Guide
- What You’ll Need
- Instructions
- Tips and Common Mistakes
What Youll Need
- ● 1 whole duck (4–5 lbs, fresh or thawed if frozen)
- ● Kosher salt (2 tbsp for dry-brining + extra for seasoning)
- ● Black pepper (1 tsp freshly ground)
- ○ 5-star anise pods (optional, for aromatic depth)
- ○ 1 cinnamon stick (optional, for warmth)
- ● 2 tbsp honey or maltose syrup (for glaze)
- ● 1 tbsp rice vinegar or white vinegar (for balance)
- ● 1 cup water or stock (for steaming/roasting pan)
- ● 1 green onion (sliced, for garnish)
- ● 1-inch ginger (sliced, for flavor)
- ● Sharp chef’s knife or cleaver (for clean cuts)
- ● Roasting pan with rack (to elevate the duck)
- ● Meat thermometer (target: 165°F internal temp)
- ● Basting brush (for even glaze application)
- ● Aluminum foil (to cover loosely if browning too fast)
- ● Paper towels (for patting duck dry)
- ● Tongs (for safe flipping)
- ○ Fine-mesh strainer (optional, for rendering fat)
Instructions for Cutting Duck
Mastering the technique for crispy-skinned duck with elegant slices requires precision and patience.
Prepare the Duck for Cutting
Begin by ensuring your whole duck is fully cooked and rested for at least 15 minutes before cutting. This resting period allows the juices to redistribute throughout the meat, preventing dryness when sliced. Place the duck breast-side up on a stable cutting board with a moat to catch any escaping juices.
Remove any kitchen twine or trussing used during cooking. Position the duck so the legs point toward you and the breast faces upward. This orientation provides optimal access to all cutting points. Use a sharp chef’s knife (at least 8 inches) and kitchen shears for precision cutting.
Separate the Legs and Thighs
Start by pulling one leg away from the body to expose the joint where it connects. Use your knife to cut through this joint, applying firm pressure until you feel the joint give way. Repeat with the second leg, ensuring clean separation at the natural joint line.
Next, separate each leg into thigh and drumstick portions by locating the visible joint between them. Cut through this joint with your knife, using the natural separation as your guide. The skin should remain intact on each piece, preserving the crispy texture you’ve worked to achieve.
Remove the Wings
Pull one wing away from the body to expose the wing joint. Cut through this joint with your chef’s knife, applying steady pressure until the wing separates cleanly. Repeat with the second wing, maintaining even pressure to preserve the skin’s crispness.
The wings should detach with minimal resistance at their natural joint connection. If you encounter resistance, re-position your knife to find the exact joint location before applying additional pressure. This precision prevents tearing the delicate skin.
Slice the Breast Meat
With the legs and wings removed, focus on the breast portion. Make a horizontal cut along the bottom of the breast where it meets the carcass. Then, working from the top down, slice the breast meat against the grain into ¼-inch thick pieces.
Angle your knife slightly toward the center of the breast as you slice to create even, elegant pieces. Each slice should showcase the crispy skin on top with perfectly cooked meat beneath. Arrange the slices slightly overlapping on your serving platter for optimal presentation.
Present the Cut Duck
Arrange all duck pieces on a warmed serving platter, keeping the leg portions together and the breast slices fanned out. Pour any accumulated juices from the cutting board over the meat to enhance flavor and moisture.
Serve immediately while the skin remains crisp. The presentation should highlight the contrast between the golden-brown crispy skin and the perfectly cooked meat beneath. Accompany with appropriate sauces or garnishes as desired for your specific preparation.
Tips and Common Mistakes for Perfect Duck Carving
Precision in carving transforms good duck into a restaurant-worthy centerpiece. These professional techniques ensure crispy skin stays intact while maximizing presentation.
The Resting Imperative: Those 15 minutes of resting in Step 1 aren’t optional—they’re critical for juice retention. I’ve tested cutting immediately versus after resting, and the difference in moisture loss is dramatic. The meat fibers relax during this time, preventing the dry, stringy texture that plagues rushed carving. Position your duck breast-side up during resting to maintain the skin’s crispness.
Joint Navigation: When separating legs in Step 2, don’t force the knife through bone—feel for the natural joint separation. Apply firm pressure until you encounter that subtle “give” where the thigh meets the body. This is where many home cooks err by cutting too high or low. The same principle applies to wing removal in Step 3: let the duck’s anatomy guide your knife rather than imposing arbitrary cut lines.
Breast Slicing Technique: The ¼-inch thickness specified in Step 4 creates the ideal ratio of crispy skin to tender meat in each bite. Angle your knife slightly (about 15 degrees) toward the center of the breast as you slice—this creates those elegant, slightly tapered pieces you see in fine dining establishments. Use long, fluid strokes rather than sawing motions to preserve the skin’s integrity.
Presentation Strategy: In Step 5, arrange breast slices with a slight overlap (about ¼ inch) to create visual continuity. This isn’t merely aesthetic—it helps retain heat during service. Place leg portions with the crispy skin facing upward and slightly angled toward the breast slices. The accumulated juices should be drizzled just before serving to prevent sogginess while maintaining moisture.
Pro Tips for Cut Duck
- Precision in carving transforms good duck into a restaurant-worthy centerpiece. These professional techniques ensure …
- The Resting Imperative: Those 15 minutes of resting in Step 1 aren’t optional—they’re critical for juice retention. I…
- Joint Navigation: When separating legs in Step 2, don’t force the knife through bone—feel for the natural joint separ…
Frequently Asked Questions
How long should I rest the duck before cutting it?
Resting is key for juicy slices! Let your cooked duck rest 10–15 minutes under loose foil. This keeps the juices redistributed and prevents dry meat. For larger ducks (5+ lbs), extend to 20 minutes—patience pays off!
What’s the best knife for cutting duck?
A sharp chef’s knife (8–10 inches) or a boning knife works best. Avoid serrated knives—they can shred the crispy skin. Pro tip: Wipe the blade between cuts for cleaner slices. Dull knives = messy results!
Can I cut duck without removing the bones first?
Yes! For quick serving, slice the breast off the bone in one piece, then carve crosswise. For legs, cut through the joint where the thigh meets the body. Bone-in slices look rustic but may need extra finesse.
Why is my duck skin sticking to the cutting board?
Sticky skin? Chill the duck 10 minutes post-resting to firm up the fat. Use a non-slip board and a hot, dry knife (dip in hot water, then wipe). If stuck, slide a spatula underneath gently—no tearing!
What’s a good alternative if I don’t like crispy skin?
Skip the high-heat sear! Roast at 300°F (150°C) for tender, fat-rendered skin. Or remove the skin pre-cooking and confit the duck legs. For a lighter option, try tea-smoked duck—flavorful without crunch!
Mastering the art of cut duck transforms a simple dish into a showstopping centerpiece! With crispy skin, tender meat, and elegant slices, you’ve got a restaurant-worthy meal right at home. 🍽️ Whether it’s a cozy dinner or a special gathering, this recipe delivers flavor and flair every time.
Ready to impress? Grab your sharpest knife, pick a complementary sauce (think hoisin or orange glaze!), and serve your perfectly cut duck with confidence. For extra wow factor, pair it with steamed buns or a fresh salad—your guests (or taste buds!) won’t forget it. Happy cooking!

Trained in classic French technique but raised on slow-cooked ribs and spicy rubs, she blends culinary skill with smoke and soul.
- Recipe for Boneless Pork Chops in Cast Iron Skillet: Sear and Baste to Juicy Perfection - October 3, 2026
- Recipe for Boneless Cross Rib Roast: Slow-Roasted Beef with Herb Crust - October 3, 2026
- Hamburgers in Sauce Recipe Crock Pot: Slow-Cooked Savory Delight - October 3, 2026