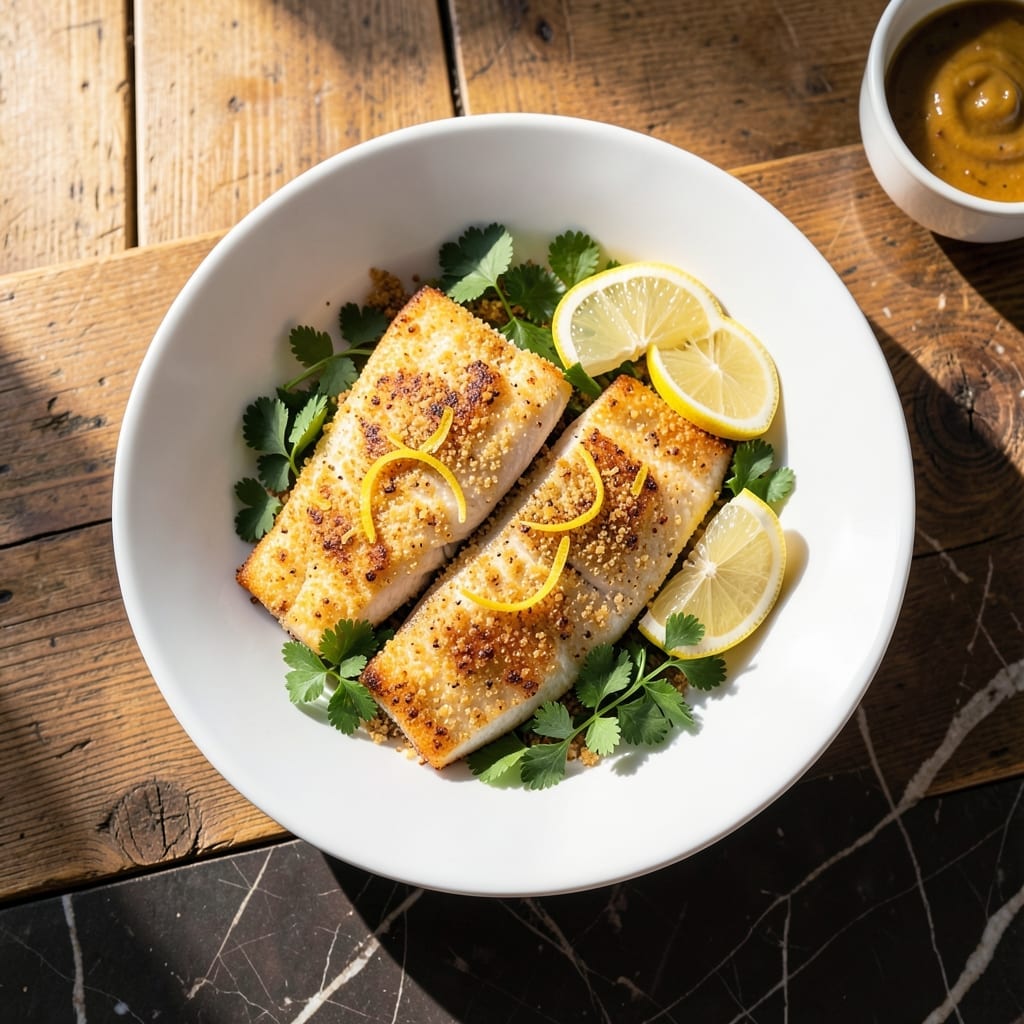
This oven-baked tilapia delivers flaky, tender fish with minimal effort. I developed this method after years of overcooking delicate white fish, and it never fails to produce perfect results.
The secret lies in a simple lemon herb crust that locks in moisture while adding bright flavor. With just 5 ingredients and 20 minutes in the oven, you’ll have a restaurant-worthy dish without the fuss.
What emerges is white fish so tender it falls apart with a fork, topped with a golden, aromatic crust. The lemon cuts through the richness, while herbs add freshness to every bite.
Serve with steamed vegetables or rice for a complete meal. This is the kind of dish that proves simple can be extraordinary.
Ingredients for Easy Recipe for Tilapia in Oven
Five ingredients plus pantry staples make this simple, elegant baked fish.
| Ingredient | Amount | Notes |
|---|---|---|
| Tilapia Fillets 🐟 | 1 ½ lb | Fresh or thawed, skinless |
| Lemon 🍋 | 1 whole | Zested and juiced |
| Fresh Parsley 🌿 | ¼ cup | Chopped, stems removed |
| Olive Oil 🫒 | 3 tbsp | Divided for fish and crust |
| Panko Breadcrumbs 🍞 | ½ cup | For crispy topping |
| Garlic Cloves 🧄 | 2 cloves | Minced finely |
| Salt 🧂 | ½ tsp | Kosher or sea salt |
| Black Pepper 🌶️ | ¼ tsp | Freshly ground preferred |
| Dried Thyme 🍃 | ½ tsp | Or fresh thyme leaves |
| Dijon Mustard 🟡 | 1 tsp | For binding crust |
[recipe_ingredient_scaler]
The tilapia is the star here, so source the freshest fillets you can find. Look for bright, moist flesh with no fishy odor. Whole Foods or Trader Joe’s usually have high-quality options. If buying frozen, thaw overnight in the fridge for best texture. The lemon should be firm and heavy—more juice, less waste.
No fresh parsley? Dried works at half the amount. Swap panko for regular breadcrumbs if needed, but panko gives that perfect crisp. Dijon can be replaced with whole-grain mustard for a milder taste. Thyme can be swapped for oregano or rosemary. The olive oil matters—use something you’d actually drizzle on bread.
This bakes in 20 minutes, so prep everything first. Leftovers? They’ll keep for 2 days in the fridge, but the crust loses some crisp. Not ideal for freezing—the texture changes too much. Best eaten fresh out of the oven.
Why You’ll Love This Recipe
- One Pan Wonder: I just toss the tilapia with olive oil, panko, and lemon on a sheet pan—no extra dishes to wash.
- Crispy Perfection: That panko crust gets golden and crunchy while the lemon keeps the fish flaky and bright.
- Weeknight Hero: Honestly, it’s my go-to when I need dinner ready before soccer practice ends.
- Budget Friendly: Tilapia fillets are affordable, and a little panko goes a long way for a satisfying meal.
Step-by-Step Instructions for Tilapia in Oven
Here’s the straightforward method for achieving perfectly flaky fish with a crispy herb crust.
Step 1: Prepare the Lemon Herb Crust
In a small bowl, combine the 0.5 cup Panko Breadcrumbs, 0.25 cup Fresh Parsley, minced 2 cloves Garlic Cloves, 0.5 tsp Dried Thyme, 0.5 tsp Salt, and 0.25 tsp Black Pepper. Stir in 1 tsp Dijon Mustard and 2 tbsp Olive Oil until the mixture resembles wet sand and holds together when pressed.
The mustard acts as a binder while adding a subtle tang that complements the fish. This ensures the crust adheres to the tilapia and creates that desirable crunch. Don’t skip pressing the mixture together—it should feel slightly tacky but not soggy.
Step 2: Season and Coat the Tilapia Fillets
Pat the 1.5 lb Tilapia Fillets completely dry with paper towels—this is crucial for achieving a good sear and preventing the crust from sliding off. Arrange the fillets on a plate and brush lightly with the remaining 1 tbsp Olive Oil. This thin layer helps the crust stick while keeping the fish moist.
Divide the crust mixture evenly among the fillets, pressing it gently onto the top of each to form a ¼-inch thick layer. The crust should cover the surface completely but not be so thick that it overpowers the delicate fish. Let the coated fillets sit for 5 minutes to allow the crust to set slightly before baking.
Step 3: Bake Until Flaky and Golden
Preheat your oven to 400°F. Place the crust-coated fillets on a parchment-lined baking sheet, leaving 1 inch between each for even air circulation. Bake on the middle rack for 12-15 minutes, or until the crust is golden brown and the fish flakes easily with a fork.
The high heat ensures the crust gets crispy while the fish cooks through quickly, preventing it from drying out. You’ll know it’s done when the thickest part of the fillet reaches an internal temperature of 145°F and the edges of the crust are just starting to darken slightly. Avoid overbaking—tilapia continues cooking slightly after it’s removed from the oven.
Step 4: Add Lemon Finish and Serve
Zest the 1 whole Lemon over the baked fillets, then squeeze half the juice evenly across all portions. The bright citrus cuts through the richness of the crust and enhances the natural sweetness of the tilapia. Save the other lemon half for serving—some diners prefer extra acidity.
Garnish with any remaining chopped Fresh Parsley for a pop of color and freshness. Serve immediately while the crust is still crisp and the fish is at its flakiest. The lemon juice should sizzle slightly when it hits the hot crust, signaling it’s time to plate.
Pro Tips For Making Easy Recipe For Tilapia In Oven
- Preheat the Oven: Set your oven to 400°F for at least 15 minutes before baking—I learned this the hard way after my first batch came out unevenly cooked.
- Pat Fillets Dry: Use a paper towel to thoroughly dry each tilapia fillet; it helps the panko stick better and prevents soggy breadcrumbs.
- Skip the Overcrowding: Leave at least an inch between fillets on the baking sheet, or they’ll steam instead of crisp up.
- Use Fresh Parsley: Dried parsley won’t give the same bright flavor—toss on the fresh stuff right after baking so it stays vibrant.
Pro Cooking Tips for This Dish
Prevent Overcooking
Tilapia cooks fast—pull it at 145°F internal temperature to avoid dryness. I use a ThermoWorks Instant Read for accuracy. The fish keeps cooking as it rests, so remove it just before it’s fully done. 🌡️
Crust Adhesion Trick
Press the crust onto fillets for 30 seconds before baking to help it cling. A light Dijon Mustard layer underneath also acts as glue while adding subtle tang.
Even Baking
Space fillets 1 inch apart on the baking sheet for proper airflow. Rotate the pan halfway through for consistent browning, especially if your oven has hot spots.
Lemon Timing
Add lemon zest before baking for infused flavor, but save the juice until after. The acid in juice can toughen the fish if added too early.
Freshness Matters
I source tilapia from New Seasons Market in Portland—they always have the freshest options. If using frozen, thaw overnight in the fridge for best texture.
Honestly, the difference between fresh and previously frozen is noticeable in the final flakiness.
Nutrition Facts
Frequently Asked Questions
What oven temperature works best?
400°F is ideal for crispy crust without drying the fish. This high heat ensures quick cooking while keeping the tilapia moist inside.
Can I use frozen fillets?
Yes, but thaw overnight in the fridge first. This prevents uneven cooking and maintains the flaky texture. Avoid microwaving to thaw as it can make the fish mushy.
How do I know when it’s done?
Check for an internal temperature of 145°F or when the fish flakes easily with a fork. The crust should be golden and the edges slightly crispy.
What can I substitute for panko?
Regular breadcrumbs work in a pinch. For extra crunch, try crushed crackers or crushed cornflakes. Use the same 0.5 cup measurement.

Trained in classic French technique but raised on slow-cooked ribs and spicy rubs, she blends culinary skill with smoke and soul.
- Recipe for Curried Lamb Chops: Spice-Rubbed and Pan-Seared to Succulence - October 3, 2026
- Recipe for Boneless Leg of Lamb Roast in the Oven: Herb-Crusted and Rosy Pink Inside - October 3, 2026
- Meat Loaf Recipe With Beef And Pork: Homestyle Blend With Rich Gravy - October 3, 2026