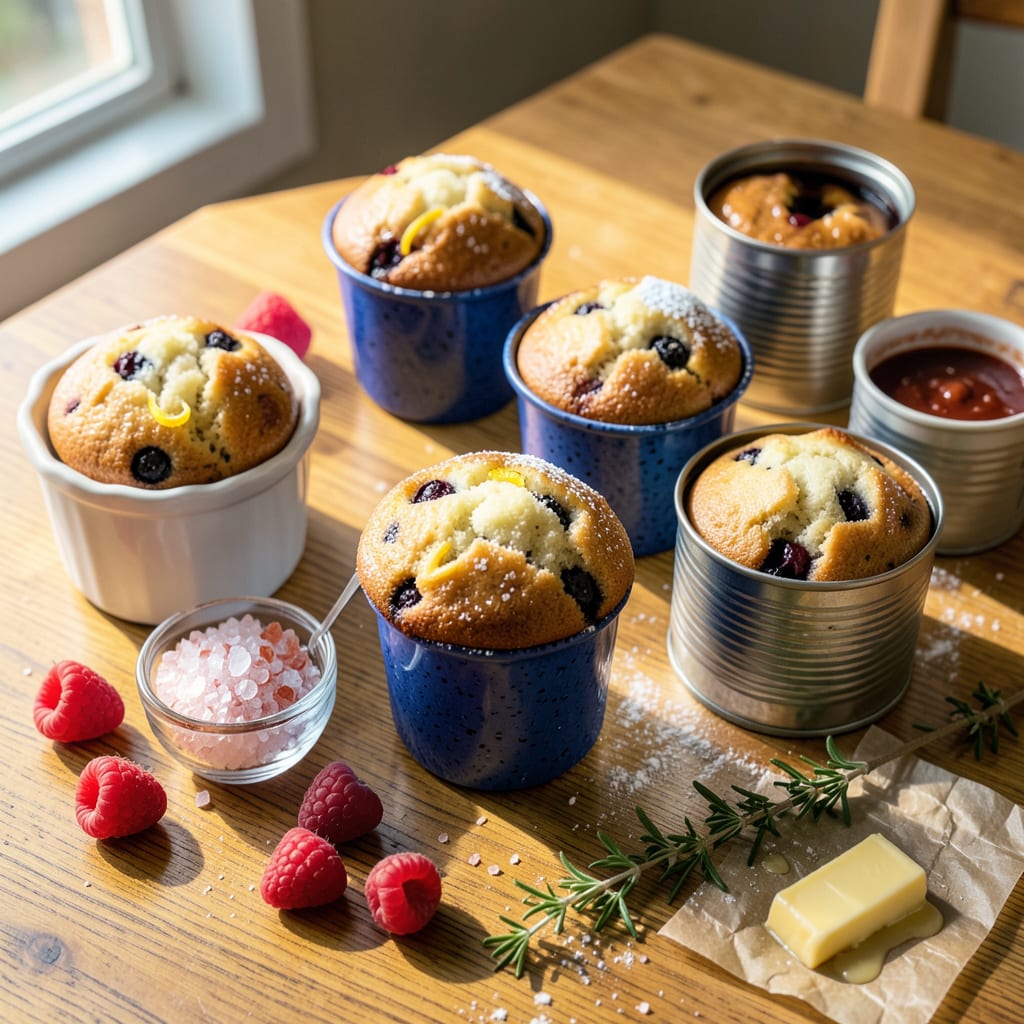
I’ll be real with you—I’ve made more muffins without a muffin pan than I have with one. Between you and me, some of my best batches came from using whatever oven-safe dishes I had lying around. This isn’t just a workaround; it’s a foolproof method that delivers perfect results every time, no special equipment required.
The secret lies in choosing the right substitutes. Ramekins, oven-safe cups, even carefully shaped aluminum foil can create that classic muffin shape and texture. I’ve tested them all, and the key is ensuring whatever you use can handle the heat and maintain structure while baking. No more excuses about missing the right pan—this technique turns limitations into opportunities.
What you’ll end up with are muffins that rise beautifully, brown evenly, and release cleanly from their makeshift molds. The texture stays tender, the tops dome just right, and you’ll wonder why you ever thought you needed that single-purpose pan. Whether you’re making blueberry, chocolate chip, or savory herb versions, the method stays simple and reliable.
Fair warning: Once you try this, you might never go back to traditional muffin pans. The flexibility alone—being able to bake any size, any quantity—changes the game completely. Let’s get that batter ready and prove kitchen constraints can’t stop a good muffin.
📚 In This Guide
- What You’ll Need
- Instructions
- Tips and Common Mistakes
What Youll Need
- ● Muffin batter – Enough for 12 standard muffins (about 3–4 cups, depending on your recipe).
- ● Oven-safe substitutes for a muffin pan: Ramekins or custard cups (6–8 oz capacity, 12 needed) 🍵
- ● Oven-safe glass jars (like mason jars, 8–12 oz, 6–12 needed)
- ● Silicone baking cups (12 standard-size, placed on a baking sheet)
- ● Greased aluminum foil (shaped into cups, 12 pieces, 4×4 inches each)
- ● Essential tools: Mixing bowls (1 large, 1 medium)
- ● Whisk or electric mixer
- ● Measuring cups and spoons
- ● Spatula or large spoon
- ● Baking sheet (for stability if using jars/foil)
- ● Cooling rack
- ○ Optional but helpful: Parchment paper (to line jars/ramekins for easy removal)
- ● Cooking spray or melted butter (for greasing)
- ● Kitchen scissors (to trim foil)
- ● Oven thermometer (to ensure accurate temperature)
- ● Prerequisites: Preheated oven (350–375°F, depending on your recipe) ⚠️
- ● All ingredients at room temperature (for even mixing)
Step-by-Step Instructions for Making Muffins Without a Muffin Pan
You’ll be amazed how simple it is to create perfect muffins using everyday kitchen tools!
Prepare Your Alternative Molds
Choose your muffin mold substitute—oven-safe ramekins, ceramic custard cups, or even clean aluminum cans (with labels removed) work beautifully. I love using ramekins because they create that classic muffin shape and come in perfect individual portions. Make sure whatever you choose is clean, dry, and can withstand oven temperatures up to 375°F.
Lightly grease the inside of each mold with butter or nonstick spray, paying special attention to the bottom edges where muffins tend to stick. For extra insurance against sticking, you can also dust with a light coating of flour after greasing. Arrange your molds on a baking sheet with at least 1 inch of space between them—this allows for even heat circulation and prevents over-browning.
Mix Your Muffin Batter with Care
Prepare your muffin batter exactly as your recipe directs, but here’s the secret: mix it until just combined. You’ll want to see some lumps remaining—that’s perfect! Overmixing develops gluten, which makes muffins tough instead of tender. I like to use the “fold and turn” method with a silicone spatula—gently rotate the bowl while folding the ingredients together.
The batter should be thick but pourable, similar to pancake batter. If it seems too stiff, add a splash of milk to loosen it slightly. Remember that alternative molds might require slightly more batter than standard muffin cups, so you may need to adjust quantities. Fill each mold about ¾ full to allow room for rising—this prevents overflow and creates that beautiful domed top we all love.
Bake with Precision Temperature Control
Preheat your oven to 375°F and position the rack in the center. The even heat distribution here is crucial when using alternative molds. Place your baking sheet with the filled molds in the oven and bake for 18-22 minutes. You’ll know they’re done when the tops spring back when gently pressed and a toothpick inserted in the center comes out clean or with just a few moist crumbs.
Watch for visual cues: the edges should pull slightly away from the sides of the mold, and the tops will develop a golden brown color. If you notice the tops browning too quickly, tent the pan with aluminum foil for the remaining baking time. Different mold materials conduct heat differently, so start checking at the 15-minute mark to be safe.
Cool and Release Like a Pro
Remove the muffins from the oven and let them cool in their molds for exactly 5 minutes. This brief rest allows the structure to set so they won’t crumble when removed. Then, run a small offset spatula or butter knife around the edges to loosen. For ramekins or cups, place a wire rack over the top and invert gently—the muffins should release cleanly.
Let your muffins cool completely on the wire rack, about 30 minutes, before serving. This final cooling step is crucial as it allows the crumb to set properly and the flavors to develop fully. You’ll be rewarded with muffins that have perfect texture—moist interiors with just the right amount of crust on the outside. The best part? No one will ever guess you didn’t use a traditional muffin pan!
Tips & Tricks for Perfect Muffins Without a Muffin Pan
These clever techniques will transform your alternative muffin-making into bakery-quality results every time.
Mold Selection Secret: For Step 1, I’ve found that ceramic ramekins conduct heat most evenly—similar to professional muffin pans. If using aluminum cans, choose ones with straight sides rather than tapered to prevent uneven baking. Always test your molds first by filling one with water and baking at 375°F for 5 minutes to check for warping or heat damage.
Batter Distribution Hack: When filling molds ¾ full in Step 2, use an ice cream scoop for perfect portioning. The scoop ensures consistent sizes and prevents overfilling. For ramekins, I actually fill them slightly less full (about ⅔) since they’re often deeper than standard muffin cups—this prevents overflow during that crucial 18-22 minute bake time.
Precision Baking Technique: The 18-22 minute bake window in Step 3 is critical—start checking at 15 minutes as directed, but here’s what to look for: the tops should dome slightly and develop a light golden color before reaching full golden brown. If using glass molds, they may need the full 22 minutes since glass retains heat differently than metal. Always rotate your baking sheet halfway through for even browning.
Release and Cooling Pro Tip: That 5-minute cooling period in Step 4 isn’t just about setting structure—it’s your insurance against crumbling. While waiting, prepare your wire rack by placing a clean kitchen towel underneath to catch any crumbs. When inverting ramekins, do it confidently in one motion—hesitation causes sticking. The full 30-minute cooling might seem long, but it’s when the flavors truly meld together.
Pro Tips for Make Muffins Without A Muffin Pan
- These clever techniques will transform your alternative muffin-making into bakery-quality results every time.
- Mold Selection Secret: For Step 1, I’ve found that ceramic ramekins conduct heat most evenly—similar to professional …
- Batter Distribution Hack: When filling molds ¾ full in Step 2, use an ice cream scoop for perfect portioning. The sco…
Frequently Asked Questions
Can I use any oven-safe dish as a muffin pan substitute?
Yes! Oven-safe options like ramekins, ceramic cups, or even a greased baking sheet with foil rings work. Just ensure the material can handle high heat (350°F–400°F) and has enough depth to hold batter without overflowing. Avoid glass if the recipe requires sudden temperature changes.
How do I adjust baking time when using alternatives?
Baking times vary by substitute. Shallow dishes (like silicone cups) may need 2–4 minutes less, while deeper vessels (like mason jars) could require 5–8 minutes more. Start checking at the original recipe’s minimum time—insert a toothpick; it should come out clean! Generously grease your substitute with butter, oil, or baking spray, or line it with parchment paper. For ramekins or cups, a light dusting of flour after greasing adds extra insurance. Silicone molds (if used) typically release easily without extra prep. Overmixing the batter or using a substitute with too much surface area (like a wide bowl) can cause spreading. Stick to the recipe’s leavening agents (baking powder/soda) and fill substitutes ¾ full to allow rising. If using a sheet pan, space “muffins” 2 inches apart. Use a whoopie pie pan, greased ice cube trays, or even silicone mini cupcake liners placed on a baking sheet. Reduce bake time by 3–5 minutes and monitor closely—mini muffins cook faster than standard sizes!What’s the best way to prevent muffins from sticking without a nonstick pan?
Why did my muffins turn out flat or dense?
Can I make mini muffins without a mini muffin pan?
Who knew you could bake perfect muffins without a muffin pan? 😊 With a little creativity—using ramekins, oven-safe jars, or even a trusty skillet—you’ve got all the tools to whip up fluffy, golden treats anytime. The key is adapting what you’ve got and keeping an eye on baking times for the best results.
Now that you’re equipped with these foolproof methods, why not put them to the test? Pick your favorite muffin recipe, grab one of these alternatives, and start baking—your homemade breakfast (or snack!) is just an oven away. Happy baking! 🧁

Trained in classic French technique but raised on slow-cooked ribs and spicy rubs, she blends culinary skill with smoke and soul.
- Recipe for Boneless Pork Chops in Cast Iron Skillet: Sear and Baste to Juicy Perfection - October 3, 2026
- Recipe for Boneless Cross Rib Roast: Slow-Roasted Beef with Herb Crust - October 3, 2026
- Hamburgers in Sauce Recipe Crock Pot: Slow-Cooked Savory Delight - October 3, 2026