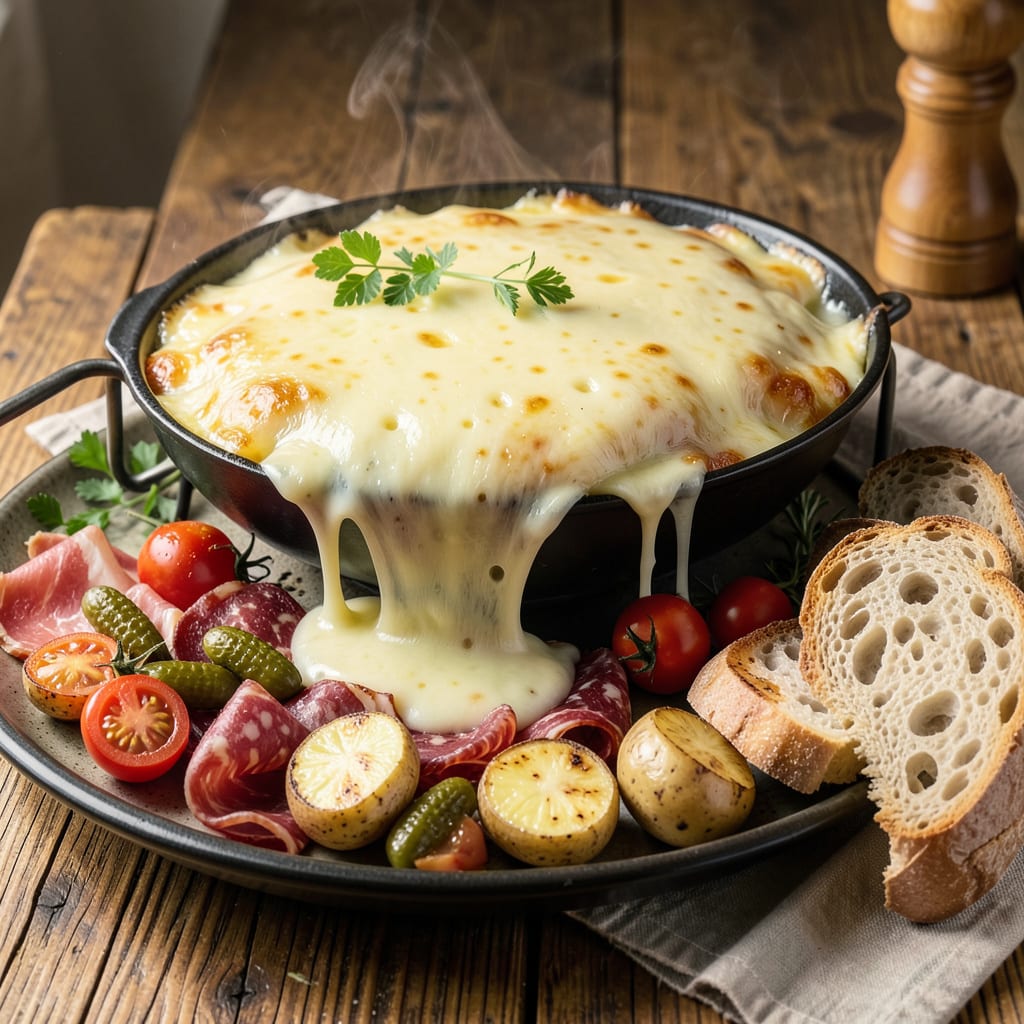
I’ll be real with you: melting raclette cheese properly is the difference between a gooey, dreamy experience and a stringy, overheated mess. After years of experimenting (and a few disappointing cheese puddles), I’ve cracked the code for that perfectly creamy melt every single time.
Here’s the thing—raclette isn’t just about melting cheese, it’s about transforming it into something magical. Whether you’re using a traditional raclette grill or your oven’s broiler, the key is low, even heat and watching for that golden moment when the surface bubbles but doesn’t brown. I’ve found that 325°F for 3-5 minutes gives you that ideal texture: fluid enough to pour but thick enough to cling to potatoes or bread.
What you’re aiming for is that unmistakable raclette experience—cheese so velvety it cascades over boiled potatoes, pickles, and cured meats (or roasted veggies if you’re keeping it vegetarian). The first time I nailed this, my dinner guests actually gasped when I scraped that perfectly melted cheese onto their plates. That’s when you know you’ve done it right.
Fair warning: cheese quality matters. Skip the pre-shredded stuff and go for a real raclette wheel or high-quality Swiss cheese. The difference in melt and flavor is night and day. Now, let’s get that cheese melting like a pro.
📚 In This Guide
- What You’ll Need
- Instructions
- Tips and Common Mistakes
What Youll Need
- ● Raclette cheese – ½ lb (8 oz) per person (pre-sliced or a whole wheel for traditional melting)
- ● Raclette grill/machine – Electric tabletop model (with non-stick pans for easy melting)
- ● Small heatproof spatula – For scraping melted cheese (silicone or wooden)
- ● Boiled potatoes – 1 lb (16 oz) small waxy potatoes (like Yukon Gold, boiled & halved)
- ○ Accompaniments (optional but recommended!): Cured meats (prosciutto, salami – 2 oz per person)
- ● Pickles & cornichons (½ cup total)
- ● Fresh baguette (1 loaf, sliced)
- ● Steamed veggies (broccoli, mushrooms – 1 cup per person)
- ● Parchment paper or aluminum foil – To line trays for easy cleanup
- ○ White wine (optional) – ¼ cup to deglaze the grill for extra flavor
- ● Cheese knife – If slicing from a wheel
Step-by-Step Instructions for Melting Raclette Cheese
Here’s the foolproof method I use to achieve that perfect, velvety melt every time.
Prepare Your Cheese and Equipment
Start by cutting your raclette cheese into thin slices or small chunks. I find that ¼-inch thick slices work best—they melt evenly without burning. If you’re using a traditional raclette grill, make sure it’s clean and properly assembled before you begin.
For electric raclette makers, plug it in and let it preheat for 10-15 minutes until the indicator light shows it’s ready. If you’re using a broiler or oven method, position your oven rack about 6 inches from the heat source and preheat to broil. This setup gives you that perfect balance of quick melting without scorching.
Choose Your Melting Method
For the classic raclette experience, place the cheese slices in the small pans (coupelles) that come with your raclette machine. Fill each pan about two-thirds full—this prevents overflow while still giving you that generous melted portion. If using a broiler, arrange the cheese slices on a parchment-lined baking sheet.
Here’s the thing—I always melt a test piece first. This lets me gauge exactly how long it will take with my specific equipment. Raclette melts quickly, so you’re typically looking at 2-4 minutes depending on your heat source. Watch for the edges to start bubbling and the surface to become glossy—that’s your visual cue it’s nearly ready.
Melt to Creamy Perfection
Place your cheese under the heat source and watch it closely. For raclette grills, this means sliding the pans under the heating element. With broilers, keep the oven door slightly ajar so you can monitor progress. You’ll see the cheese first soften, then begin to bubble gently around the edges.
The moment you notice the surface turning golden brown in spots and the cheese has completely liquefied (it should look like a smooth, creamy pool), it’s done. This usually happens at about the 3-minute mark for most equipment. Don’t walk away—raclette can go from perfectly melted to burnt in less than a minute.
Scrape and Serve Immediately
Using a small spatula or the traditional raclette scraper, carefully transfer the melted cheese to your serving plate. I like to tilt the pan slightly to get every last bit of that creamy goodness. The cheese should be smooth and velvety, with just a hint of browning on top.
Serve immediately while it’s still hot and fluid. Raclette hardens quickly as it cools, so timing is everything. I always have my boiled potatoes, cured meats, and pickles ready on the table before I start melting. That way, everyone can enjoy the cheese at its creamy best.
Repeat for Perfect Results Every Time
Continue melting cheese in batches, keeping an eye on each one. I’ve found that subsequent batches often melt slightly faster since the equipment is fully heated. Adjust your timing accordingly—sometimes reducing to 2 minutes for later batches.
Between batches, I like to wipe the pans with a dry paper towel to remove any browned bits. This prevents burning and ensures each serving is as perfect as the first. Remember, the key to that ideal raclette texture is gentle, even heat and careful monitoring—never rush the process.
Tips and Common Mistakes for Perfectly Creamy Raclette
After years of perfecting this technique, I’ve learned that small details make all the difference between good and extraordinary melted raclette.
Cheese Preparation Tip: When cutting your cheese into ¼-inch slices in Step 1, use a sharp knife and cut against the coldest part of the cheese wheel. I learned this the hard way after struggling with uneven melting – the colder the cheese when sliced, the cleaner the cut and more consistent the melt. Let it sit at room temperature for just 10 minutes before slicing to prevent crumbling.
Equipment Insight: That 10-15 minute preheat time in Step 1 isn’t arbitrary. I’ve found that electric raclette makers need the full 15 minutes to reach optimal temperature, while traditional grills often heat faster. Test your equipment by placing your hand 6 inches above the heating element – if you can only hold it there for 3 seconds, it’s ready. This simple test prevents underheating that leads to uneven melting.
Melting Technique: In Step 3, when you see that golden brown color developing at about the 3-minute mark, resist the urge to pull it immediately. Let it develop for another 10-15 seconds – this creates that perfect balance between creamy interior and slightly caramelized top that makes raclette so special. The difference between good and exceptional is often just those few extra seconds of patience.
Batch Management: For Step 5, here’s what nobody tells you – the pans retain heat between batches. I always let them cool for 30 seconds between uses, which prevents the cheese from cooking too quickly on the bottom while the top remains unmelted. This small pause ensures each serving melts as beautifully as the first, without that frustrating burnt bottom layer.
Pro Tips for Melt Raclette Cheese
- After years of perfecting this technique, I’ve learned that small details make all the difference between good and ex…
- Cheese Preparation Tip: When cutting your cheese into ¼-inch slices in Step 1, use a sharp knife and cut against the …
- Equipment Insight: That 10-15 minute preheat time in Step 1 isn’t arbitrary. I’ve found that electric raclette makers…
Frequently Asked Questions
Can I melt raclette cheese in the microwave?
Yes, but it’s not ideal! Microwaving can make raclette cheese rubbery or unevenly melted. For best results, use low power (30-50%) in 15-second bursts, stirring in between. A raclette grill or stovetop method yields creamier, smoother results. Save the microwave for quick fixes only!
How long does it take to melt raclette cheese under a raclette grill?
Typically 3–5 minutes per slice, depending on thickness and grill heat. The cheese is ready when it’s bubbly, golden, and easily scraped off with a raclette knife. Avoid over-melting—it can turn oily or burn. Patience pays off with that perfect gooey texture!
What’s the best raclette cheese substitute if I can’t find the original?
Try Gruyère, Emmental, or Fontina for similar meltability and flavor. Avoid pre-shredded cheese (it contains anti-caking agents that ruin the texture). For a budget pick, young Gouda works well—just expect a milder taste.
Why is my melted raclette cheese grainy or stringy?
Graininess often means the cheese was heated too fast or at too high a temperature. Stringiness can happen if the cheese isn’t fully melted or is overworked. Fix it by gently reheating with a splash of white wine or cream to restore creaminess. Low and slow is the golden rule!
Can I reheat melted raclette cheese?
Yes, but it’s tricky! Reheating can make it greasy or clumpy. Store leftovers in an airtight container and reheat gently in a double boiler or raclette grill (not the microwave). Add a splash of milk or wine to revive the texture. Best enjoyed fresh, though!
Now you’re ready to melt raclette cheese like a pro—whether under a traditional raclette grill, in the oven, or even on the stovetop! 🧀✨ The key is low heat, patience, and the right tools to keep that creamy texture smooth and dreamy. Don’t be afraid to experiment with toppings or pairings to make it your own.
Ready to host your first raclette night? Gather your favorite charcuterie, veggies, and bread, then let the melty magic begin! For more cheesy inspiration, check out our guide on perfect raclette pairings next. Happy melting! 🎉

Trained in classic French technique but raised on slow-cooked ribs and spicy rubs, she blends culinary skill with smoke and soul.
- Recipe for Boneless Pork Chops in Cast Iron Skillet: Sear and Baste to Juicy Perfection - October 3, 2026
- Recipe for Boneless Cross Rib Roast: Slow-Roasted Beef with Herb Crust - October 3, 2026
- Hamburgers in Sauce Recipe Crock Pot: Slow-Cooked Savory Delight - October 3, 2026