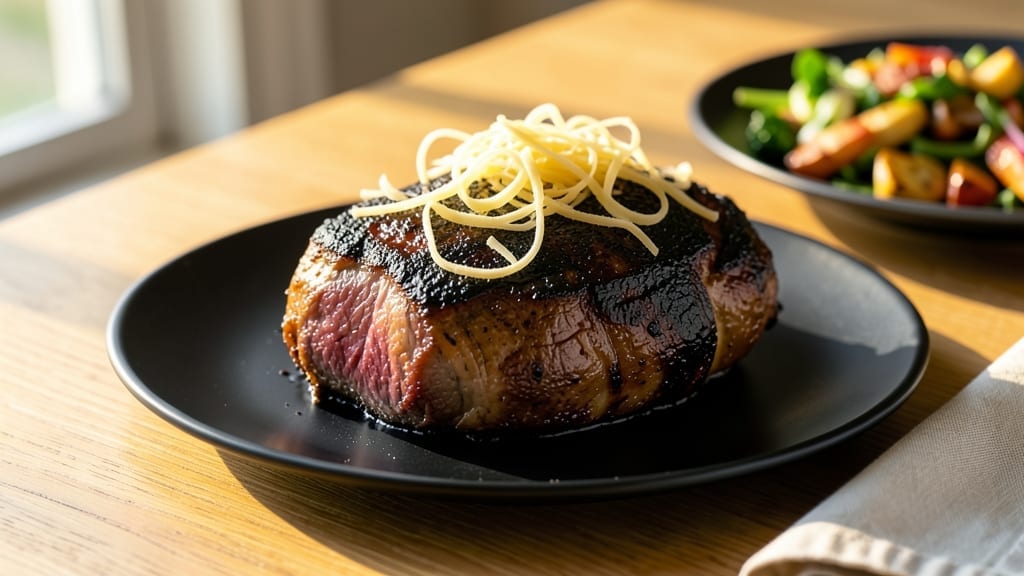
This smoked beef roast recipe transforms tough cuts into melt-in-your-mouth perfection through the magic of low-and-slow smoking. 🔥 The key lies in precise temperature control, patient timing, and a well-balanced rub that creates that signature smoky crust while keeping the interior tender and juicy.
I first mastered this technique during a family cookout when my uncle let me take over the smoker for hours—what started as a learning experience became my signature dish.
The process begins with selecting the right cut—a chuck roast or bottom round works best—and applying a dry rub of coarse salt, black pepper, garlic powder, and smoked paprika.
The meat then spends hours in the smoker at 225°F, where the wood smoke infuses every bite without overpowering the natural beef flavor. This method ensures the connective tissue breaks down slowly, resulting in fork-tender meat that practically falls apart.
By the time you reach the perfect internal temperature of 145°F, your kitchen will be filled with an intoxicating aroma that announces dinner is ready. The exterior develops a beautiful bark from the rub and smoke, while the interior remains moist and rich.
Resting the roast for 15-20 minutes before slicing against the grain ensures each bite delivers maximum tenderness and flavor.
Serve with classic sides like roasted garlic mashed potatoes or a tangy horseradish cream sauce for a complete meal that feels restaurant-quality.
The beauty of this recipe is its versatility—whether you’re hosting a holiday gathering or treating yourself to a special weeknight dinner, this smoked beef roast delivers consistent, impressive results every time.
Ingredients for smoked beef roast
Big flavors start with these simple ingredients. Juicy roast perfection awaits your smoker.
| Ingredient | Amount | Notes |
|---|---|---|
| Chuck Roast 🥩 | 4 lb | With visible fat marbling |
| Coarse Kosher Salt 🧂 | 2 tbsp | Diamond Crystal preferred |
| Black Pepper 🌶️ | 1 ½ tbsp | Freshly ground preferred |
| Garlic Powder 🧄 | 2 tbsp | Not garlic salt |
| Smoked Paprika 🌶️ | 1 ½ tbsp | Sweet or hot variety |
| Dried Thyme 🌿 | 1 tbsp | Mexican oregano if available |
| Brown Sugar 🍚 | 1 tbsp | Lightly sweetens bark |
| Apple Cider Vinegar 🍎 | 1 tbsp | For tenderizing |
| Honey 🍯 | 1 tbsp | For glaze finish |
| Wood Chips 🪵 | 1 package | Hickory or oak preferred |
| Smoker Pellets 🔥 | 2 lb | Hickory flavor preferred |
| Beef Broth 🥘 | 1 cup | For basting |
[recipe_ingredient_scaler]
The beef is everything here. Chuck roast with fat marbling gives you that melt-in-your-mouth texture—bottom round works too if that’s what’s on sale. I always buy mine from Costco when I’m prepping for a crowd, but the local butcher’s selection is great too. Look for bright red color and visible marbling—that’s your sign of quality. The fat renders during smoking, keeping the meat juicy. If you’re short on time, pre-cut cubes from the deli save hours of slicing.
No wood chips? Pellets do the job—just adjust your smoker’s air intake for that smoky flavor. Short on time to make the rub? Mix all spices first to save steps. Want more bark? Add 1 tbsp cayenne pepper to the rub. The beef broth for basting can be low-sodium—just add salt to taste. And if you’re worried about the vinegar’s acidity, use apple cider vinegar—it’s milder and adds a subtle sweetness.
This roast keeps beautifully for 4-5 days in the fridge—honestly tastes better the second day. For longer storage, freeze for 3-4 months in airtight containers. I portion mine into 1 lb slices before freezing so I can grab what I need. The wood chips? Store in a cool, dry place—sealed bag with a moisture absorber keeps them fresh for months. And don’t skip the resting time—15-20 minutes is non-negotiable for that perfect slice.
Why You’ll Love This Recipe
- No-Fuss Smoking: I love that this roast practically cooks itself once it hits the smoker. Just slap on that dry rub with salt, pepper, garlic powder, and smoked paprika—then let it sit while you prep the smoker. The apple cider vinegar trick? Game-changer for tenderness without extra effort.
- Chew-Worthy Bark: That crispy edge from the smoked paprika and brown sugar glaze? Chef’s kiss. The honey-sweetened finish keeps it from tasting like a salty slab—it’s smoky, slightly sweet, and so satisfying. My kids don’t even notice they’re eating chuck roast.
- Leftovers That Shine: Honestly, the second day is when this roast hits its stride. Slice it for tacos, sandwiches, or just reheated with mashed potatoes—it’s that good. And if you freeze half, it’ll still taste like it came straight off the smoker.
- Budget Beef Boost: Chuck roast is one of the most affordable cuts, but this recipe turns it into something special. The wood chips and spices elevate it without breaking the bank—plus, the extra meat from trimming fat? Perfect for wraps or gravy.
Step-by-step instructions for smoked beef roast
Here’s how to transform a tough cut into melt-in-your-mouth perfection with smoky depth.
🔥 Step 1: Prep the Roast with the Dry Rub
Start by patting the 4 lb chuck roast completely dry with paper towels—this helps the rub stick and creates that coveted bark. In a small bowl, combine 2 tbsp coarse kosher salt, 1½ tbsp black pepper, 2 tbsp garlic powder, 1½ tbsp smoked paprika, and 1 tbsp dried thyme. Mix well until evenly distributed.
Generously coat the roast with the dry rub, pressing it into every crevice so it adheres well. For extra tenderness, brush the roast with 1 tbsp apple cider vinegar—this helps break down tough fibers. Let it sit at room temperature for 1 hour before smoking, which ensures even cooking and maximum flavor penetration.
🔥 Step 2: Set Up the Smoker for Low and Slow
Fill your smoker with 1 package wood chips (hickory or oak preferred) and add 2 lb smoker pellets for consistent heat. Preheat the smoker to 225°F—this low temperature is key for tenderizing the beef without drying it out. Place a water pan inside to maintain moisture and prevent the bark from becoming too tough.
Once the smoker reaches temperature and you see clean, thin blue smoke (not thick white smoke), place the roast fat-side up on the smoker grate. The fat will render slowly, basting the meat and creating flavorful drippings. Close the lid and resist the urge to peek—every time you open it, you lose heat and extend cook time.
⏰ Step 3: Smoke Until Probe-Tender
Smoke the roast undisturbed for 6-8 hours, or until the internal temperature reaches 195-200°F (use a meat thermometer inserted into the thickest part of the roast). This is where the magic happens—the low heat breaks down collagen in the meat, turning it into gelatin that keeps the roast incredibly juicy.
About 1 hour before the roast is done, mix 1 tbsp brown sugar and 1 tbsp honey with ½ cup beef broth in a small bowl. Brush this glaze over the roast every 30 minutes for the last hour of cooking. This creates a beautiful caramelized crust while keeping the meat moist. The glaze should bubble slightly when applied—this signals it’s working.
🥘 Step 4: Rest and Slice for Maximum Juiciness
Once the roast reaches 200°F and a probe slides in like butter, remove it from the smoker and transfer it to a cutting board. Tent loosely with foil and let it rest for 30-45 minutes. This resting period allows the juices to redistribute throughout the meat, ensuring every slice is succulent and flavorful.
Slice the roast against the grain into ½-inch thick pieces. Serve immediately with the remaining ½ cup beef broth reduced by half in a small saucepan (simmer until slightly thickened) for a quick pan sauce. The result? A perfectly smoked, juicy, and smoky roast that’s sure to impress.
Pro Tips For Making Smoked Beef Roast
- Use Diamond Crystal Salt: The recipe calls for 2 tbsp of Diamond Crystal kosher salt—not table salt, not Morton’s. It’s coarser and dissolves slower, which means better flavor distribution and that perfect crust. I’ve learned this the hard way—regular salt won’t give you the same depth.
- Wait for Thin Blue Smoke: Don’t rush into smoking when the smoker is just puffing white smoke—that’s steam, not flavor. Wait until you see clean, thin blue smoke from the wood chips (hickory or oak) and pellets. Thick white smoke means it’s still burning off moisture, and that’s when your roast gets a bitter, off taste.
- Press Rub Into Fat Caps: The chuck roast has fat marbling, and that’s where flavor hides. Don’t just sprinkle the rub—press it into the fat caps and crevices. The fat renders during smoking, and if the rub isn’t stuck there, you’ll lose half the smoky, garlicky punch.
- Glaze When It Bubbles: That brown sugar and honey glaze isn’t just for looks—it needs to bubble when you brush it on. If it’s not sizzling a little, the roast won’t get that caramelized bark. Brush it on 30 minutes apart, and don’t skimp on the beef broth in the mix; it keeps the glaze from drying out too fast.
Make-ahead tips for this dish
Prep Ahead for Stress-Free Smoking
I always prep my roast the night before to save time on the big day. After applying the dry rub and vinegar, wrap the roast tightly in plastic wrap and refrigerate uncovered on a tray. This lets the flavors penetrate while keeping it cold—no need to rush the morning of.
The 1-hour room temp rest can happen right before smoking, so you’re ready to fire up the smoker without last-minute chaos. 🔥
Make the Glaze in Advance
Mix your 1 tbsp brown sugar, 1 tbsp honey, and ½ cup beef broth the night before and store it in an airtight container. This saves you from scrambling during the final hour of cooking.
Just reheat it gently in the microwave before applying—it’ll be ready to brush on without any extra fuss. I keep mine in a small mason jar for easy access.
Pre-Soak Wood Chips
If you’re using wood chips, soak them in water for 30 minutes the night before and store them in a sealed bag in the fridge. This prevents them from burning too quickly when you add them to the smoker.
I always have a few bags ready in my freezer for quick access—just thaw overnight in the fridge. Pro tip: Label your bags with the wood type and date!
Portion Sides in Advance
Roast some garlic mashed potatoes or smoked sweet potatoes ahead and reheat them in the oven while the roast finishes. I make double the potatoes and freeze half for another meal.
Even simple sides like green beans sautéed with garlic taste better when prepped in advance—they just need a quick warm-up. Pack them in separate containers to avoid sogginess.
Set Up Your Smoker Early
If your smoker takes time to heat up, plug it in and set it to 225°F the night before. Most modern smokers maintain temperature overnight, so you’ll just need to add fresh wood chips and pellets in the morning.
This way, you’re ready to load the roast as soon as it’s room temperature. I’ve even done this on my Traeger Pro Series—it’s a game-changer for busy weekends.
Prep Serving Stations
Set out your serving dishes, utensils, and even the pan sauce ingredients before the roast is done. I like to have a small saucepan with the remaining ½ cup beef broth ready to reduce while the roast rests.
This way, you can focus on slicing and plating without scrambling. A quick sprinkle of fresh rosemary or parsley over the slices adds a fresh touch right at the table. 💫
Nutrition facts
Frequently asked questions
Why does my smoked beef roast need to rest after cooking?
Resting is critical because it lets the juices redistribute evenly throughout the meat. After smoking at 225°F for hours, the internal juices push toward the center. When you slice immediately, they spill out, leaving dry slices. A 30-45 minute rest ensures every bite is juicy and flavorful. Think of it like letting a cake cool—patience pays off!
Can I use a different wood type than hickory or oak?
Hickory and oak are classic choices, but fruitwoods like cherry or apple add sweetness, while mesquite delivers bold, earthy notes. Just avoid overly strong woods like hickory for sensitive palates—start with 1 package wood chips and adjust based on your preference. The key is to match the wood to your flavor goals.
What if my smoker runs out of pellets halfway through cooking?
Don’t panic! If you’re using 2 lb smoker pellets, add another package when the level drops below half. Most smokers maintain temperature for 1-2 hours without pellets, so just top it off and keep smoking. If you’re using wood chips, replace them with fresh, soaked chips to maintain that thin blue smoke. Consistency is key!
How do I know when the roast is done without overcooking?
Use a meat thermometer to check the thickest part of the roast—it’s done at 195-200°F. The probe should slide in like butter, not fight you. Overcooking happens when the internal temp exceeds 200°F, drying out the meat. Trust the thermometer over guesswork—it’s the only way to guarantee perfect doneness every time!
Can I make the dry rub ahead of time?
Yes! Mix all the spices—2 tbsp kosher salt, 1.5 tbsp black pepper, and the rest—up to 1 week ahead. Store in an airtight container, and it’ll keep its potency. Just shake it well before applying to the roast. This saves time on the day of cooking and ensures even distribution. Pro tip: Label your containers with the date!

Trained in classic French technique but raised on slow-cooked ribs and spicy rubs, she blends culinary skill with smoke and soul.
- Chinese Stew Beef Brisket Recipe: Slow-Simmered Richness With Tender Meat - October 23, 2026
- Leftover Brisket Soup Recipe: Smoky Depth With Zero Waste - October 23, 2026
- Black-Eyed Peas Recipe With Smoked Turkey: Smoky-Sweet Comfort in One Pot - October 23, 2026