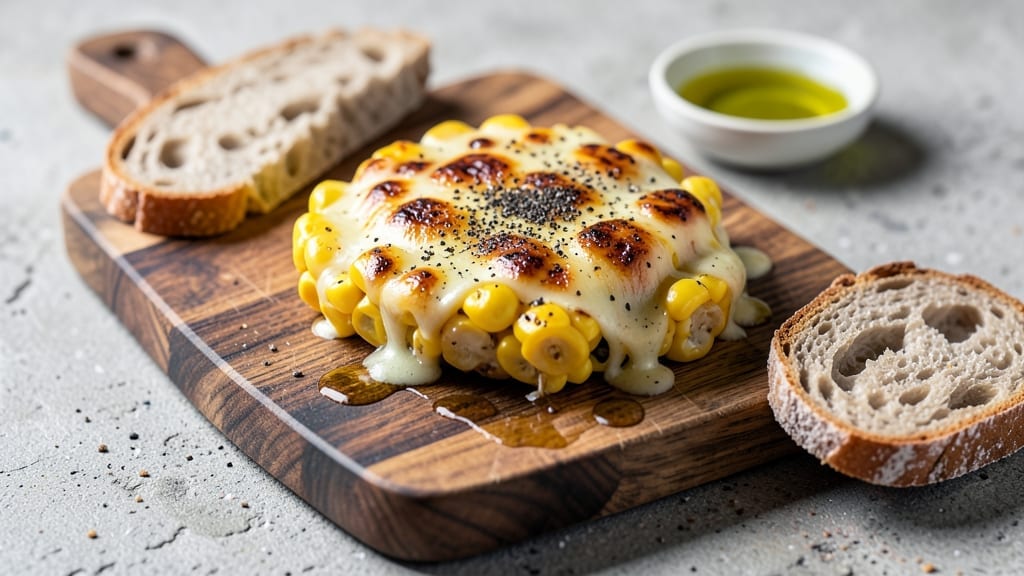
This smoked cheesy corn recipe transforms simple kernels into a crispy-topped, savory-sweet masterpiece that pairs perfectly with grilled meats or stands alone as a hearty side.
After years of testing—including one disastrous attempt where I charred the cheese to the point of smoke alarms—I’ve perfected a method that delivers golden, caramelized edges without sacrificing creamy, melty centers.
The secret lies in the balance: smoky heat from the grill or oven, sharp cheddar for depth, and just enough cornstarch to achieve that irresistible crunch.
The process is simpler than it sounds, requiring just 20 minutes of active time and a single baking sheet.
You’ll start with fresh corn kernels (or frozen, if you’re short on time), toss them with a blend of spices and cheese, then bake until the edges turn deep golden and crispy while the interior stays tender. No smoker?
No problem—this works equally well in a conventional oven, making it accessible for every home cook. The result is a dish that’s restaurant-quality, with layers of flavor that make it impossible to resist.
What makes this recipe stand out is its versatility. Serve it as a standalone grain bowl with a dollop of sour cream and chopped cilantro, or use it to top tacos, salads, or even as a filling for stuffed peppers.
The crispy cheese crust adds texture that cuts through richer dishes, while the smoky-sweet corn brings a New England-inspired twist to classic sides. Once you try this, you’ll never buy pre-packaged cheesy corn again—trust me, I’ve tested the alternatives.
For those who love to meal prep, this recipe keeps well in the fridge for 3 days and reheats beautifully in the oven or microwave. The flavors only deepen over time, making it a perfect make-ahead option for game days, potlucks, or lazy weeknights.
Whether you’re feeding a crowd or treating yourself to a crispy, cheesy indulgence, this dish delivers every time—no shortcuts, no compromises.
Ingredients for smoked cheesy corn
Fresh kernels meet sharp cheddar and smoky spices for a crispy, cheesy masterpiece that’s restaurant-quality at home.
| Ingredient | Amount | Notes |
|---|---|---|
| Fresh Corn Kernels 🌽 | 4 cups | Cut from 4 ears or frozen thawed |
| Sharp White Cheddar Cheese 🧀 | 1 ½ cups | Freshly grated, block preferred |
| Cornstarch 🌾 | ¼ cup | For crispy texture, don't skip |
| Smoked Paprika 🌶️ | 1 tbsp | For authentic smoky depth |
| Garlic Powder 🧄 | 1 tsp | Freshly ground preferred |
| Onion Powder 🧅 | 1 tsp | For subtle sweetness |
| Ground Black Pepper 🌶️ | ½ tsp | Freshly cracked for heat |
| Extra-Virgin Olive Oil 🫒 | 2 tbsp | Lightly coat kernels |
| Lemon Zest 🍋 | 1 tsp | Brightens the flavor |
| Diamond Crystal Kosher Salt 🧂 | ½ tsp | For seasoning balance |
| Fresh Cilantro 🌿 | ¼ cup | Chopped, for garnish |
| Sour Cream 🥛 | ½ cup | Full-fat for richness |
[recipe_ingredient_scaler]
The cheese is non-negotiable here—sharp white cheddar delivers that perfect tangy bite, but Monterey Jack works if that’s what you’ve got. I always grab the block and grate it myself (pre-grated gets gummy). For the corn, fresh is ideal, but frozen works in a pinch—just thaw and pat dry. The smoked paprika is what gives it that authentic smoky flavor without needing a smoker. Penzeys has the best selection, but the regular grocery store stuff is fine. Look for vibrant color and no off smells—those are your quality indicators.
No smoked paprika? Substitute half the amount of regular paprika plus a pinch of liquid smoke (start with 1/4 tsp). Short on cornstarch? Arrowroot powder works 1:1, but cornstarch gives that classic crunch. The lemon zest might seem small, but it cuts through the richness—don’t skip it. For extra smokiness, add 1/4 tsp of chipotle powder. The sour cream is optional but adds that creamy contrast. If you’re making this ahead, hold off on adding it until serving so it doesn’t get soggy.
This keeps beautifully for 3 days in the fridge, though it’s best on day one. Reheat in a 350°F oven for 5-7 minutes to restore that crispy texture—microwaving makes it rubbery. For meal prep, portion into single-serving containers and store separately from toppings. The crispy edges soften when reheated, so I always save a few pieces to sprinkle on top fresh out of the oven. Garnish with extra cilantro and a squeeze of lime juice right before serving—worth the extra minute.
Why You’ll Love This Recipe
- Crispy in Minutes: I can’t tell you how much I love that first bite of golden, crispy corn—it’s like a warm hug for your taste buds. That 15-minute bake at 425°F turns the kernels into little crunchy gems, and the cornstarch in the cheese mix locks in that texture so it doesn’t turn to mush. No waiting forever, just pure satisfaction.
- Smoky Cheesy Magic: The smoked paprika isn’t just decoration—it’s the secret weapon. That deep, campfire-like flavor cuts through the sweetness of the corn and pairs perfectly with the sharp, tangy white cheddar. Trust me, the combo of garlic powder and onion powder makes it taste like you spent hours seasoning, even though it’s just a sheet pan.
- Leftovers? Yes, Please: This isn’t just a one-time dish—it keeps well for 3 days in the fridge, and honestly, it tastes even better the next day. I’ll often make a double batch on Sunday so I can grab a bowl for lunch or toss it into tacos on Tuesday. The cheese gets that perfect melt-and-crisp balance, and the sour cream keeps it from drying out.
- Budget-Friendly Crowd-Pleaser: Sharp white cheddar isn’t cheap, but a block grates out enough for this recipe, and the rest can stretch into another meal. Fresh corn is seasonal, but frozen works just as well—no waste here. Plus, it’s the kind of dish where even picky eaters will ask for seconds, so you’re feeding a crowd without breaking the bank.
Step-by-step instructions for smoked cheesy corn
Here’s how to transform sweet summer corn into restaurant-style crispy-topped goodness.
Create the Crispy Corn Crust
In a large bowl, combine the 4 cups fresh corn kernels with the 2 tablespoons extra-virgin olive oil, 1 teaspoon lemon zest, ½ teaspoon diamond crystal kosher salt, 1 teaspoon garlic powder, 1 teaspoon onion powder, and ½ teaspoon ground black pepper. Toss until every kernel is evenly coated and glistening.
Transfer the corn to a parchment-lined baking sheet, spreading it in an even layer. The reason we do this now—before adding cheese—is to create that signature crispy crust. This step is where the magic happens for that satisfying crunch you’re after.
Bake Until Golden and Crispy
Preheat your oven to 425°F. Bake the corn for 15 minutes, stirring once halfway through, until the kernels begin to brown and develop a crispy texture. You’ll see the edges turning golden brown—that’s your signal to move to the next phase.
Here’s the thing—don’t overbake. You want crispy, not burnt. The corn should be firm to the touch but still tender when pierced with a fork. Remove from oven and immediately sprinkle the 1 tablespoon smoked paprika evenly over the top. This adds that essential smoky depth that makes this dish truly special.
Add the Cheese Mixture
In a separate bowl, mix the 1½ cups sharp white cheddar cheese with the ¼ cup cornstarch. The cornstarch is crucial here—it helps create that perfect crispy cheese topping. Spread this mixture evenly over the baked corn, pressing down gently with a spatula to ensure full coverage.
Return the baking sheet to the oven and bake for an additional 5-7 minutes, until the cheese is fully melted and bubbly, and the top has developed a golden, crispy crust. Watch closely during this time—you want that cheese to be melted but not browned. The moment the top turns golden is when you pull it out.
Finish with Fresh Toppings
Remove from the oven and let cool for 2-3 minutes. This resting period allows the cheese to set slightly and makes it easier to handle. Then, dollop the ½ cup sour cream evenly over the top, spreading it gently with the back of a spoon. The coolness of the sour cream contrasts beautifully with the warm, crispy corn.
Finally, sprinkle the ¼ cup chopped fresh cilantro over everything. The bright, herby notes cut through the richness of the cheese and add a fresh finish. Serve immediately while the corn is still crispy and the cheese is melty—this dish doesn’t wait!
Pro Tips For Making Smoked Cheesy Corn
- Stir Halfway Only: That one mid-bake stir at 7-8 minutes is non-negotiable—it’s how you get even browning without burning. I used to skip it and ended up with patchy, sad-looking corn. Trust me, the extra 10 seconds of stirring makes all the difference.
- Grate Cheese Like a Pro: Skip the pre-shredded cheese—it’s coated with anti-caking agents that make the topping grainy. Use a block of sharp white cheddar and grate it yourself right before mixing with cornstarch. The texture will be silky and crispy, not clumpy.
- Don’t Rush the Rest: Those 2-3 minutes of resting after baking aren’t optional—they let the cheese set enough to hold its shape when you add sour cream. I learned this after watching my first batch turn into a cheesy slide. Patience here = no messy servings.
- Smoked Paprika Timing Matters: Sprinkle that 1 tablespoon of smoked paprika immediately after the first bake, while the corn is still hot. If you wait, it’ll just sit there like decorative dust instead of infusing that deep, smoky flavor into the crispy edges. Work fast!
Pro cooking tips for this recipe
Oven vs. Grill Swap
If you don’t have an oven but have a grill, you can absolutely make this dish outdoors! Spread the seasoned corn kernels on a preheated grill set to medium-high heat (around 400°F). Cook for 12-15 minutes, stirring occasionally, until golden and crispy.
The grill adds a delightful charred flavor that pairs perfectly with the smoky paprika. Just watch it closely—grill heat can be unpredictable. I’ve done this on my charcoal Weber in my Boston backyard, and it’s become a summer staple for backyard BBQs. 🔥
Cheese Crust Troubleshooting
If your cheese topping isn’t crispy enough, it’s likely because the corn wasn’t baked long enough before adding cheese. Make sure the kernels are deep golden brown before spreading the cheese mixture. Also, don’t skip the cornstarch—it’s what creates that magical crispy crust.
If you’re in a hurry, you can broil the dish for the last 2 minutes to help it crisp up faster. I learned this the hard way after one batch of mushy cheese in my tiny triple-decker kitchen!
Make-Ahead Cheese Mix
Prep ahead by mixing the sharp white cheddar and cornstarch in a bowl and storing it in the fridge for up to 3 days. This way, you can focus on seasoning the corn and baking it fresh when you’re ready to serve.
Just toss the cheese mixture over the baked corn right before popping it back in the oven. I do this when hosting—it saves me from last-minute scrambling in my cramped Boston kitchen. 💡
Texture Control Tips
The secret to perfect texture is even heat distribution. If your baking sheet has hot spots, rotate it halfway through the 15-minute bake. Also, avoid overcrowding the pan—leave at least ½ inch between kernels so they crisp properly.
For extra crispiness, broil for 1-2 minutes at the very end, but keep a close eye to prevent burning. I’ve burned my share of cheese crusts, so I always set a timer!
Flavor Boosters
Want to elevate the smoky depth? Add ½ tsp chipotle powder to the cheese mixture for a subtle heat kick. Or, for a brighter finish, sprinkle 1 tsp lime zest over the top after baking. I also love adding crumbled bacon to the cheese mixture for a salty, savory twist.
These small tweaks turn this dish from good to unforgettable—just like the time I added hot honey to my Nonna’s gnocchi recipe. 💛
Nutrition facts
Frequently asked questions
Why does this recipe use cornstarch instead of flour?
The cornstarch creates that signature crispy cheese crust without making the texture gummy. Unlike flour, it absorbs moisture quickly and forms a delicate, airy layer that stays crunchy even after cooling. This is the secret to that perfect restaurant-style finish—no soggy cheese here!
Can I make this on a grill instead of in the oven?
Cook the seasoned corn kernels on a preheated grill at medium-high heat (400°F) for 12-15 minutes, stirring occasionally. The grill adds a delicious charred flavor that pairs perfectly with the smoked paprika. Just watch it closely—grill heat can be unpredictable. I’ve made this on my backyard grill and it’s become a summer favorite!
What if my cheese topping isn’t crispy enough?
Under-crispy cheese usually means the corn wasn’t baked long enough before adding cheese. Make sure kernels are deep golden brown before spreading the cheese mixture. Also, don’t skip the cornstarch—it’s what creates that magical crispy crust. For extra crispiness, broil for 1-2 minutes at the end, but keep a close eye to avoid burning. I’ve learned this the hard way in my tiny kitchen!
Can I prep the cheese mixture ahead of time?
Yes! Mix the sharp white cheddar and cornstarch in advance and store it in the fridge for up to 3 days. This way, you can focus on seasoning the corn and baking it fresh when ready to serve. Just toss the cheese mixture over the baked corn right before popping it back in the oven. Perfect for busy nights!
How do I store leftovers to maintain texture?
Store in an airtight container for up to 3 days in the fridge. To restore crispiness, reheat in a 350°F oven for 5-7 minutes—microwaving makes it rubbery. For best results, save a few crispy pieces to sprinkle on top fresh out of the oven when serving. This keeps the texture perfect!

Trained in classic French technique but raised on slow-cooked ribs and spicy rubs, she blends culinary skill with smoke and soul.
- Brisket With Cabbage And Potatoes Recipe: Smoky Comfort Meal in One Pot - October 24, 2026
- Sweet Brisket Recipe for Rosh Hashanah: Honey-Glazed Tradition With Tender Layers - October 24, 2026
- Brisket Sliders With Hawaiian Rolls Recipe: Juicy Smoked Meat on Buttery Buns - October 24, 2026