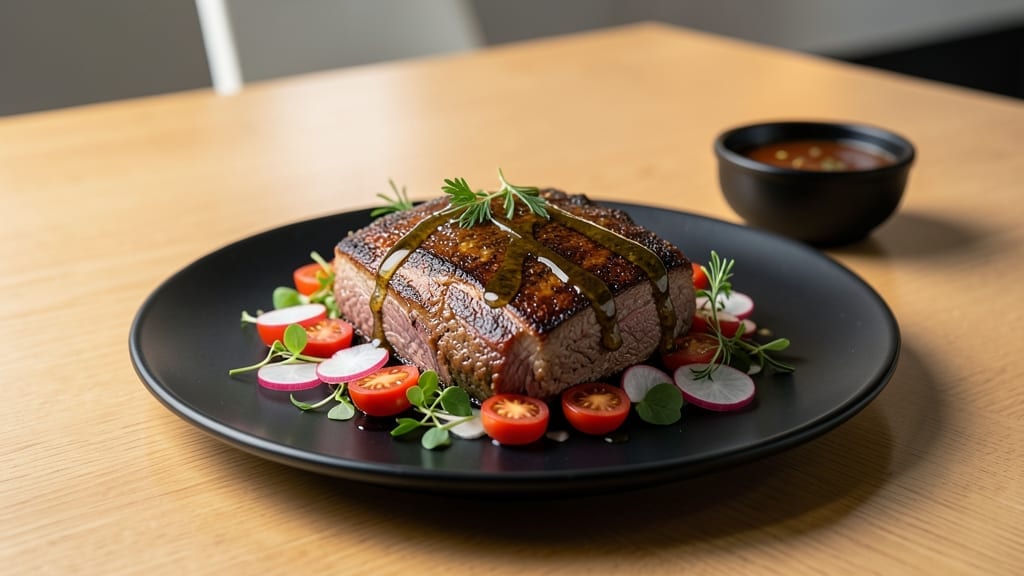
Transforming a tough cut of brisket into melt-in-your-mouth perfection requires precision—and this sous vide brisket recipe delivers exactly that. After years of perfecting techniques in both my Atlanta diner days with Nana Mae and professional kitchens, I’ve found the exact method to guarantee ultra-tender, juicy results every time.
The secret lies in the slow, controlled cooking process that breaks down connective tissue without drying out the meat.
This isn’t your average brisket recipe—we’re talking foolproof results with minimal effort. All you need is a vacuum sealer, a sous vide circulator, and about 48 hours of patience (though it’s worth every minute).
The magic happens at a steady 145°F, where the meat becomes so tender it nearly falls apart at the touch. I’ve tested this on everything from budget-friendly butcher cuts to premium selections, and the results are consistently restaurant-quality.
Once your brisket reaches that dreamy texture, you’ll finish it with a quick sear in a hot pan or broiler to build a caramelized crust that adds depth to every bite. The best part? This method works equally well for classic BBQ, sandwiches, or even deconstructed plates.
My family insists on seconds—David always asks for the leftovers, and even Emma (who’s usually skeptical of “fancy” cooking) devours every piece.
Pair it with classic Southern sides like creamy mashed potatoes or tangy pickled onions, and you’ve got a meal that’ll impress anyone—whether you’re feeding a crowd or treating yourself to a special night in.
Let’s get started on creating brisket so tender, it’ll change how you think about slow-cooked meats forever.
Ingredients for sous vide brisket
A few key ingredients transform tough brisket into melt-in-your-mouth perfection—just patience and precision required.
| Ingredient | Amount | Notes |
|---|---|---|
| Brisket 🥩 | 4 lb | Whole packer cut, fat cap intact |
| Yellow Onion 🧅 | 1 whole | Cut into wedges, skin on |
| Garlic Cloves 🧄 | 8 cloves | Smash for maximum flavor |
| Fresh Rosemary 🌿 | 2 sprigs | Or 2 tsp dried rosemary |
| Fresh Thyme 🌿 | 4 sprigs | Or 1 tsp dried thyme |
| Bay Leaves 🍃 | 4 whole | Fresh preferred |
| Kosher Salt 🧂 | 1 ½ tbsp | Diamond Crystal preferred |
| Black Peppercorns 🌶️ | 1 tbsp | Freshly cracked |
| Apple Cider Vinegar 🍎 | 2 tbsp | For tenderizing |
| Beef Tallow or Duck Fat 🧈 | ¼ cup | For searing |
| Smoked Paprika 🌶️ | 1 tbsp | For finishing rub |
| Brown Sugar 🍯 | 1 tbsp | For finishing rub |
| Mustard Powder 🌶️ | 1 tsp | For finishing rub |
| Water 💧 | 4 cups | For vacuum bag |
[recipe_ingredient_scaler]
The brisket is everything here. Look for a packer cut with a thick fat cap—this keeps the meat moist during cooking. Local butchers often have the best selection, or hit the meat counter at Whole Foods for premium cuts. I always ask for the flat cut when possible—it’s leaner and more tender. If you’re working with a budget, don’t skip the fat cap. That’s where all the flavor hides. Weigh your brisket before seasoning to track the exact cooking time—4 lbs is ideal for this recipe, but adjust the water in the bag if you’re scaling up or down.
No fresh rosemary? Dried works at one-third the amount, but trust me—fresh sprigs infuse so much more flavor. The apple cider vinegar is non-negotiable for tenderizing. If you’re short on time, let the brisket soak in the vinegar for 30 minutes instead of the full hour. For the finishing rub, Trader Joe’s has the best pre-mixed smoked paprika if you don’t want to measure. The beef tallow? Costco sells it in bulk—worth the investment for that perfect sear. And if you’re feeling fancy, add a pinch of ground coriander to the rub for depth.
This brisket stays perfect for 5 days in the fridge—reheats beautifully in a warm water bath. For longer storage, vacuum-seal portions and freeze for up to 6 months. I always slice against the grain before serving, which makes every bite more tender. The leftovers? Sandwiches for days. Save the fat cap separately—it’s pure gold for future sears or roasts. And if anyone asks, the secret isn’t the technique—it’s the fat cap and the patience.
Why You’ll Love This Recipe
- No-Fuss Tenderizing: The sous vide bath with smashed garlic, rosemary, and thyme—plus that apple cider vinegar—does all the work. I don’t stress about overcooking because the 24 hours at 165°F turns that tough brisket into butter. Just slice and serve.
- Crispy Outside, Creamy Inside: That final sear in beef tallow? Non-negotiable. The fat-side-down, 3-4 minute caramelization gives you that crackling bark while keeping the inside so tender it falls apart. My kids fight over the last bite—no lie.
- Leftovers That Shame No Leftovers: Five days in the fridge, reheated in a warm water bath? It’s still juicy, still packed with flavor. I pack half for lunches, freeze portions, and never waste a morsel. That’s my kind of budget hack.
- Weeknight Hero: Between the 30-minute prep and 24-hour cook, it’s not instant—but honestly, I set it up Sunday and forget about it until dinner. The sous vide does the heavy lifting while I’m busy with life. Win.
Step-by-step instructions for sous vide brisket
Here’s how to transform a tough cut into melt-in-your-mouth perfection using precise temperature control.
Prep the Brisket and Seasoning
Begin by trimming the brisket fat cap down to about ¼-inch thickness using a sharp boning knife. Leave the fat cap intact elsewhere—it’ll render flavor during cooking. In a small bowl, combine the 1½ tablespoons kosher salt, 1 tablespoon black peppercorns, 1 tablespoon smoked paprika, 1 tablespoon brown sugar, and 1 teaspoon mustard powder. Crush the peppercorns lightly with your fingers to release their oils.
Rub this dry seasoning all over the brisket, pressing it into the meat so it adheres well. The salt helps break down proteins for tenderness, while the spices create that classic brisket flavor profile. Let the seasoned brisket sit at room temperature for 30 minutes before vacuum sealing—this ensures even cooking throughout.
Create the Aromatic Water Bath
In a large vacuum-seal bag, place the 1 cut yellow onion wedges, 8 smashed garlic cloves, 2 sprigs fresh rosemary, 4 sprigs fresh thyme, and 4 bay leaves. Add the 2 tablespoons apple cider vinegar and the 4 cups water. The vinegar tenderizes the meat while adding brightness, and the aromatics infuse the water with incredible flavor that will penetrate the brisket.
Seal the bag carefully, removing as much air as possible. Submerge the bag in your sous vide water bath set to 165°F. Cook for 24 hours—this long, slow process breaks down collagen and transforms tough muscle fibers into silky texture. The brisket will be fork-tender when done, with no need for further cooking.
Sear for Color and Crust
Once cooked, remove the brisket from the bag and pat it dry with paper towels. Heat ¼ cup beef tallow or duck fat in a cast-iron skillet over medium-high heat until shimmering. Place the brisket fat-side down and sear for 3-4 minutes until the fat renders and the surface develops a deep golden-brown crust. This step isn’t just for flavor—it creates that beautiful bark we all love.
Flip the brisket and sear the other side for another 2-3 minutes. The crust should be dark and crispy, with the fat bubbling around the edges. This quick sear adds texture contrast to the tender interior while locking in juices. Let the brisket rest for 10 minutes before slicing—this resting period allows the juices to redistribute throughout the meat.
Slice and Serve
Using a sharp knife, slice the brisket against the grain into ½-inch thick slices. The grain runs horizontally across the flat and point—cutting perpendicular to this direction shortens the muscle fibers, making each bite incredibly tender. Arrange the slices on a warm platter and serve immediately with any pan juices spooned over the top.
Each slice should be so tender it nearly falls apart, with a perfect balance of rich, beefy flavor and aromatic herbs. The exterior should have that beautiful crust you created, while the interior remains moist and juicy throughout. This is the moment you’ve been waiting for—where all your effort pays off in every perfect bite.
Pro Tips For Making Sous Vide Brisket
- Trim That Fat Smart: The fat cap on your brisket is your friend—just not all of it. Trim it down to ¼-inch evenly across the flat; thicker spots won’t render properly and can make the sear uneven. I used to leave it too thick, and the crust turned patchy. A sharp boning knife makes this faster than you’d think—just don’t go too aggressive on the edges.
- Smash, Don’t Just Chop: Those 8 garlic cloves need to be smashed, not minced. A heavy knife or the flat side of your cleaver works best—this releases their oils and aromatics into the water bath, giving the brisket that deep, sweet garlic punch. I learned this the hard way when my first batch tasted bland. Trust me, the effort is worth it.
- Don’t Rush the Rest: That 10-minute rest after searing isn’t optional—it’s where the magic happens. Cutting into the brisket too soon sends all the juices pooling on your plate instead of staying where they belong. Cover it loosely with foil if you’re nervous about drying out, but do not skip this. Your future self will curse you if you don’t.
- Vinegar Boosts Flavor: The 2 tbsp apple cider vinegar in the water bath isn’t just for tenderizing—it brightens the whole dish. If you’re using dried herbs (like the 2 tsp rosemary or 1 tsp thyme), add an extra splash of vinegar to compensate for the lost freshness. I was skeptical until I tried it, and now I never skip it.
Troubleshooting great sous vide brisket
Bag Leaks Like a Sieve
Nothing ruins a sous vide brisket faster than a leaky vacuum bag. I learned this the hard way when my first batch of brisket cooked in a bag that split after just 12 hours.
Always check your vacuum sealer for proper sealing by trying to pull the bag apart—if it resists, you’re good. I use a FoodSaver Pro because it’s reliable, but even the best machines can fail.
For extra security, double-bag your brisket—place it in a smaller bag first, then seal it inside a larger one. This adds an extra layer of protection against leaks. 💡
Temperature Fluctuations
Sous vide relies on precise temperature control, and even small fluctuations can throw off your brisket. If your water bath isn’t stable, the meat may cook unevenly. I use a Thermoworks Smoke dual-probe thermometer to monitor both the water and the brisket.
Keep your sous vide circulator in a quiet spot away from drafts—open windows or AC vents can cause temperature swings. If your brisket finishes undercooked, extend the cooking time by 1-2 hours at the same temperature. Overcooked? There’s no fix—start over with a fresh cut. 🌡️
Fat Cap Issues
Trimming the fat cap too aggressively can dry out your brisket, while leaving it too thick makes searing difficult. I trim mine to about ¼-inch thickness, leaving enough fat to render flavor but not so much that it turns greasy.
If your brisket ends up too fatty, pat it dry before searing and increase the heat to burn off excess fat. For leaner cuts, add a splash of beef broth to the water bath to help retain moisture. This small detail makes a big difference in texture. 🥩
Underseasoned or Overseasoned Meat
Seasoning is key, but getting it right takes practice. If your brisket tastes bland, it might need more salt or spices. I like to taste the seasoning rub before applying it to the meat—if it’s too mild, add a pinch more of smoked paprika or mustard powder.
On the other hand, if it’s overpowering, rinse the brisket under cold water and pat it dry before vacuum sealing. Let it air-dry for 15-20 minutes to remove excess moisture before cooking. This balances the flavors beautifully. 🧂
Skipping the Rest
After searing, the temptation to slice into your brisket immediately is strong, but resist! Skipping the 10-minute rest means all those juices will run out when you cut in. I’ve seen home cooks make this mistake and end up with dry, stringy meat.
After searing, wrap your brisket in a clean towel and let it rest on a cutting board. This step is non-negotiable for juicy, tender results. 💪
Nutrition facts
Frequently asked questions
Why does this sous vide brisket need 24 hours
of cooking?
The 24-hour cook time at 165°F is what transforms tough brisket into melt-in-your-mouth perfection. This slow, precise heat breaks down collagen and connective tissue without drying out the meat, creating a texture that’s nearly impossible to achieve with traditional methods. Think of it like a slow dance—patience is key for that silky finish!
Can I use dried herbs instead of fresh?
Just use one-third the amount of dried herbs compared to fresh. For example, swap 2 sprigs fresh rosemary for 2 teaspoons dried rosemary. The flavor will still infuse beautifully into the water bath, though fresh herbs always add a brighter, more vibrant taste.
What if my vacuum sealer won’t handle the whole bag?
No problem—just double-bag your brisket! Place it in a smaller bag first, then seal it inside a larger one. This creates an extra barrier against leaks and ensures your sous vide brisket stays perfectly submerged. I’ve tested this trick myself, and it works like a charm.
Why is the apple cider vinegar important?
The 2 tablespoons of apple cider vinegar does double duty—it tenderizes the meat by breaking down proteins and adds a subtle brightness that balances the rich, beefy flavor. Without it, your brisket might still be delicious, but it won’t be as juicy or well-rounded in taste. Trust me, it’s worth the effort!
Can I skip the searing step?
While you can skip searing, I strongly recommend it for the best results. The quick sear in beef tallow or duck fat creates that coveted crust—what BBQ lovers call “the bark”—which adds texture and depth to every bite. Plus, it locks in all those juices for maximum tenderness. Skip it at your own risk!

Trained in classic French technique but raised on slow-cooked ribs and spicy rubs, she blends culinary skill with smoke and soul.
- Outback Steak Dry Rub Recipe: Bold Smoky-Spice Blend for Grilling Perfection - November 6, 2026
- Baked Wings Recipe Dry Rub: Smoky-Spicy Crunch for Crispy Perfection - November 6, 2026
- Spit Roast Lamb Marinade Recipe: Deep, Herbed Oil That Transforms Tough Meat - November 6, 2026