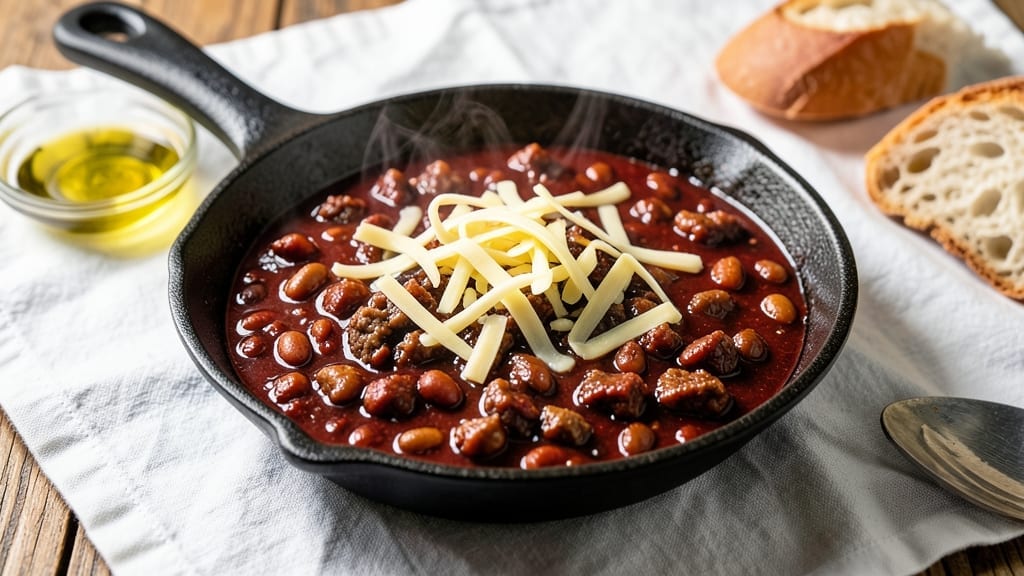
This Texas smoked chili recipe delivers the deep, smoky heat that defines true Lone Star State tradition—where beef and beans simmer together until the flavors meld into something unforgettable. 🔥 I perfected this version after years of watching my grandfather’s chili pot transform tough brisket into tender, flavor-packed bites that disappear faster than you can say “second bowl.”
The secret lies in the slow-cooked beef, which breaks down into rich, meaty chunks while absorbing the smoky spices and deep tomato base. We use a mix of kidney and pinto beans—not for texture, but for that authentic Texas flavor that balances the heat with hearty depth.
The spices? Just enough chili powder, cumin, and smoked paprika to create that signature smoky warmth without overpowering the beef.
By the time it’s done, you’ll have a thick, meaty chili with a crust on the edges and tender beef that practically falls apart. The aroma alone will have everyone gathering around the table, and the first bite delivers that perfect balance of smoky, spicy, and rich.
This is the kind of chili that turns casual dinners into legendary meals.
Serve it in deep bowls with all the fixings—cheddar cheese, sour cream, and a side of cornbread—and watch it disappear. Here’s how to make it the Texas way.
Ingredients for texas smoked chili
Pantry staples meet Texas tradition. Just beef, beans, and a handful of spices.
| Ingredient | Amount | Notes |
|---|---|---|
| Beef Chuck Roast 🥩 | 3 lb | Tough cut, trimmed of fat |
| Kidney Beans 🌱 | 1 lb | Dried or canned, drained |
| Pinto Beans 🌱 | 1 lb | Dried or canned, drained |
| Onions 🧅 | 2 whole | Yellow or red, chopped |
| Bell Peppers 🌶️ | 2 whole | Any color, chopped |
| Garlic Cloves 🧄 | 6 cloves | Fresh, minced |
| Tomato Paste 🍅 | ½ cup | High-quality, not watery |
| Chili Powder 🌶️ | 2 tbsp | Smoky, not sweet |
| Ground Cumin 🌿 | 1 tbsp | Freshly toasted preferred |
| Smoked Paprika 🌶️ | 1 tbsp | For authentic smoky flavor |
| Cayenne Pepper 🔥 | ½ tsp | Adjust for heat preference |
| Beef Broth 💧 | 4 cups | Low-sodium preferred |
| Dark Brown Sugar 🍚 | 1 tbsp | Balances acidity |
| Apple Cider Vinegar 🍎 | 1 tbsp | Brightens flavors |
| Salt 🧂 | 1 ½ tsp | Kosher or sea salt |
| Black Pepper 🌶️ | ½ tsp | Freshly ground |
[recipe_ingredient_scaler]
The beef is non-negotiable—chuck roast is a must. It’s tougher than sirloin, but that’s what gives it that melt-in-your-mouth texture after hours of slow cooking. Costco sells it pre-cut if you’re short on time, but buying a whole roast and cubing it yourself means you control the size. Look for good marbling, not too much fat—just enough to keep it juicy. I always grab extra because it’s worth it for that second batch. The beans? Kidney and pinto together give you that classic Texas chili depth. Canned is fine, but dried soaks up all the smoky flavors like a sponge.
No smoked paprika? Regular paprika plus a pinch of liquid smoke gets you close. Short on cayenne? Red pepper flakes at half the amount works, but you’ll lose some of that kick. The tomato paste can be jarred (I use Muir Glen when I’m not making my own), but don’t skimp on quality—watery paste makes for a thin chili. The onions and peppers can be swapped for whatever’s in your crisper, but bell peppers add that sweetness that balances the heat. And if you’re using dried beans, soak them overnight—it’s worth the extra time.
This chili tastes even better the next day once everything melds together. Store it in a heavy-duty pot or Dutch oven in the fridge for up to 5 days, or freeze portions for 3 months. I double the batch and freeze half—nothing beats pulling out a pot of pre-made chili on a cold night. The crust that forms on top? Don’t skip it. That’s where all the smoky goodness lives. Just scrape it into the pot before reheating.
Why You’ll Love This Recipe
- One-Pot Magic: Honestly, this is the kind of recipe where you start with one pot and end with zero cleanup. That Dutch oven does all the work—searing the beef, toasting the spices, and simmering everything together. I mean, who doesn’t love a weeknight dinner that leaves me with just a pot to wipe down?
- Smoky, Spiced Perfection: The smoked paprika and chili powder? Chef’s kiss. That tomato paste caramelizes into something deep and rich, while the dark brown sugar and apple cider vinegar keep it from tasting too heavy. The beef chuck roast turns fall-apart tender, and the beans soak up all that smoky goodness—it’s the kind of chili that makes you want to lick the bowl.
- Feeds a Crowd (or Your Couch): This isn’t just for game day or potlucks—it’s my go-to for lazy Sundays, post-work hangouts, or even when I’m craving something hearty on a Tuesday night. The beans stretch it out for leftovers (up to 5 days in the fridge, or freeze portions for months), and honestly, it tastes even better the next day. Plus, it’s cheap—3 pounds of beef chuck roast and two pounds of beans? That’s a steal for a meal that feels like a feast.
- Budget-Friendly Powerhouse: Between us, this recipe is my secret weapon for feeding a family without breaking the bank. The beef chuck roast is tough but turns out rich and tender, and the dried beans (if you use them) are dirt cheap. I’ve made this with canned beans too, and it still works—just as long as you’ve got the right spices. It’s the kind of dish that makes me feel like I’m treating everyone to a restaurant meal, but for a fraction of the cost.
Step-by-step instructions for Texas smoked chili
Here’s how to build deep, smoky flavor layer by layer—no shortcuts, just pure Texas chili magic.
🔥 Step 1: Sear the Beef Chuck Roast for Maximum Flavor
Heat a Dutch oven over medium-high heat until hot. Pat the 3 lb beef chuck roast dry with paper towels—this ensures a proper sear. Add the roast and sear on all sides for 8-10 minutes until deeply browned. You’ll see a dark crust form and smell that irresistible meaty aroma.
Here’s the thing—this searing step isn’t just about color. It builds the foundation of your chili’s depth by creating a flavorful crust called the “fond.” Don’t rush it; let the meat develop that rich brown crust before cutting it into 1-inch chunks. Transfer the seared beef to a plate and set aside temporarily.
🍳 Step 2: Build the Chili Base with Aromatics and Spices
In the same Dutch oven, add 2 tablespoons chili powder, 1 tablespoon ground cumin, 1 tablespoon smoked paprika, and ½ teaspoon cayenne pepper. Stir constantly for 30 seconds until fragrant—this activates the spices and prevents burning. Add the 2 chopped onions and 2 chopped bell peppers, cooking for 5 minutes until softened.
Now add the 6 minced garlic cloves and stir for 30 seconds until you smell that sweet, garlicky aroma. Here’s where it gets good—pour in the ½ cup tomato paste and cook for 2 minutes, stirring constantly. This creates a rich, concentrated base that will carry all those smoky flavors. You’ll see the mixture darken slightly as it caramelizes.
🥘 Step 3: Simmer the Beef and Beans for Deep Flavor
Return the seared beef chunks to the pot. Add 4 cups beef broth, 1 tablespoon dark brown sugar, and 1 tablespoon apple cider vinegar. Bring to a boil, then reduce heat to low and let it simmer uncovered for 2 hours. This long cook time breaks down the tough beef into tender, melt-in-your-mouth pieces.
After 1 hour 30 minutes, add the 1 lb kidney beans and 1 lb pinto beans (drained if using canned). Stir in 1½ teaspoons salt and ½ teaspoon black pepper. The beans will absorb all that rich, smoky beef flavor. You’ll know it’s ready when the beef easily pulls apart with a fork and the chili has thickened into a hearty consistency.
⏰ Step 4: Rest and Adjust for Perfect Texture
Remove from heat and let the chili rest for 15 minutes. This resting period allows all the flavors to meld together and the chili to thicken slightly. Taste and adjust seasoning if needed—you might want to add a splash more apple cider vinegar for brightness or a pinch of cayenne for extra heat.
Here’s the final touch: skim off any excess fat that has risen to the surface with a spoon. Serve this Texas smoked chili hot with all the fixings—shredded cheese, sour cream, and chopped cilantro. Each bowl should be packed with tender beef, hearty beans, and layers of smoky, spicy flavor that’ll have everyone asking for seconds.
Pro Tips For Making Texas Smoked Chili
- Don’t Rush the Sear: That 8-10 minute sear on the beef chuck roast isn’t just for looks—it’s where the deep, meaty flavor hides. I used to cut corners here, and my chili always tasted flat. Let that crust form fully before even thinking about cutting the meat, or you’ll miss out on the rich fond that dissolves into the broth later.
- Toast Your Cumin First: Skip the pre-toasted cumin, and your chili will taste dull. Dry-toast the 1 tablespoon ground cumin in the Dutch oven for 30 seconds before adding spices—just until you smell that warm, nutty aroma. It’s the difference between good and really good.
- Add Beans Late: Dump those beans in too early, and they’ll turn mushy. Wait until the beef has simmered for 1 hour 30 minutes before adding the kidney and pinto beans. That way, they soak up the beefy, spiced broth without falling apart.
- Skim the Fat: After the 15-minute rest, skim off that hardened fat from the surface—it’s not gross, it’s insurance. Too much fat makes chili greasy, and nobody wants that. A quick spoon run cleans it up without losing flavor.
Storing and reheating your texas smoked chili
Fridge Storage Secrets
After that 2-hour simmer, let your chili cool completely before transferring it to a heavy-duty pot or Dutch oven with a tight-fitting lid. I always use glass containers—I love watching the crust form on top.
Store it in the fridge for up to 5 days, and honestly, it tastes even better the second day as the flavors deepen. The crust? Don’t skip it—it’s packed with concentrated smoky goodness. Just scrape it back into the pot before reheating. ❄️
Freezing Like a Pro
For long-term storage, freeze portions in quart-sized freezer bags or glass containers. Leave 1 inch of headspace to prevent cracks from ice expansion. I label each bag with the date and write “Texas Smoked Chili” so I know what I’m getting later.
Portions stay good for 3 months, though I’ve had it last up to 4 months without losing quality—just watch for freezer burn.
Reheating Without Ruining It
I prefer stovetop reheating for texture. Pour chili into a heavy-bottomed pot, add ¼ cup beef broth to prevent sticking, and warm over medium-low heat for 10-15 minutes. Stir occasionally and taste—sometimes a pinch of salt or a splash of vinegar brings it back to life.
Microwaving works too, but it can make the beans mushy. If using the microwave, cover loosely and heat in 2-minute intervals until steaming. 🔥
Reviving Crusty Toppings
If your chili develops a crusty top in the fridge, don’t toss it! Simply scrape it into the pot with a spoon before reheating. That crust is packed with concentrated spices and caramelized flavors—it’s like a flavor bomb.
I’ve even used it as a topping for cornbread or nachos when I’m feeling lazy. It’s the little details that make Texas chili special.
Leftovers Get a Second Life
Use chili leftovers for creative dishes. Turn it into chili cheese fries by topping baked fries with melted cheese and chili, or make chili-stuffed peppers by filling bell peppers with leftover chili and baking.
I once made chili mac and arrows by mixing it with elbow macaroni—it was a hit at my family cookout. Get creative, but always keep the smoky, meaty essence of the original. 💛
Nutrition facts
Frequently asked questions
Why does this recipe use beef chuck roast instead of leaner cuts?
The 3 lb beef chuck roast is the secret to tender, flavorful chili. This tougher cut breaks down beautifully during the 2-hour simmer, creating melt-in-your-mouth texture while absorbing all the smoky spices. Lighter cuts like sirloin lack the marbling needed for that authentic Texas richness.
Can I substitute dried beans for canned ones?
Use 1 lb each of dried kidney and pinto beans, soaked overnight. They’ll absorb the smoky beef broth like a sponge, but remember—dried beans take 1 hour 30 minutes longer to cook fully. Rinse well before adding to avoid a starchy texture.
What if my chili is too thick after simmering?
No problem! Add ¼ cup beef broth at a time while stirring until you reach your desired consistency. The key is to maintain that thick, hearty texture—just don’t over-dilute. Stirring constantly prevents clumps while keeping the smoky depth intact.
How do I make this chili spicier without overpowering it?
Start with the ½ teaspoon cayenne pepper in the base, then build heat gradually. For extra kick, add ½ teaspoon chili powder or a dash of hot sauce after simmering. The smoked paprika and apple cider vinegar balance the heat while keeping that authentic Texas flavor profile.
Is it okay to skip the resting period before serving?
While you can serve it immediately, skipping the 15-minute rest means missing out on deeper flavor development. This quiet time lets the spices meld and the chili thicken slightly—like letting wine breathe before pouring. Trust the process for that perfect bowl of smoky goodness.

Trained in classic French technique but raised on slow-cooked ribs and spicy rubs, she blends culinary skill with smoke and soul.
- Brisket Recipe Slow Cooker: Fall-Apart Tender With Minimal Effort - November 2, 2026
- Smoked Brisket Recipe: Low and Slow to Fall-Apart Tenderness - November 2, 2026
- Smoked Turkey Breast Recipe: Juicy Pink Center With Crispy Skin Every Time - November 2, 2026