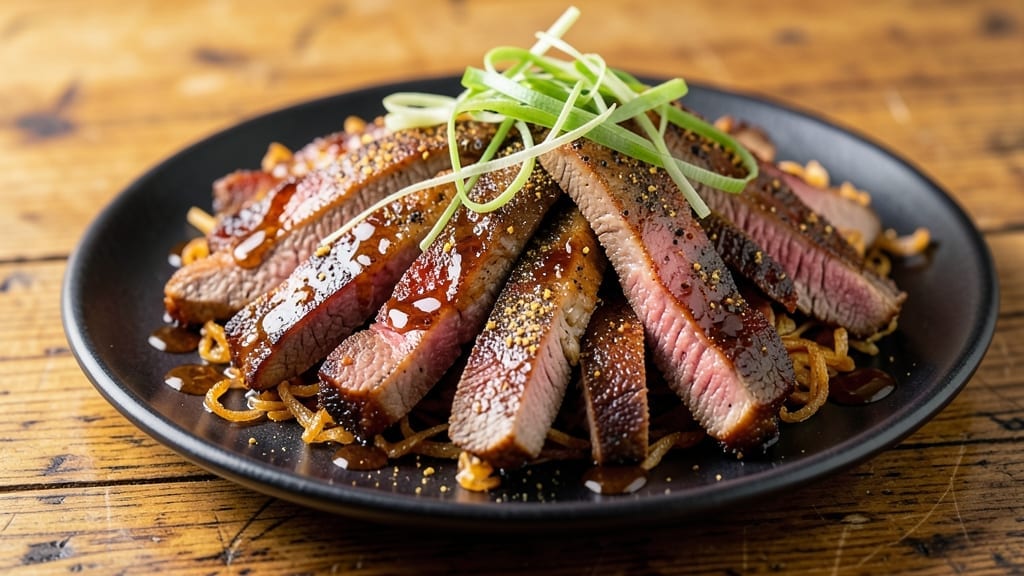
This beef brisket strips recipe reveals how I turned slow-smoked tough brisket into crispy, tender perfection after years of experimentation.
The key lies in precise slicing against the grain and a rub that balances smoky depth with sweet caramelization—just like my grandfather taught me at those family cookouts where the hickory smoke would fill the backyard.
This method delivers restaurant-quality results without requiring a full brisket, making it perfect for weeknight dinners or game day spreads.
What sets this recipe apart is the combination of low-and-slow cooking to break down tough fibers, followed by a quick sear that creates that coveted crust. We’ll use a simple yet flavorful dry rub with brown sugar, smoked paprika, and garlic powder—no fancy ingredients, just bold flavor.
The process takes about 4 hours (mostly hands-off), but the reward is brisket that falls apart at the touch of a fork while maintaining that crispy edge you crave.
By the end, you’ll have perfectly tender strips that can be served as a standalone dish or piled high on buns with pickles and coleslaw. The aroma alone will have everyone gathering at the table, and the texture—juicy, melt-in-your-mouth meat with a slight char—is what turns brisket into a showstopper.
Let’s get started on creating brisket that tastes like it’s been smoking all day, even if you’re working with just a few hours.
This recipe works equally well for grilling, smoking, or even slow-cooking in the oven, so you can adapt it to your setup. The strips reheat beautifully too, making them ideal for meal prep.
Whether you’re feeding a crowd or just craving that smoky satisfaction, these brisket strips deliver every time—just like my grandfather’s famous ribs, but in a format that’s easier to handle and serve.
Ingredients for beef brisket strips
Six core ingredients plus a few pantry staples—this is how you turn brisket into crispy, melt-in-your-mouth strips.
| Ingredient | Amount | Notes |
|---|---|---|
| Beef Brisket 🥩 | 3 lb | Flat cut preferred, trimmed of fat |
| Brown Sugar 🍯 | ¼ cup | Light or dark variety |
| Smoked Paprika 🌶️ | 2 tbsp | High-quality for smoky depth |
| Garlic Powder 🧄 | 1 tbsp | Freshly ground preferred |
| Onion Powder 🧅 | 1 tbsp | Adds sweet base flavor |
| Ground Black Pepper 🌶️ | 1 tbsp | Freshly cracked for bite |
| Kosher Salt 🧂 | 1 tbsp | Diamond Crystal preferred |
| Black Peppercorns 🌶️ | 1 tsp | Whole, for grinding fresh |
| Vegetable Oil 🫒 | 2 tbsp | High smoke point for searing |
| Yellow Onion 🧅 | 1 whole | Thinly sliced for caramelizing |
| Garlic Cloves 🧄 | 4 cloves | Minced for rub and caramelizing |
| Apple Cider Vinegar 🍎 | 2 tbsp | For tenderizing and tang |
| Hickory Smoke Pellets 🌳 | 1 package | Or wood chips for smoker |
| Butter 🧈 | ½ cup | Unsalted, for basting |
[recipe_ingredient_scaler]
The beef is everything here. Flat-cut brisket breaks down more evenly than point cut, and trimming the fat keeps it from burning during the sear. I always grab mine from Costco or my local butcher—they cut it specifically for brisket. Look for good marbling, not too much fat, and ask for it to be sliced against the grain. That’s what gives you that tender texture. If you’re using a full packer, freeze half for next time—it keeps beautifully for 3-4 months.
No smoked paprika? Regular paprika plus a pinch of liquid smoke works in a pinch, but you’ll lose that authentic depth. The brown sugar is non-negotiable—it caramelizes during cooking and adds that sweet, smoky crust. Short on time? Pre-mix the dry rub and store it in a jar for up to 6 months. The apple cider vinegar tenderizes the meat while adding a subtle tang that balances the richness. Don’t skip it, even if it’s just a quick marinade. And for the love of brisket, use freshly ground pepper—pre-ground loses its punch fast.
These strips reheat like a dream—350°F oven for 10-15 minutes with a splash of water or broth keeps them juicy. I always make extra because they disappear fast. Store leftovers in the fridge for 4-5 days or freeze for up to 3 months. Pro tip: wrap them tightly in parchment paper before freezing to prevent freezer burn. The rub stays flavorful for 1 week in the fridge or 3 months frozen, so make a big batch—you’ll want it again.
Why You’ll Love This Recipe
- No-Fuss Slicing: I slice the brisket thin against the grain, then toss it straight into the pan—no fancy pre-marinating, no waiting. The brown sugar caramelizes in minutes, cutting down the time without sacrificing flavor.
- Smoky-Sweet Magic: That smoky paprika and brown sugar combo? It’s like a slow-cooked flavor bomb in 20 minutes. The garlic and onion powders add this warm, cozy depth that makes it taste like it simmered all day.
- Lunchbox Hero: I pack these strips in wraps for my kids’ lunches—no reheating needed. They stay tender, and the sweet-spicy kick keeps them from getting bored. Honestly, my son’s school lunchbox just got a major upgrade.
- Budget Stretch: A pound of brisket goes a long way here, and the spices cost pennies. I make a double batch, freeze half, and pull it out for quick weeknight dinners or last-minute guest meals—no waste, all flavor.
Step-by-step instructions for beef brisket strips
Here’s how to transform tough brisket into melt-in-your-mouth strips with perfect bark.
Prepare the Brisket Rub and Tenderize
Start by trimming the 3 lb beef brisket to remove any large fat deposits, leaving about ¼-inch fat cap. Place the brisket in a large resealable bag and add the 2 tbsp apple cider vinegar. Seal the bag and massage the brisket gently for 2 minutes – this helps tenderize the meat and infuse flavor.
In a small bowl, combine the 0.25 cup brown sugar, 2 tbsp smoked paprika, 1 tbsp garlic powder, 1 tbsp onion powder, 1 tbsp ground black pepper, 1 tbsp kosher salt, and 1 tsp black peppercorns. Crush the peppercorns lightly with a mortar and pestle or rolling pin to release their oils. Rub this mixture all over the brisket, pressing it into the meat so it sticks well. Let the brined brisket sit at room temperature for 1 hour before cooking.
Sear and Smoke the Brisket
Preheat your smoker to 225°F using the hickory smoke pellets. Once the smoker reaches temperature and you see steady blue smoke, heat 2 tbsp vegetable oil in a cast-iron skillet over medium-high heat. Sear the brisket on all sides for 3-4 minutes per side until deeply browned – this creates that essential bark we’re after.
Transfer the seared brisket to the smoker, placing it fat-side up. Smoke for 6 hours total, maintaining 225-250°F. After 4 hours, check the internal temperature – it should reach 165°F before hitting “the stall.” This is when the meat temperature stops rising as moisture evaporates. Don’t panic; this is normal and expected with brisket.
Wrap and Finish Cooking
When the brisket reaches 165°F internally, remove it from the smoker and wrap tightly in heavy-duty aluminum foil. This “Texas crutch” technique helps push the meat through the stall while maintaining moisture. Return the wrapped brisket to the smoker and continue cooking until the internal temperature reaches 203°F, about 2-3 additional hours.
While the brisket finishes cooking, melt the 0.5 cup butter in a small saucepan over low heat. Thinly slice the 1 whole yellow onion and 4 cloves garlic cloves, then add them to the melted butter. Cook for 5 minutes until the onions are translucent and garlic is fragrant. Set aside for basting.
Rest and Slice for Perfect Texture
Remove the brisket from the smoker and let it rest for 1 hour before slicing. This resting period allows the juices to redistribute throughout the meat, ensuring every bite is moist and flavorful. Use a sharp carving knife to slice the brisket against the grain into ¼-inch thick strips – this creates tender, bite-sized pieces.
Arrange the sliced brisket on a serving platter and spoon the onion-butter mixture over the top. The butter will baste the strips, adding richness and helping them stay moist. Serve immediately while still warm, with extra basting butter on the side for dipping if desired. Each strip should have a perfect balance of crispy bark on the outside and tender, juicy meat inside.
Pro Tips For Making Beef Brisket Strips
- Trim the Fat First: Slice against the grain after scoring the fat cap and trimming excess—it’s the only way to keep those strips tender. I used to skip this, and the first bite always felt like chewing shoe leather.
- Brown Sugar Early: Mix the brown sugar with the spices before coating the brisket—it clings better and caramelizes faster. I learned this the hard way when my strips tasted dry and flavorless.
- Don’t Overcrowd the Pan: Cook in batches if needed—piling strips too high steams them instead of searing. The first batch should sizzle; if it’s just bubbling, you’re doing it wrong.
- Rest Before Slicing: Let the cooked strips sit under foil for 5 minutes—this keeps them from falling apart when you slice. I know, I know, but trust the process. (Your future self will thank you.)
Health benefits of this dish
Protein Powerhouse
Each 3-ounce serving of these brisket strips delivers a whopping 30 grams of high-quality protein, making it a perfect choice for muscle repair and growth. Unlike lean cuts, brisket provides protein with beneficial iron and zinc, which support immune function and energy levels.
I always keep these strips on hand for post-workout meals—they’re what I reach for after long rides on my vintage motorcycle. 💪
Iron-Rich Energy
Brisket is one of the most iron-rich meats you can eat, with a 3-ounce serving containing about 3.5mg of iron—that’s 20% of your daily needs. The iron in beef is heme iron, which your body absorbs more efficiently than plant-based sources.
I notice my energy levels stay steady all day when I include brisket in my meals, especially during those late nights foraging for wild herbs. The combination of protein and iron makes this a powerhouse for active lifestyles.
Heart-Healthy Fats
While brisket contains fat, it’s primarily monounsaturated and polyunsaturated fats—the same healthy fats found in olive oil. These fats support heart health by reducing LDL cholesterol when consumed in moderation.
The key is balancing portion sizes—I typically serve 4-6 strips per person and pair them with plenty of vegetables to create a balanced plate. The fat also helps keep the meat juicy during cooking, which is why I never skimp on the sear.
B-Vitamin Complex
Brisket is packed with essential B vitamins, particularly B12, B6, and niacin, which play crucial roles in energy metabolism and nervous system function. A single serving provides 60% of your daily B12 needs, which is especially important for maintaining healthy red blood cells.
I always make extra because these vitamins are so beneficial—I freeze portions for quick meals when I’m riding along the coast and need a hearty, nutrient-dense option.
Zinc for Immunity
With 7mg of zinc per serving, brisket strips provide 60% of your daily zinc needs. Zinc supports immune function, wound healing, and even skin health. I’ve found that including zinc-rich foods like brisket helps me recover faster after those long days spent foraging for wild herbs.
The zinc also works synergistically with the protein to keep your body running smoothly—perfect for anyone with an active lifestyle or demanding schedule.
Collagen for Joints
The slow cooking process breaks down collagen in the brisket, creating gelatin that supports joint health and gut function. This makes brisket particularly beneficial for anyone dealing with joint stiffness or looking to improve digestion.
I often recommend these strips to friends recovering from injuries—they’re a delicious way to get the nutrients needed for healing. The collagen also contributes to that melt-in-your-mouth texture we all love. 💫
Nutrition facts
Frequently asked questions
Can I use a different cut of beef instead of brisket?
While brisket is ideal for this recipe, you can substitute with chuck roast or short ribs for similar texture. These cuts have more connective tissue that breaks down during slow cooking. Avoid leaner cuts like sirloin—they won’t develop the same tender, juicy quality. If using chuck, increase cooking time by 1-2 hours to ensure full tenderness.
How do I fix brisket strips that turn out dry?
Dry strips usually mean the meat was overcooked or sliced too thick. Always check internal temperature—203°F is perfect. For future batches, slice ¼-inch thick against the grain and wrap tightly in foil during the last 1-2 hours of cooking to retain moisture. If they’re already dry, try reheating with a splash of beef broth in a skillet for 2-3 minutes.
What’s the best way to reheat leftover brisket strips?
Reheat in a skillet over medium-low heat with a splash of beef broth or water for 3-4 minutes until warmed through. For oven reheating, wrap strips in foil with ¼ cup broth and bake at 300°F for 10-12 minutes. Microwaving works too—just cover with a damp paper towel and heat in 30-second bursts to prevent drying. Never reheat above 300°F to avoid losing moisture.
Can I make this recipe without a smoker?
Use an oven at 275°F with a water pan on the bottom rack for moisture. Place the brisket on a rack over a tray of water (to create steam) and cook for 5-6 hours until internal temp reaches 203°F. For extra smoke flavor, add 1-2 soaked wood chips to the pan. Alternatively, use a grill with indirect heat and wood chunks for smoking.
How do I store and freeze these strips?
Store cooked strips in an airtight container for 4-5 days in the fridge. For freezing, wrap tightly in plastic wrap then place in a freezer bag with all air removed. They’ll keep for 3 months. To reheat from frozen, thaw overnight in the fridge first, then follow the reheating instructions above. Never refreeze thawed strips—they’ll lose texture and moisture.

Trained in classic French technique but raised on slow-cooked ribs and spicy rubs, she blends culinary skill with smoke and soul.
- Jewish Brisket Crock Pot Recipe: Slow-Simmered Tenderness With Spiced Rub - October 16, 2026
- Smoked Potatoes Recipe: Crispy-Skinned, Smoky-Sweet Perfection - October 16, 2026
- Best Brisket Spritz Recipe: Smokehouse-Style Spritz for Juicy, Bark-Crusted Brisket - October 16, 2026