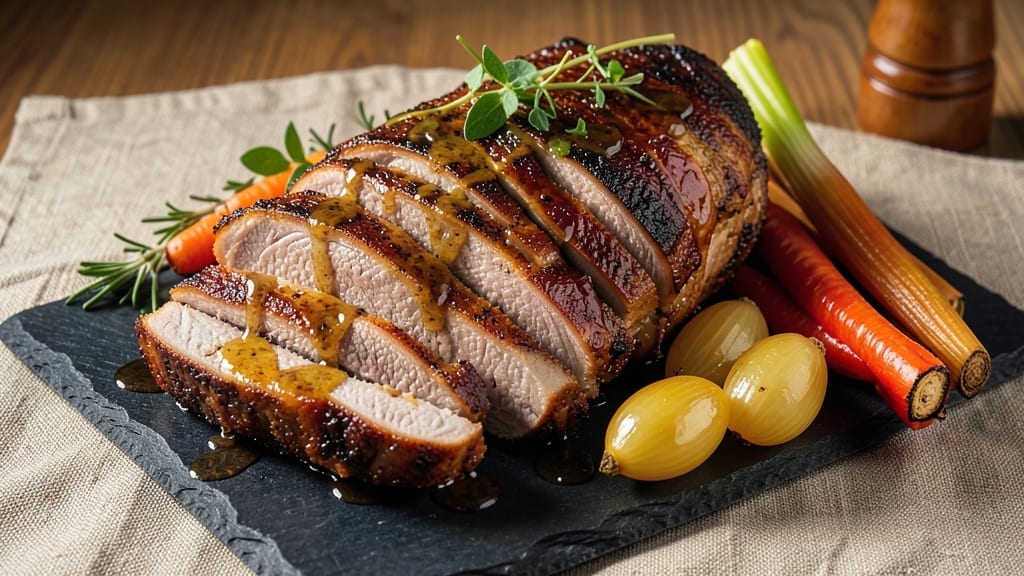
Master this foolproof boneless brisket roast recipe to turn tender, fall-apart meat into showstopping perfection without endless hovering. The day I realized French braising methods could elevate my family’s slow-cooked brisket changed everything, and this recipe delivers that same restaurant-quality tenderness without the fat.
What makes this different is how we control the moisture and temperature to break down the meat gently while building deep, savory flavors.
This method relies on a simple but critical approach: searing the brisket first to lock in juices, then slow-cooking it with aromatics and broth until it reaches that magical 203°F internal temperature where collagen dissolves into rich, velvety moisture.
The key ingredients—a blend of salt, pepper, garlic powder, and a splash of apple cider vinegar—create a crust that seals in flavor while keeping the meat tender. Unlike traditional brisket, we skip the fat cap entirely, focusing instead on precise seasoning and controlled cooking.
By the time you carve into this brisket, you’ll find slices that fall apart with just a fork, infused with smoky-sweet flavors from the slow cook. The crust remains intact, adding texture without overwhelming the delicate meat underneath.
This is the kind of dish that transforms a weeknight dinner into a special occasion—rich, satisfying, and worth every minute of the process.
Serve with roasted root vegetables or crusty bread to soak up every last bit of that flavorful cooking liquid. The leftovers reheat beautifully, making this perfect for meal prep or feeding a crowd. Let’s get started on creating brisket that feels like a celebration every time.
Ingredients for boneless brisket roast
French-inspired technique meets American comfort—just 14 ingredients for brisket that melts in your mouth.
| Ingredient | Amount | Notes |
|---|---|---|
| Boneless Brisket Roast 🥩 | 4 lb | Flat cut preferred, trimmed of excess fat |
| Yellow Onion 🧅 | 1 whole | Peeled, cut into 8 wedges |
| Carrots 🥕 | 4 whole | Scrubbed, cut into 2-inch chunks |
| Celery Stalks 🌿 | 3 whole | Trimmed, cut into 2-inch pieces |
| Garlic Cloves 🧄 | 8 cloves | Peeled, lightly smashed |
| Apple Cider Vinegar 🍎 | ¼ cup | Unfiltered for depth of flavor |
| Beef Broth 💧 | 2 cups | Low-sodium, preferably homemade |
| Dry Red Wine 🍷 | ½ cup | Bold variety like Cabernet Sauvignon |
| Kosher Salt 🧂 | 2 tbsp | Diamond Crystal preferred |
| Freshly Ground Black Pepper 🌶️ | 1 ½ tsp | Coarse grind for texture |
| Garlic Powder 🧄 | 1 tbsp | Freshly ground preferred |
| Dried Thyme 🌿 | 1 tsp | Or 1 tbsp fresh thyme leaves |
| Bay Leaves 🌿 | 2 whole | Fresh preferred, dried works too |
| Extra-Virgin Olive Oil 🫒 | 2 tbsp | For searing brisket |
[recipe_ingredient_scaler]
The brisket is everything here. Look for flat cuts at specialty butchers—they’re leaner and more consistent. Costco or Whole Foods carry great options, but call ahead to confirm boneless cuts. Trim any remaining fat to avoid greasiness during slow cooking. The key is choosing a piece with good marbling—those little fat streaks keep the meat moist. If your butcher won’t trim it, do it yourself with kitchen shears for even cooking. For the aromatics, fresh thyme and bay leaves add layers of flavor that dried versions can’t match, but if you’re in a pinch, dried works at half the quantity.
No red wine? Substitute with extra beef broth—just add another cup. Running low on apple cider vinegar? White wine vinegar or lemon juice work in a bind, though they’ll change the flavor profile slightly. The garlic powder can be swapped for fresh minced garlic (use 4 cloves total), but toast it first in the olive oil for deeper flavor. For the beef broth, homemade is ideal, but even store-bought low-sodium versions work. The carrots and celery can be swapped for other root vegetables like parsnips or turnips—whatever’s on hand. And if you’re making this ahead, prep all your veggies the night before to save time on cooking day.
This brisket tastes even better the next day, so plan to cook it a day ahead if possible. Store leftovers in the fridge for up to 5 days, covered with its cooking juices. For freezing, portion into airtight containers with a thin layer of broth on top—keeps for 3 months. The cooking liquid makes an amazing gravy too, so don’t pour it away. Strain it, reduce by half, and you’ve got instant weeknight dinner sauce. And if you’re feeding a crowd, double the recipe—the leftovers make perfect sandwiches or tacos.
Why You’ll Love This Recipe
- One-Pot Magic: I swear by this—just toss the brisket, onions, carrots, and celery into a pot with garlic, cover it with broth, and walk away. No chopping boards to clear, no extra pans to wash. That’s my kind of dinner.
- Garlic Bomb Flavor: The moment the brisket starts to tenderize, that garlic and onion mirepoix turns the whole kitchen into a cozy, savory dream. It’s not just good—it’s the kind of rich, meaty depth that makes you close your eyes and sigh.
- Leftovers for Days: Between us, this roast is so forgiving that it actually improves the next day. Slice it thin for sandwiches, shred it for tacos, or just reheat it straight from the fridge—it’s my go-to for lazy lunches.
- Budget-Friendly Feast: A single roast feeds my family of four plus leftovers for two more meals, and the veggies stretch the flavor without breaking the bank. Honestly, it’s the only way I justify buying brisket—because it never goes to waste.
Step-by-step instructions for slow-cooked brisket roast
Here’s how to transform a tough cut into melt-in-your-mouth perfection using simple techniques and patient timing.
Prepare the Brisket and Build the Flavor Base
Pat the 4 lb boneless brisket roast completely dry with paper towels—this is crucial for developing that beautiful crust later. Place it in a large Dutch oven or heavy pot and set it aside. In the same pot, heat the 2 tbsp extra-virgin olive oil over medium-high heat until shimmering.
Add the peeled, cut 1 whole yellow onion, scrubbed 4 whole carrots, and trimmed 3 whole celery stalks. Sauté for 5-6 minutes until the vegetables begin to soften and release their sweet aromas. Add the peeled, lightly smashed 8 cloves garlic and cook for another 30 seconds until fragrant.
Here’s the thing—don’t let the vegetables brown too much. You want them to soften but still retain their shape and color. This creates a flavorful base without overpowering the brisket. Remove the vegetables with a slotted spoon and set them aside for later.
Sear the Brisket and Create the Braising Liquid
Return the pot to medium-high heat and add the brisket, placing it fat-side down if there’s any remaining fat. Sear for 3-4 minutes per side until you develop a deep golden-brown crust. This step is what transforms tough meat into tender slices—don’t skip it.
Remove the brisket and set it aside. Now it’s time to build the braising liquid. Add the 0.25 cup apple cider vinegar and let it bubble away for 1 minute to deglaze the pot, scraping up all those flavorful browned bits from the bottom. Pour in the 0.5 cup dry red wine and let it simmer for 2 minutes until slightly reduced.
Add the 2 cups beef broth, 2 tbsp kosher salt, 1.5 tsp freshly ground black pepper, 1 tbsp garlic powder, 1 tsp dried thyme, and 2 whole bay leaves. Stir everything together until the salt and spices dissolve completely. Return the seared brisket to the pot along with the sautéed vegetables.
Braise Until Fork-Tender
Bring the liquid to a gentle simmer, then reduce the heat to low. Here’s where patience pays off—cover the pot and let it cook for 3 hours. This slow cooking time is what breaks down the tough muscle fibers and transforms the brisket into tender slices.
After 3 hours, check the doneness by inserting a meat thermometer into the thickest part of the brisket. It should read between 195°F and 205°F. If it’s not quite there yet, continue cooking for another 30-60 minutes. The meat will continue to tenderize as it rests.
Real talk: Your oven might run hot, so start checking at the 20-minute mark. The brisket is done when it’s fork-tender and the internal temperature reaches that perfect range. Don’t rush this step—it’s the difference between tough and tender.
Rest and Serve with Confidence
Once the brisket reaches the perfect internal temperature, remove it from the pot and transfer it to a cutting board. Here’s the crucial part: let it rest for at least 15 minutes before slicing. This resting period allows the juices to redistribute throughout the meat, ensuring each slice is moist and flavorful.
While the brisket rests, skim any excess fat from the braising liquid and return it to a gentle simmer. You can use this rich, flavorful liquid as a sauce for serving. Slice the brisket against the grain into ¼-inch thick slices and serve with the vegetables and sauce.
Each bite should deliver that perfect balance of tender meat with deep, complex flavors from the braising liquid. The vegetables will be perfectly softened but still hold their shape, and the sauce will be rich and full of the brisket’s natural juices. This is the moment you’ve been waiting for—enjoy your perfectly tender brisket roast!
Pro Tips For Making Boneless Brisket Roast
- Brown the Brisket First: Skip the slow start—sear the brisket in oil over medium-high heat for 5-6 minutes per side until it’s deep golden. I used to rush this, and the finished roast never had that rich, caramelized depth. The crust locks in flavor and keeps the meat juicy during the long cook.
- Dice the Veggies Evenly: Cut onions, carrots, and celery into roughly ½-inch chunks—no small dice, no giant hunks. Uneven pieces mean some veggies steam while others burn. My grandmother’s trick: Use a knife to chop the celery stalks lengthwise first, then crosswise for consistency.
- Don’t Overcrowd the Pan: If you’re browning the brisket and veggies together, work in batches. A packed pan steams instead of sears, and you’ll end up with soggy carrots and pale onions. I learned this the hard way—now I brown the brisket first, then the veggies in a fresh pan.
- Check Internal Temp Early: Pull the brisket when it hits 195°F, not when it looks done. The probe should slide in like butter—if it fights you, keep it in. I’ve overcooked this before, and the difference between tender and dry is just 10 minutes. Let it rest 15 minutes before slicing, or you’ll lose all that juiciness.
Storing and reheating this boneless brisket roast
Refrigerator Storage
Let your brisket roast cool to room temperature for no more than 2 hours before transferring to airtight containers—I swear by glass Pyrex with snap-on lids. Store at 40°F or below for up to 5 days, covered with its flavorful cooking juices.
The longer it rests in the fridge, the more the flavors meld together, creating a deeper, richer taste. I always double-wrap the containers with plastic wrap pressed directly against the surface to prevent drying. 💪
Freezer Storage
For longer storage, portion your brisket into quart-sized freezer bags with 1 inch of headspace—this prevents expansion cracks. Add a thin layer of the braising liquid to keep it moist, then seal tightly.
Label with the date and freeze for up to 3 months. Thaw overnight in the fridge before reheating. I’ve found that freezing the brisket whole (before slicing) maintains better texture than pre-sliced portions.
Stovetop Reheating
My preferred method is stovetop reheating because it preserves that perfect texture. Place slices in a heavy-bottomed skillet with 1 tbsp of the reserved braising liquid per serving. Cover and heat over medium-low heat for 8-10 minutes, stirring occasionally.
The liquid helps restore moisture without making the meat mushy. Taste and adjust seasoning—brisket often needs a pinch of salt after reheating. 🔥
Oven Reheating
For larger batches, preheat your oven to 325°F and place the brisket in a baking dish with ¼ cup of beef broth. Cover tightly with foil and bake for 20-25 minutes, checking at the 15-minute mark.
This gentle heat ensures even warming without drying. I like to add a splash of apple cider vinegar to the broth to refresh the flavors. The foil trap keeps everything juicy while reheating.
Microwave Safety
When I’m in a rush, I use the microwave—but with caution. Place slices on a microwave-safe plate with a damp paper towel covering them. Heat on 50% power for 2-3 minute intervals, stirring between each.
This prevents overcooking and maintains some texture. Add a splash of water if it looks dry. Honestly, this is my last resort because it’s never as good as stovetop or oven methods. 💡
Gravy Revival
Don’t discard that braising liquid—it’s liquid gold for reheating! Strain it, reduce by half on the stovetop, and you’ve got instant gravy. Simply add 1 tbsp cornstarch mixed with 2 tbsp water to thicken it up.
This gravy works wonders over reheated brisket slices or as a sauce for mashed potatoes. I keep a small jar of this gravy base in the freezer for quick weeknight dinners. ✨
Nutrition facts
Frequently asked questions
Can I use this recipe with a bone-in brisket?
This recipe is specifically designed for boneless brisket, but you can adapt it for bone-in cuts with some adjustments. The bone will add extra flavor but may require 1-2 additional hours of cooking time. Remove the bone before serving and reduce the cooking liquid by 1 cup to account for the extra moisture. The internal temperature should still reach 203°F in the thickest part of the meat.
How do I know when the brisket is fully tender?
The best way to test doneness is with a meat thermometer. Insert it into the thickest part of the brisket—it should read between 195°F and 205°F. If it’s not quite there, continue cooking for another 30-60 minutes. You can also press the meat gently with tongs—if it crumbles easily, it’s ready. The meat will continue to tenderize as it rests, so don’t overcook it.
Can I make this brisket in a slow cooker instead of a Dutch oven?
Transfer the seared brisket and all ingredients to a 6-quart slow cooker and cook on low for 6-8 hours or high for 4-5 hours. The slow cooker’s gentle heat will work wonders for tenderizing the meat. Just make sure to check the internal temperature before serving—it may need an extra 30 minutes to reach 203°F.
What if my brisket turns out dry?
Dry brisket usually happens from overcooking or not resting properly. If it’s slightly dry, try reheating it with extra braising liquid or a splash of beef broth in a covered skillet. For future attempts, ensure the internal temperature doesn’t exceed 205°F and always let it rest for at least 15 minutes before slicing. The resting time is critical for redistributing juices.
Can I use this brisket for sandwiches or tacos?
This recipe works perfectly for sandwiches or tacos! Slice the brisket thinly against the grain and serve it on crusty bread with your favorite toppings. The rich, tender meat pairs well with pickles, coleslaw, or avocado. For tacos, shred the brisket and mix it with the braising liquid to create a flavorful filling. Just make sure to reheat it gently to maintain moisture.

Trained in classic French technique but raised on slow-cooked ribs and spicy rubs, she blends culinary skill with smoke and soul.
- Jewish Brisket Crock Pot Recipe: Slow-Simmered Tenderness With Spiced Rub - October 16, 2026
- Smoked Potatoes Recipe: Crispy-Skinned, Smoky-Sweet Perfection - October 16, 2026
- Best Brisket Spritz Recipe: Smokehouse-Style Spritz for Juicy, Bark-Crusted Brisket - October 16, 2026