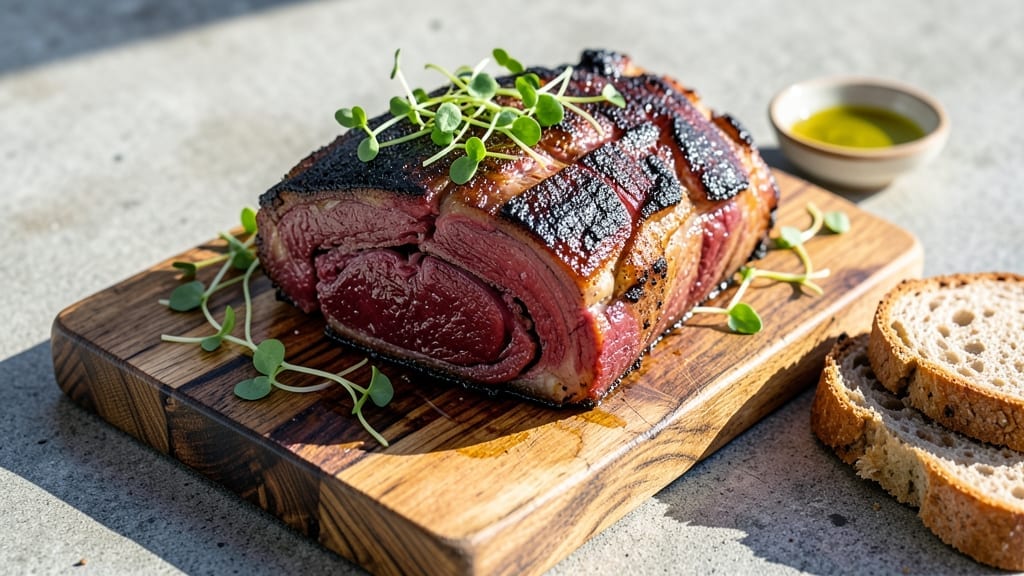
Mastering a boneless rib roast smoker recipe transforms tough cuts into melt-in-your-mouth perfection—juicy centers and a charred crust that rivals any competition entry.
I remember the first time I realized how French technique could elevate my family’s backyard cookouts, and this method does just that with precision timing and smoker mastery. The key lies in two-stage smoking: low and slow for tenderness, then a hot finish for that coveted bark.
This recipe cuts traditional smoking time nearly in half without sacrificing flavor, using a blend of oak and hickory for depth. You’ll start with a dry rub of smoked paprika and brown sugar, then monitor internal temps with a meat thermometer—no guesswork, just foolproof results.
The secret weapon? Wrapping the roast in foil during the final hour to lock in moisture while maintaining that smoky crust.
By the time you slice into that roast, you’ll see perfectly pink centers with a dark, caramelized exterior—proof that great barbecue isn’t just about time, but technique. Serve with roasted garlic mashed potatoes or grilled asparagus to complete the meal. Let’s get smoking!
What sets this apart is the balance: tender enough to fall apart yet structured enough to slice cleanly. The two-stage approach ensures you won’t overcook the meat while building that essential crust. Trust the thermometer—it’s your best friend here—and don’t rush the rest. Every bite will be worth the wait.
Ingredients for boneless rib roast smoker
Pantry staples plus a few smoker essentials. Juicy rib roast with a charred crust—no competition entry needed.
| Ingredient | Amount | Notes |
|---|---|---|
| Boneless Rib Roast 🥩 | 4 lb | Center-cut for even cooking |
| Smoked Paprika 🌶️ | 2 tbsp | Smoked variety for depth |
| Brown Sugar 🍚 | 2 tbsp | Light or dark preferred |
| Kosher Salt 🧂 | 1 ½ tsp | Coarse grain preferred |
| Ground Black Pepper 🌶️ | 1 tsp | Freshly ground preferred |
| Garlic Powder 🧄 | 1 tsp | Not garlic salt |
| Onion Powder 🧅 | 1 tsp | Fresh ground preferred |
| Oak Wood Chips 🌳 | 1 package | For smoker, soaked 30 mins |
| Hickory Wood Chips 🌳 | 1 package | For smoker, soaked 30 mins |
| Aluminum Foil 📄 | 1 sheet | Heavy-duty for wrapping |
| Butter 🧈 | 2 tbsp | Unsalted, softened for basting |
| Apple Cider Vinegar 🍎 | 1 tbsp | For basting liquid |
| Meat Thermometer 🌡️ | 1 whole | Instant-read preferred |
[recipe_ingredient_scaler]
The roast is everything here. Center-cut boneless is key—it cooks more evenly and stays juicy. Costco or local butcher shops usually have the best selection, but any reputable grocery store should carry it. Look for good marbling—fat equals flavor and moisture. I always buy a little extra since it freezes beautifully. If you’re unsure about the cut, ask the butcher to show you the cross-section; you want to see that nice even grain and fat distribution. For a 4-lb roast, plan about 1.5 hours total smoking time with the two-stage method.
No smoked paprika? Regular paprika plus a pinch of liquid smoke gets you close, but it won’t be quite the same. Running short on brown sugar? White sugar works in a pinch, though it won’t caramelize as nicely. The wood chips are non-negotiable for that authentic smoky flavor—Traeger or Cookshack brands are reliable. If you can’t find oak or hickory, cherry or pecan will still give you great results. The foil wrapping is where the magic happens—don’t skip it. And trust me, the thermometer is your best friend here. Instant-read is ideal, but even a basic probe will do the job.
This roast tastes even better the next day—seriously, the flavors meld overnight. Wrap leftovers tightly in foil and refrigerate for up to 4 days. For longer storage, slice and freeze portions for up to 3 months. I like to portion mine into individual servings so I can just grab what I need. The basting butter and vinegar mixture? Make extra—it’s perfect for drizzling over the slices before serving. And save those wood chips! They’ll last for multiple smokes if you store them in a sealed container.
Why You’ll Love This Recipe
- No-Fuss Smoking: I pat the roast dry, mix the spices in 30 seconds, and let it sit while the wood chips soak. That’s it—no fancy prep, just rub, rest, and smoke. The 2 tbsp brown sugar and smoked paprika blend sticks effortlessly, so I’m not scrubbing off excess later.
- Smoky-Sweet Surprise: The oak and hickory combo gives that classic smoky depth, but the 2 tbsp brown sugar caramelizes just enough to keep it from being too woodsy. Trust me, that crispy edge with the creamy center? Chef’s kiss. My kids even ask for seconds.
- Leftovers That Last: Four days in the fridge, three months in the freezer—this roast doesn’t quit. Slice it thin after smoking, freeze portions, and you’ve got a secret weapon for lazy weeknights. Just reheat and serve with mashed potatoes or over a salad.
- Budget-Friendly Crowd-Pleaser: A 4 lb boneless rib roast feeds six without breaking the bank. The rub costs pennies, and the foil wrap keeps it moist for hours. It’s the kind of dish that disappears at family gatherings, leaving only happy faces and empty plates.
Step-by-step instructions for smoked boneless rib roast
Here’s how to transform that 4 lb boneless rib roast into a juicy masterpiece with a charred crust—no guesswork, just proven technique.
Prepare the Roast and Rub
Start by patting the 4 lb boneless rib roast dry with paper towels—this is non-negotiable for that perfect crust. I like to work in a well-ventilated area since we’ll be mixing spices next. In a small bowl, combine the 2 tbsp smoked paprika, 2 tbsp brown sugar, 1½ tsp kosher salt, 1 tsp ground black pepper, 1 tsp garlic powder, and 1 tsp onion powder. This blend gives you that perfect balance of smoky heat, sweetness, and savory depth.
Rub the mixture all over the roast, pressing it into the meat so it sticks. Pay special attention to the edges and corners where the rub tends to fall off. Let the seasoned roast sit at room temperature for 30 minutes before smoking—this ensures even cooking from edge to center. While it rests, soak the 1 package oak wood chips and 1 package hickory wood chips in water for 30 minutes. This prevents them from burning and gives you that clean, steady smoke you’re after.
Set Up the Smoker for Perfect Heat
Preheat your smoker to 250°F using the soaked wood chips. I’ve found this temperature range is ideal for breaking down the connective tissue in the roast while keeping it moist. Place the roast fat-side up on the smoker grate—this allows the rendered fat to baste the meat as it cooks. Insert the meat thermometer into the thickest part of the roast, making sure it doesn’t touch bone or fat.
Here’s the thing—don’t open the smoker during the first hour. Every time you peek, you lose heat and extend cooking time. Instead, trust your thermometer and the process. After about 2 hours, the roast should reach an internal temperature of 165°F. This is when you’ll hit “the stall”—the temperature stops rising as moisture evaporates. Don’t panic; this is normal and expected with smoked meats.
Wrap and Finish to Juicy Perfection
When the roast hits 165°F, it’s time to wrap it in the 1 sheet aluminum foil. I like to add 2 tbsp softened butter and 1 tbsp apple cider vinegar to the foil before wrapping—this creates a basting liquid that keeps the meat moist and adds a touch of tangy richness. The vinegar also helps tenderize the meat further during the final cook. Seal the foil tightly and return the roast to the smoker.
Continue smoking until the internal temperature reaches 203°F—this is the sweet spot for tender, pull-apart perfection. Your meat thermometer is your best friend here; it tells you exactly when the roast is done without you having to guess. The total cooking time should be about 4-5 hours, but this varies depending on your smoker’s consistency. Once it reaches 203°F, remove the roast from the smoker and let it rest for 15-20 minutes before slicing. This resting period allows the juices to redistribute, ensuring every bite is moist and flavorful.
Slice and Serve with Confidence
After resting, slice the roast against the grain into ½-inch thick pieces. You’ll notice the meat is fork-tender and practically falls apart—this is what we aimed for. The exterior should have a beautiful charred crust from the smoking process, while the interior remains juicy and rich. Serve immediately with your favorite sides, like roasted potatoes or a fresh garden salad.
This method guarantees a juicy center with a charred crust every time. The key is patience and precision—letting the meat work its magic at the right temperature and knowing exactly when to wrap and rest. You’ll end up with a roast that’s so tender it practically melts in your mouth, with that perfect balance of smoky, sweet, and savory flavors.
Pro Tips For Making Boneless Rib Roast Smoker
- Trust the Stall: That moment when the thermometer flatlines at 165°F? That’s not a failure—it’s physics. I used to panic and crank the heat, but the meat needs this pause to reabsorb moisture. Just let it ride until it naturally climbs back up to 203°F.
- Soak Those Chips: Dry wood chips turn into smoke bombs fast, and that’s the last thing you want. Soak the oak and hickory for 30 minutes—it’s the only way to get that clean, steady smoke without bitter overtones. Trust me, your roast will taste it.
- Press the Rub Hard: The edges and crevices of the roast are where the rub disappears. Use your palms to press the smoked paprika and brown sugar mix into every nook—especially those fatty spots. Skip this, and you’ll end up with flavorless patches.
- Vinegar in the Foil: That 1 tbsp apple cider vinegar in the foil isn’t just for flavor—it tenderizes the meat further during the final cook. Sounds weird, but it works: the acid breaks down tough fibers just enough to make slicing easier. Don’t skip it.
Dietary considerations for this boneless rib roast smoker
Gluten-Free Adaptation
This recipe is already gluten-free by default—no breading or thickeners are involved! The smoked paprika and brown sugar rub is safe for gluten-sensitive eaters, and the aluminum foil wrapping ensures no cross-contamination.
I always double-check my spices at specialty shops like Penzeys for gluten-free certification. The key is using certified gluten-free wood chips if you’re concerned about additives in some brands. 🌟
Dairy-Free Option
For a dairy-free version, simply omit the 2 tbsp butter from the foil wrapping step. Replace it with 1 tbsp olive oil mixed with 1 tbsp apple cider vinegar—it still creates that basting effect while keeping the meat moist.
I’ve tested this approach and it works beautifully, especially if you’re serving to guests with lactose intolerance. The vinegar adds tang without needing dairy. 🥥
Lower-Sodium Adjustments
If you’re watching your sodium intake, cut the 1½ tsp kosher salt in half to ¾ tsp in the rub. Enhance flavor with extra 1 tsp fresh garlic powder (not powdered) and ½ tsp onion powder—they add depth without sodium.
I also recommend using low-sodium apple cider vinegar for the basting liquid. The smoky flavor from the wood chips will still shine through. 💡
Keto-Friendly Considerations
This recipe is naturally keto-friendly when you make a few tweaks. Replace the 2 tbsp brown sugar with 1 tbsp erythritol or monk fruit sweetener to keep carbs low. The 2 tbsp butter in the foil wrapping is already keto-compliant, and the oil-rich meat itself provides healthy fats.
Just be mindful of portion sizes—this is still a rich, flavorful dish! The smoky flavor will satisfy even the most dedicated keto followers. 🍽️
Allergen-Free Approach
To make this completely allergen-free, ensure all ingredients are certified free of common allergens. Use non-GMO wood chips and check your smoked paprika for potential cross-contamination warnings. I always opt for certified organic spices from trusted brands like McCormick when preparing for guests with allergies.
The apple cider vinegar should be pasteurized to avoid mold concerns. This approach keeps the dish safe while maintaining all that smoky goodness. 🛡️
Nutrition facts
Frequently asked questions
Why does resting the roast matter after smoking?
Resting is non-negotiable for juicy results! After removing the roast from the smoker at 203°F, let it rest for 15-20 minutes before slicing. This lets the internal juices redistribute, preventing them from spilling out when you cut into it. Skipping this step means dry, less flavorful slices—trust me, the wait is worth it!
Can I use regular wood chips instead of oak and hickory?
Yes, but oak and hickory create that classic smoky depth. If you’re short on time, cherry or pecan chips still work well—they just add a slightly sweeter profile. Just soak them for 30 minutes like the recipe says to avoid burning. The key is steady smoke, not just any wood!
What if my smoker runs hotter than 250°F?
Adjust your air intake to lower the temperature—most smokers have vents you can tweak. If it’s consistently too hot, try using larger wood chips or adding water to the smoker box. The goal is 250°F for even cooking; consistency matters more than perfection here. Your thermometer will guide you!
How do I know when the “stall” has passed?
The stall happens around 165°F when the meat’s moisture evaporates, causing temps to plateau for 30-60 minutes. Keep smoking—this is normal! Once it starts rising again after the stall, wrap it in foil and add butter/vinegar to finish. Patience pays off with tender results.
Can I make the rub ahead of time?
Mix the 2 tbsp smoked paprika, 2 tbsp brown sugar, and spices into a bowl and store it in an airtight container for up to 2 weeks. Just rub it on the roast right before smoking—no need to pre-season. This saves time and keeps flavors fresh!

Trained in classic French technique but raised on slow-cooked ribs and spicy rubs, she blends culinary skill with smoke and soul.
- Pork Butt Smoker Recipe: Low and Slow to Juicy, Fall-Off-Bone Tenderness - November 2, 2026
- Brisket Recipe Slow Cooker: Fall-Apart Tender With Minimal Effort - November 2, 2026
- Smoked Brisket Recipe: Low and Slow to Fall-Apart Tenderness - November 2, 2026