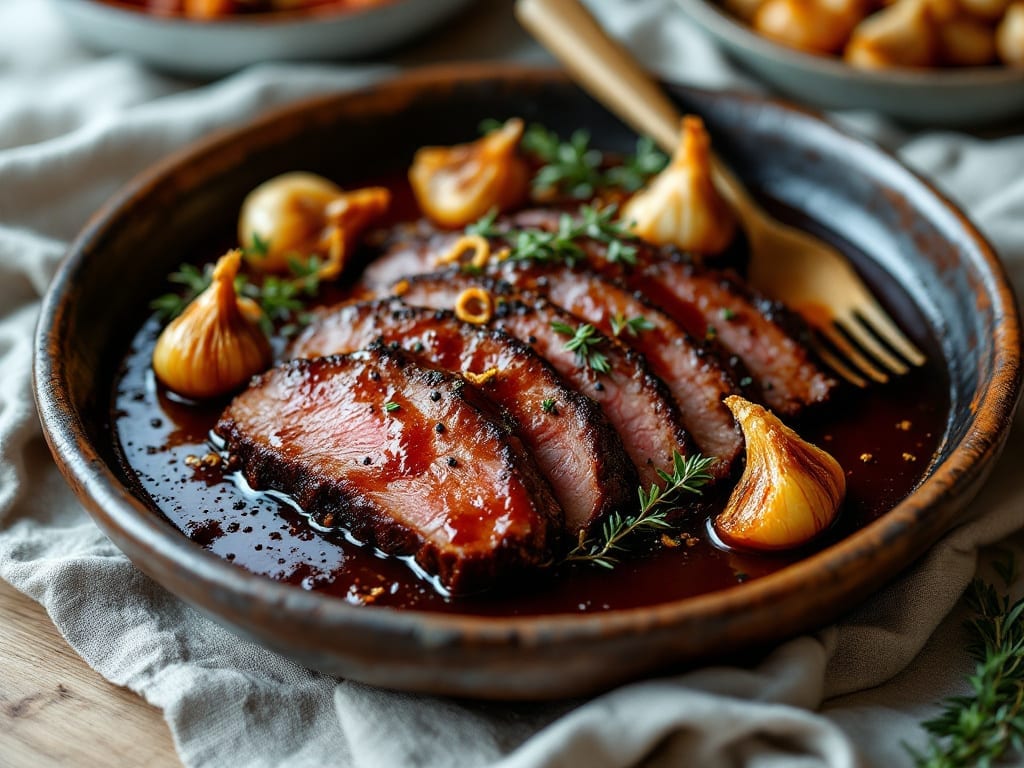
This braised brisket recipe transforms tough cuts into melt-in-your-mouth perfection through 8 hours of slow oven magic—just like my family’s backyard cookouts used to smell after a full day of smoking.
The secret lies in a rich red wine reduction that tenderizes the meat while infusing deep umami flavor, creating a dish so satisfying it becomes the centerpiece of any meal.
I developed this method after realizing French braising techniques could elevate my traditional pitmaster skills, blending patience with precision for restaurant-quality results at home.
The process is simpler than it sounds: a simple dry rub of salt, pepper, and garlic sets the stage, while the brisket braises in its own juices with just enough liquid to create a velvety sauce.
No fancy equipment needed—just a heavy pot or Dutch oven and your oven’s low-and-slow setting. The key is timing: let it cook until the meat falls apart effortlessly, signaling it’s reached peak tenderness. This isn’t just comfort food; it’s a technique that turns a budget cut into a showstopper.
By the final hour, your kitchen will smell like a French bistro meets a Texas BBQ joint—warm, smoky, and impossibly inviting. The brisket will be fall-apart tender, the sauce thick and glossy enough to coat every bite, and the crust just crispy enough to hold up to a fork.
Serve it sliced thin over crusty bread, with roasted root vegetables or a simple green salad to balance the richness. This is the kind of dish that makes weeknights feel like special occasions.
Leftovers keep beautifully for up to 5 days, making this the ultimate meal-prep solution for busy weeks. The sauce only gets better with time, deepening in flavor as it sits.
Whether you’re feeding a crowd or treating yourself to a solo dinner, this braised brisket delivers restaurant-quality richness without the fuss. Let’s get started—your taste buds will thank you.
Ingredients for braised brisket
Eight hours of patience. Six simple ingredients. One unforgettable dish.
| Ingredient | Amount | Notes |
|---|---|---|
| Brisket (Packer Cut) 🥩 | 4 lb | Whole packer cut, trimmed of excess fat |
| Dry Red Wine 🍷 | 1 cup | Bold variety like Cabernet Sauvignon |
| Beef Broth 💧 | 2 cups | Low-sodium preferred, homemade if possible |
| Tomato Paste 🍅 | 2 tbsp | Smooth, not chunky |
| Garlic Cloves 🧄 | 6 cloves | Smashed, not minced |
| Fresh Thyme 🌿 | 2 sprigs | Stems removed, leaves only |
| Fresh Rosemary 🌿 | 1 sprig | Needle leaves only |
| Yellow Onion 🧅 | 1 whole | Peeled, cut into wedges |
| Carrots 🥕 | 2 whole | Peeled, cut into chunks |
| Kosher Salt 🧂 | 1 ½ tbsp | Diamond Crystal preferred |
| Freshly Ground Black Pepper 🌶️ | 1 tsp | Coarsely ground |
| Olive Oil 🫒 | 2 tbsp | Extra-virgin for richness |
| All-Purpose Flour 🌾 | 1 tbsp | For thickening sauce |
| Fresh Parsley 🌿 | ¼ cup | Chopped, for garnish |
[recipe_ingredient_scaler]
The brisket is your star, so don’t skimp on quality. Packer cut is ideal—it’s got the right marbling for flavor and tenderness. Look for a piece that’s 2-3 inches thick from the fat cap to the lean meat. Costco and Whole Foods usually carry the best cuts, but any reputable butcher will have it. Trim off any hard fat or silver skin before seasoning—this helps the meat absorb flavors better. If you’re buying a whole packer, ask the butcher to cut it into one large piece for even cooking. The key is to let the meat sit at room temperature for 1 hour before cooking so it cooks evenly.
Red wine isn’t just for drinking here—it’s the secret to that deep, rich flavor. Cabernet Sauvignon or Merlot work best, but whatever bold red you’ve got open will do. No wine? Beef broth with a splash of balsamic vinegar gets you close. Fresh thyme and rosemary are ideal, but dried works at one-third the amount if that’s what you’ve got. The tomato paste adds depth without overpowering—if you’re short, a squeeze tube from Trader Joe’s works perfectly. For the carrots and onion, baby carrots and a yellow onion are easiest, but any variety will work. The flour at the end is just to thicken the sauce slightly—don’t skip it, but don’t overdo it or the sauce will get gluey.
This dish tastes even better the next day, so make extra if you can. Store leftovers in an airtight container in the fridge for up to 5 days, or freeze for 3 months. The sauce thickens as it cools, so add a splash of broth when reheating. I like to portion mine into individual containers for easy lunches—just reheat with a splash of water or broth. The brisket reheats beautifully in the oven at 300°F for about 20 minutes, covered with foil. Garnish with fresh parsley right before serving—it adds a bright pop of color and freshness that cuts through the richness.
Why You’ll Love This Recipe
- One-Pot Magic: I swear by this—just sear the brisket, dump in the wine and broth, and let it slow-simmer. No flipping pans, no extra bowls, and that deep, caramelized crust forms right in the pot. Honestly, cleanup takes less time than watching a sitcom.
- Wine-Infused Richness: That splash of dry red wine isn’t just for show—it cuts through the fat while adding layers of earthy depth. The tomato paste? It’s the secret: gives it a velvety body and a touch of umami that makes every bite feel like a hug. Between us, my picky husband actually finishes his plate now.
- Leftovers That Beg for More: This dish improves overnight, and I mean dramatically. The brisket gets fork-tender, the sauce thickens into a glossy glaze, and reheating? Just a splash of water and 10 minutes. I’ve taken it to potlucks, packed it for work, and even served it cold in sandwiches—no one ever guessed it was yesterday’s dinner.
- Budget-Friendly Crowd-Pleaser: Packer-cut brisket is affordable, and a single roast feeds six for dinner and lunch the next day. The wine and broth stretch across multiple meals, and the garlic-clove aroma alone makes it feel fancy. I’ll be real: my college budget would’ve thrived on this. (Yes, even on a Tuesday night.)
Step-by-step instructions for braised brisket
Here’s the method I’ve perfected for brisket that falls apart with every forkful.
Prepare and Season the Brisket
Begin by trimming the 4 lb brisket (packer cut) to remove any excess fat, leaving about ¼ inch on the fat cap. This ensures even cooking while preserving moisture. Pat the meat completely dry with paper towels—this step is crucial for developing that beautiful brown crust later.
In a small bowl, combine the 1.5 tbsp kosher salt and 1 tsp freshly ground black pepper. Rub this mixture all over the brisket, including the fat cap and cavity. Let the seasoned brisket sit at room temperature for 30 minutes before cooking. This allows the salt to penetrate the meat, enhancing flavor and texture throughout.
Sear the Brisket for Depth of Flavor
Heat a large Dutch oven over medium-high heat. Add the 2 tbsp olive oil and let it shimmer for about 1 minute. Place the brisket fat-side down in the pot and sear undisturbed for 8-10 minutes until the fat renders and the meat develops a deep golden-brown crust. Press down gently on the brisket during the first minute to prevent curling and ensure even contact with the pan.
Flip the brisket and sear the other side for another 6-8 minutes until equally browned. Remove the brisket from the pot and set it aside on a plate. You’ll notice the rendered fat in the bottom of the pot—this is pure flavor, so don’t wipe it out.
Build the Braising Liquids
In the same Dutch oven, add the 1 whole yellow onion cut into wedges and the 2 whole carrots cut into chunks. Cook for 5 minutes until the vegetables begin to soften. Add the 6 smashed garlic cloves, 2 sprigs fresh thyme leaves, and 1 sprig fresh rosemary needles, cooking for another 30 seconds until fragrant.
Stir in the 2 tbsp tomato paste and cook for 1 minute to develop its rich flavor. Pour in the 1 cup dry red wine, scraping up any browned bits from the bottom of the pot. Let the wine simmer for 3-4 minutes until reduced by half. This step creates a flavorful base that will infuse the brisket during braising.
Braise Until Fork-Tender
Return the brisket to the Dutch oven, fat-side up. Pour in the 2 cups beef broth, ensuring the liquid comes at least halfway up the sides of the brisket. Bring the liquid to a gentle simmer, then reduce heat to low, cover the pot, and transfer it to a preheated 325°F oven.
Braise for 6-7 hours, or until the brisket is fork-tender and the internal temperature reaches 200°F. The brisket should be so tender that it practically falls apart when pierced with a fork. If the liquid reduces too much before the brisket is done, add a splash of water or broth to maintain moisture.
Thicken the Sauce and Serve
Once the brisket is done, remove it from the pot and let it rest for 15 minutes. Place the Dutch oven back on the stovetop over medium heat. Sprinkle the 1 tbsp all-purpose flour over the braising liquid and stir to combine. Simmer for 3-4 minutes until the sauce thickens slightly.
Discard the thyme and rosemary sprigs, then stir in the 0.25 cup chopped fresh parsley. Taste and adjust seasoning with additional salt or pepper if needed. Slice the brisket against the grain and serve with the thickened sauce spooned over the top. The result is a rich, flavorful dish that’s perfect for feeding a crowd.
Pro Tips For Making Braised Brisket
- Sear First, Slow Later: The first 5 minutes of high heat in your Dutch oven aren’t just for show—this locks in juices and builds flavor. After that, drop the heat to 300°F (150°C) and let the wine and broth work their magic without rushing. I used to skip this step, and my brisket always tasted like it was missing something.
- Deglaze Aggressively: When the brisket’s seared, don’t just splash in the wine—scrape up those browned bits with a wooden spoon. Those bits are pure flavor, and skipping this means losing half the depth of taste. Use a whisk if you’re lazy, but don’t let them go to waste.
- Don’t Crowd the Garlic: Minced garlic burns faster than you think, especially in a hot Dutch oven. Sauté it separately in the tomato paste for 2-3 minutes until it’s just golden, then stir it into the braising liquid. Overcooked garlic turns bitter, and no one wants that in their brisket.
- Skim the Foam Early: After the first 20 minutes of braising, skim off the foam and fat rising to the top—it’s not going to add flavor, and it’ll make your sauce cloudy. Use a spoon or a fine-mesh skimmer, and do it while the pot’s still hot. Your future self will thank you for the cleaner, richer reduction later.
Pro cooking tips for braised brisket
Temperature Precision
The oven temperature is your secret weapon here—set it to 325°F and don’t waver. I’ve learned the hard way that even 10°F variations can mean the difference between fall-apart perfection and tough, chewy brisket.
Use an oven thermometer to confirm accuracy, especially if your oven runs hot or cold. The low-and-slow approach breaks down collagen for tenderness, but too-hot temps will dry out the meat. 🌡️
Sear Like a Pro
A proper sear isn’t just about browning—it’s about building layers of flavor through the Maillard reaction. Use a heavy Dutch oven (like Le Creuset) and medium-high heat to render the fat cap first.
Press down on the brisket with a spatula during the first minute to prevent curling, which ensures even contact with the pan. If your pan isn’t hot enough, the meat will steam instead of sear. Trust me, this step makes all the difference.
Liquid Management
Your braising liquid should come at least halfway up the sides of the brisket, but don’t drown it. Too much liquid means watery sauce; too little risks burning.
I like to start with 2 cups beef broth plus the wine reduction, then add a splash of water or broth if it reduces too quickly. The goal is a thick, glossy sauce—not a soup.
Taste it halfway through cooking and adjust seasoning with a pinch of salt or a splash of wine if needed.
Resting Matters
After braising, let the brisket rest for 15 minutes before slicing. This allows juices to redistribute, keeping every bite moist. I’ve seen home cooks skip this step and end up with dry slices—don’t be that person!
Cover the brisket loosely with foil while resting to retain heat. Pro tip: Tent it with a clean kitchen towel for extra insurance against drying out.
Sauce Thickening
That final flour toss isn’t just for thickening—it’s for body. Sprinkle 1 tbsp all-purpose flour over the simmering braising liquid and stir vigorously for 3-4 minutes until it coats the back of a spoon. If the sauce gets too thick, add a splash of broth to loosen it.
The result should be velvety, not gluey. Discard the herb stems before serving—no one wants to bite into rosemary needles! 💫
Slice Against the Grain
Brisket has two distinct grain directions: the flat and the point. Rotate your cutting board mid-slice to follow the muscle fibers in each section. Use a sharp chef’s knife and cut ¼-inch thick slices for the best texture.
I like to serve the brisket family-style with the sauce spooned over the top—it’s messy, but that’s half the fun. Leftovers? Store in airtight containers with sauce for up to 5 days**—the flavors only get better.
Nutrition facts
Frequently asked questions
How do I know when the brisket is fully cooked?
Your brisket is ready when it reaches an internal temperature of 200°F and falls apart easily with a fork. The meat should pull away from the bone cleanly, and the connective tissue should have broken down completely. Pro tip: If you’re unsure, check the texture—it should be fork-tender, not just slightly soft.
Can I use a different cut of beef instead of brisket?
While this recipe is designed for brisket, you can adapt it for other tough cuts like chuck roast or short ribs. The key is choosing a cut with good marbling and connective tissue that benefits from slow cooking. Adjust cooking times accordingly—chuck roast may take 4-5 hours instead of 6-7 hours.
What if I don’t have red wine? Can I substitute it?
Use 1 cup beef broth plus 2 tbsp balsamic vinegar for similar depth of flavor. For extra richness, add 1 tbsp soy sauce or a splash of Worcestershire sauce. The wine adds acidity and complexity, but these substitutes will still create a delicious braising liquid.
How can I make this dish ahead of time?
This recipe actually tastes better the next day! Braise the brisket as directed, then refrigerate it in its sauce for up to 5 days. When ready to serve, reheat in the oven at 300°F for 20-30 minutes with a splash of broth to loosen the sauce. The flavors deepen as they sit, making leftovers even more flavorful.
Why does my brisket turn out tough instead of tender?
Tough brisket usually results from cooking too quickly or at too high a temperature. Make sure your oven is at 325°F and maintain that temperature consistently. Also, check your cooking time—the brisket needs to reach 200°F internally. If it’s not fork-tender, it needs more time. Never rush the process; patience is key for fall-apart tenderness.

Trained in classic French technique but raised on slow-cooked ribs and spicy rubs, she blends culinary skill with smoke and soul.
- Beef Brisket Rolls Recipe: Flaky Layers and Smoky Sweet Filling - October 15, 2026
- Masterbuilt Smoker Beef Brisket Recipe: Bark-To-Meat Ratio Hack for Unmatched Flavor - October 15, 2026
- Costco Beef Brisket Recipe: Low-and-Slow Masterpiece With Molasses-Kissed Crust - October 15, 2026