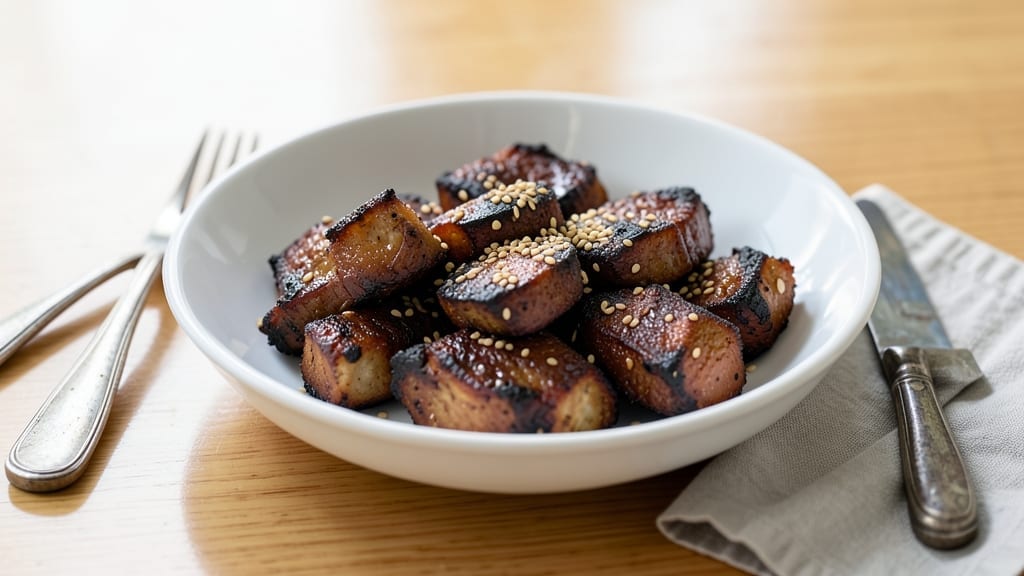
Mastering burnt ends without a smoker is all about patience and precision—transforming tough brisket into melt-in-your-mouth richness using simple techniques. The key lies in a dry rub that clings to the meat like armor, while slow cooking breaks down collagen into velvety perfection.
I first perfected this method after years of studying how pitmasters achieve that signature fall-apart texture, and it delivers the same results in your oven or grill.
This recipe starts with a high-quality brisket—look for well-marbled cuts from your local butcher—and a dry rub of smoked paprika, brown sugar, garlic powder, and black pepper that builds deep, smoky flavor. The secret to mimicking smoker results without one?
A combination of slow, indirect heat and a touch of liquid smoke in the cooking liquid, plus a final char from the broiler to add that signature bark. Every step is designed to maximize tenderness while keeping the process straightforward.
By the time you slice into those fall-apart pieces, you’ll have a dish that rivals any competition-style burnt ends—juicy, rich, and packed with that unmistakable smoky-sweet flavor. The rub caramelizes into a sticky crust, while the slow cook transforms tough meat into something so tender it practically dissolves.
Serve with classic sides like tangy pickles or creamy coleslaw to balance the richness, and you’ve got a meal that’s worth every minute of waiting.
Perfect for game days, family gatherings, or when you crave that deep, smoky satisfaction without needing a smoker. The method is foolproof, the flavors are unbeatable, and the result is a dish that turns weeknight dinners into special occasions. Let’s get started—your taste buds will thank you.
Ingredients for burnt ends recipe without a smoker
A well-marbled brisket and a dry rub that builds smoky-sweet layers—this is how you get that signature burnt ends texture without a smoker.
| Ingredient | Amount | Notes |
|---|---|---|
| Beef Brisket 🥩 | 4 lb | Well-marbled, point cut preferred |
| Smoked Paprika 🌶️ | ¼ cup | High-quality, not sweet paprika |
| Light Brown Sugar 🍯 | ¼ cup | Packed, for caramelization |
| Garlic Powder 🧄 | 2 tbsp | Freshly ground preferred |
| Ground Black Pepper 🌶️ | 1 ½ tbsp | Freshly cracked for intensity |
| Kosher Salt 🧂 | 1 tbsp | Diamond Crystal preferred |
| Liquid Smoke 💨 | 1 tbsp | Pure, no additives |
| Beef Broth 🥛 | 2 cups | Low-sodium, homemade or quality store-bought |
| Apple Cider Vinegar 🍎 | ½ cup | For tenderizing |
| Yellow Onion 🧅 | 1 whole | Yellow or red, diced |
| Fresh Thyme 🌿 | 2 sprigs | Or 1 tsp dried thyme |
| Fresh Rosemary 🌿 | 1 sprig | For aromatic depth |
| Butter 🧈 | ½ cup | Unsalted, cold for finishing |
| Yellow Cornmeal 🌾 | ¼ cup | For final coating |
[recipe_ingredient_scaler]
The brisket is non-negotiable. Look for point cut with thick fat cap—your local butcher will know what to recommend. Costco or Whole Foods often carry well-marbled briskets, but don’t hesitate to ask for their best cut. The fat is what renders into flavor during slow cooking, so don’t skimp. If you’re using a pre-cut brisket, trim any large fat chunks to about 1/4-inch thickness—they’ll render faster and not make your cooking liquid greasy. For the rub, Penzeys or McCormick smoked paprika gives that authentic smoker flavor, while brown sugar adds just enough sweetness to caramelize beautifully. The garlic powder and black pepper are the backbone of the flavor profile, so don’t substitute with salted versions.
No liquid smoke? Substitute with 1 tbsp of smoked salt—it’s not identical, but it adds depth. Short on fresh thyme or rosemary? Dried works at one-third the amount, but fresh herbs add that aromatic punch that’s hard to replicate. For the vinegar, if you’re avoiding it, lemon juice works in a pinch, but apple cider vinegar’s mild sweetness balances the smokiness better. The beef broth should be low-sodium—Homemade or Kitchen Basics are my go-tos. If you’re using a pre-made rub, skip the garlic powder and black pepper in the ingredients list, but don’t skip them entirely—they’re what makes this taste homemade. For the cornmeal, if you’re out, all-purpose flour works fine, but cornmeal gives that perfect crispy texture when charred.
Brisket keeps best in the fridge for 3-4 days before cooking, but you can freeze it for up to 6 months—thaw overnight in the fridge before seasoning. The dry rub will stay potent for 3 months in an airtight container, so make extra if you’re planning to use it again. Once cooked, burnt ends reheat beautifully—slowly in the oven at 300°F with a splash of broth keeps them moist. Portion into containers with a little extra cooking liquid to freeze for up to 3 months. The rub can be made ahead and stored in the fridge for up to 1 week or frozen for 3 months—just let it come to room temperature before applying.
Why You’ll Love This Recipe
- Oven-Friendly Magic: I don’t own a smoker, but this recipe makes me feel like I do. The trick? A Dutch oven and 300°F oven do all the heavy lifting while I prep the rest of dinner. The brisket gets that smoky depth from the liquid smoke and smoked paprika—no extra gear needed.
- Crispy-Chewy Perfection: That final broil with cornmeal and butter? Game-changer. You get the tender, fall-apart meat from the slow cook, but the cornmeal gives it that signature burnt-end crunch. It’s like eating two textures at once—creamy and crispy, every bite.
- Leftovers That Last: Cook once, eat twice. These burnt ends taste even better the next day, especially after a slow reheat in the oven with a splash of broth. I pack them for lunches, toss them in tacos, or just snack straight from the fridge. No waste, just flavor.
- Budget Beef Boost: A 4 lb brisket is cheaper than you think, and the light brown sugar and garlic powder stretch the flavor so far. You’re not just feeding yourself—you’re getting a whole meal’s worth of rich, smoky goodness. My wallet (and my taste buds) thank me.
Step-by-step instructions for slow-cooked burnt ends
Here’s how to transform tough brisket into melt-in-your-mouth burnt ends using just your oven or slow cooker.
Prep and Season the Brisket for Maximum Flavor
Begin by trimming the fat cap of the 4 lb beef brisket down to about ¼-inch thickness, leaving the fat on the edges for moisture. This step is crucial—it allows the rub to penetrate while preventing excessive grease during cooking. In a small bowl, combine the ¼ cup smoked paprika, ¼ cup light brown sugar, 2 tbsp garlic powder, 1½ tbsp ground black pepper, 1 tbsp kosher salt, and 1 tbsp liquid smoke. Mix thoroughly until evenly distributed.
Generously coat the brisket with the spice mixture, pressing it into the meat so it adheres well. Pay special attention to the point cut, as it tends to dry out faster. Place the seasoned brisket in a resealable plastic bag and refrigerate for at least 4 hours, or preferably overnight. This resting period allows the rub to penetrate deeply, ensuring every bite is packed with flavor. Real talk: Don’t skip this step—it makes all the difference in the final texture and taste.
Sear and Deglaze for Deep Flavor
Preheat your oven to 300°F. Heat a large Dutch oven over medium-high heat and add the 1 yellow onion, diced, along with the 2 sprigs fresh thyme and 1 sprig fresh rosemary. Sear for 5 minutes until the onion softens slightly and becomes fragrant. Remove the aromatics with a slotted spoon and set aside, leaving the rendered onion bits in the pot.
Add the seasoned brisket to the Dutch oven, fat-side down, and sear for 8-10 minutes until a deep golden-brown crust forms. Flip the brisket and sear the other side for another 5-7 minutes. Here’s the thing—this sear creates a flavorful crust that forms the foundation of your burnt ends. Once seared, remove the brisket and set it aside. Pour in the ½ cup apple cider vinegar and scrape up all the browned bits from the bottom of the pot. This deglazing step captures all the concentrated flavors that would otherwise be lost.
Slow Cook Until Fork-Tender
Return the brisket to the Dutch oven and pour in the 2 cups beef broth. Bring the liquid to a simmer, then cover and transfer to the preheated 300°F oven. Cook for 4-5 hours, or until the brisket reaches an internal temperature of 195°F and is fork-tender. Here’s where patience pays off—this long, slow cook time breaks down the tough connective tissue, turning it into rich, gelatinous goodness that makes these ends fall apart.
About halfway through cooking, check the liquid level and add a splash of water or broth if it’s reduced too much. You want enough liquid to keep the brisket moist but not so much that it dilutes the flavor. Your oven might run hot, so start checking at the 3-hour mark. The brisket is done when it’s so tender that a fork slides in and out like butter, and the meat pulls apart easily.
Finish with Cornmeal and Butter for Crispy Texture
Once the brisket reaches the perfect internal temperature, remove it from the oven and transfer it to a cutting board. Let it rest for 15 minutes before handling. Meanwhile, preheat your broiler to high. In a small bowl, combine the ¼ cup yellow cornmeal with 2 tbsp of the ½ cup butter, creating a paste-like consistency. This mixture will give your burnt ends that signature crispy exterior.
Using two forks, shred the brisket into bite-sized pieces and place them in a single layer on a baking sheet. Brush each piece with the cornmeal-butter mixture, ensuring even coverage. Transfer the baking sheet to the broiler and cook for 3-5 minutes, watching closely to prevent burning. The cornmeal will crisp up beautifully, creating that coveted crunch you love in burnt ends. Finish by tossing the shredded brisket with the remaining ¼ cup butter, minus the 2 tbsp used earlier, and any accumulated juices from the Dutch oven. The result should be tender, flavorful pieces with a crispy, caramelized exterior.
Pro Tips For Making Burnt Ends Recipe Without A Smoker
- Trim That Fat Right: Don’t just eyeball it—trim the brisket’s fat cap to a crisp ¼-inch thickness before seasoning. Too thick, and your Dutch oven turns into a grease bath; too thin, and you lose moisture. I learned this after watching my first batch swim in its own rendered fat like a sad, greasy soup.
- Sear in Batches: If your brisket is wider than your Dutch oven, sear it in two rounds—fat-side down first, then flip and finish the second side. Crowding the pan steams the meat instead of browning it, and nobody wants sad, pale burnt ends. Trust me, the extra 5 minutes saves you from regret later.
- Vinegar First, Broth Second: Pour in the ½ cup apple cider vinegar before adding the broth—it tenderizes the brisket faster and cuts through the richness of the rendered fat. Skip this, and your slow cook liquid turns murky instead of bright. It’s the one step that actually changes the texture, not just the flavor.
- Broil Like a Boss: When finishing with cornmeal, spread the shredded brisket in a single layer—no overlapping. Too thick, and it steams instead of crisps. Watch it like a hawk after 3 minutes; burnt ends should be golden, not charcoal. (Yes, even if you’re impatient like me.)
Troubleshooting this recipe
Oven Temp Troubleshooting
If your oven runs hotter than 300°F, you’ll need to adjust your cooking time. I’ve learned the hard way that some ovens can reach 325°F or more, which dries out the brisket.
Use an oven thermometer to monitor the actual temperature and reduce it by 25°F if needed. This ensures your brisket stays moist and tender. 🌡️
Fat Cap Consistency
Some briskets come with uneven fat distribution, which can lead to dry spots. Trim the fat cap to ¼-inch thickness, but leave ¼-inch fat edges to prevent moisture loss. If your brisket has large fat chunks, trim them down to avoid greasy cooking liquid that can dilute flavor.
Liquid Level Control
Too much liquid means watery burnt ends, while too little can cause sticking. Keep the liquid level about ½-inch above the brisket. If it reduces too quickly, add ¼ cup beef broth every hour.
I always check halfway through cooking to adjust—this keeps the meat juicy without diluting the rub’s intensity.
Resting Mistakes
Skipping the 15-minute rest after cooking is a common error. The meat needs time to redistribute juices, or you’ll end up with dry pieces. I always cover the brisket with foil and let it rest—this step is non-negotiable for perfect texture.
Don’t rush it, or you’ll lose all that tender work.
Broiler Burn Risk
Broiling for 3-5 minutes can easily turn crispy cornmeal into burnt ends. Keep a close eye on the pieces—they’ll crisp up fast. If the cornmeal starts smoking, pull it off immediately. I like to use a baking sheet with a wire rack for better airflow and even browning.
Temperature Confusion
Checking internal temperature at the wrong spot causes inaccurate readings. Use a meat thermometer in the thickest part of the point cut, avoiding fat or bone. The 195°F target is for the thickest section—if your brisket varies in thickness, check multiple spots to ensure even doneness.
Nutrition facts
Frequently asked questions
Why does the brisket need to rest in the fridge before cooking?
The 4-hour overnight rest lets the dry rub penetrate deeply into the meat, ensuring every bite is packed with flavor. This step also helps the fat render evenly during cooking, keeping your burnt ends juicy and tender. Skipping it means missing out on that melt-in-your-mouth texture!
Can I use a slow cooker instead of the oven?
After searing the brisket, transfer it to your slow cooker with the broth and aromatics. Cook on low for 8 hours or high for 6 hours, adding broth as needed. The key is patience—slow cooking breaks down the collagen for that signature fall-apart texture.
What if my oven runs hotter than 300°F?
Use an oven thermometer to check the actual temperature. If it’s hotter, reduce the heat by 25°F to prevent drying out the brisket. Alternatively, tent it with foil after 2 hours to retain moisture. Adjusting the temp ensures your burnt ends stay tender, not tough.
How do I know when the brisket is done?
Check the internal temperature in the thickest part of the point cut—it should reach 195°F and feel fork-tender. The meat should also pull apart easily when prodded. If unsure, err on the side of slightly underdone and let it rest longer—it’ll keep tenderizing!
Can I make burnt ends ahead of time?
Yes! Cook the brisket, cool it completely, and store in an airtight container in the fridge for up to 3 days. Reheat slowly in the oven at 300°F with a splash of broth to restore moisture. Freeze for up to 3 months for future game-day feasts.

Trained in classic French technique but raised on slow-cooked ribs and spicy rubs, she blends culinary skill with smoke and soul.
- Chinese Braised Beef Brisket with Daikon Recipe: Silky Tender Meat and Crunchy Roots - October 18, 2026
- Oklahoma Joe’s Smoked Beans Recipe: Slow-Smoked Flavor That Rivals the Original - October 18, 2026
- Beef Brisket Chili Recipe: Slow-Simmered Richness with Deep Flavor Layers - October 18, 2026