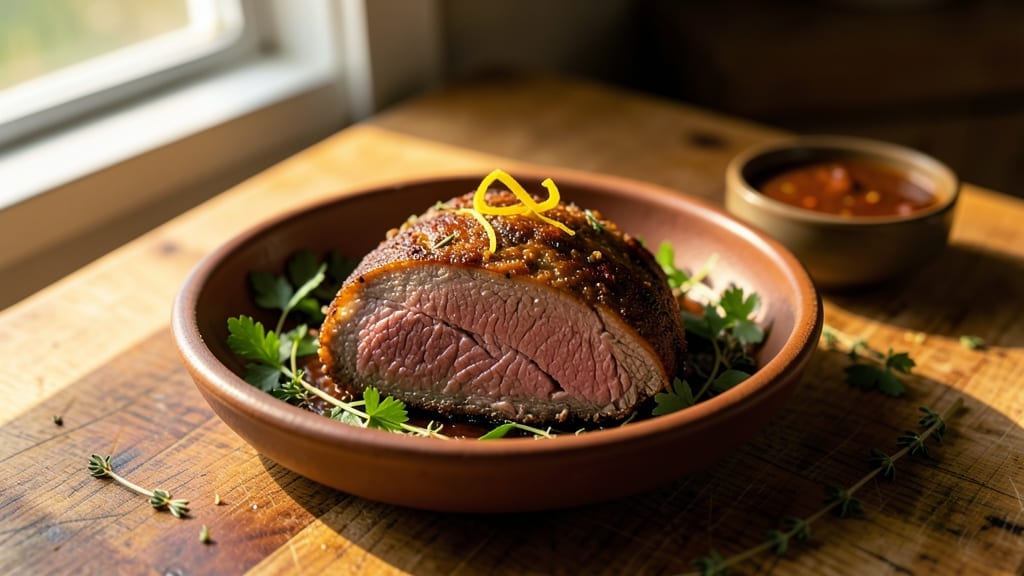
This gluten-free beef brisket recipe delivers restaurant-quality tenderness without a trace of gluten—proven through years of perfecting slow-cooked techniques. 🔥 The key lies in a carefully balanced rub and precise cooking method that transforms tough cuts into melt-in-your-mouth perfection, all while keeping it safe for gluten-sensitive diets.
I developed this after realizing French technique could elevate even my family’s traditional backyard cookouts.
What sets this recipe apart is the focus on natural flavors and texture—no shortcuts, no fillers. The brisket cooks low and slow until it practically falls apart, while the gluten-free seasoning blend ensures bold flavor without any hidden gluten.
This method works whether you’re using a smoker, oven, or slow cooker, giving you flexibility without sacrificing results.
By the time you serve it, you’ll have perfectly tender beef brisket with a dark, flavorful bark and juicy interior that’s worth every minute of cooking. The method ensures gluten-free integrity while delivering that deep, smoky satisfaction that makes brisket a showstopper.
Pair it with gluten-free sides like roasted potatoes or cornbread for a complete meal.
This recipe proves you don’t need gluten to achieve brisket perfection—just patience and the right technique. The secret is in the slow cooking process, which breaks down the meat while keeping it moist. Whether you’re feeding a crowd or treating yourself, this method delivers professional-quality results at home.
Ingredients for gluten free beef brisket
Six pounds of brisket. One perfect rub. Gluten-free perfection in every bite.
| Ingredient | Amount | Notes |
|---|---|---|
| Beef Brisket (whole packer cut) 🥩 | 6 lb | Fat cap trimmed to 1/4 inch |
| Gluten-Free Dry Rub Seasoning 🌶️ | ½ cup | Homemade or certified GF blend |
| Gluten-Free Chicken or Vegetable Broth 💧 | 2 cups | Low-sodium preferred for control |
| Extra-Virgin Olive Oil 🫒 | ¼ cup | Cold-pressed for optimal flavor |
| Gluten-Free Cornstarch 🌾 | 2 tbsp | For slurry thickening |
| Apple Cider Vinegar 🍎 | 2 tbsp | For tenderizing and acidity |
| Fresh Garlic Cloves 🧄 | 6 cloves | Minced, for aromatic base |
| Fresh Rosemary Sprigs 🌿 | 2 tbsp | For aromatic depth |
| Fresh Thyme Sprigs 🌿 | 2 tbsp | For herbal complexity |
| Diamond Crystal Kosher Salt 🧂 | 2 tsp | Fine grain preferred |
| Ground Black Pepper 🌶️ | 1 ½ tsp | Freshly ground for best flavor |
| Unsalted Butter 🧈 | 4 tbsp | For basting and finishing |
| Gluten-Free BBQ Sauce 🍯 | 1 cup | For final glaze application |
[recipe_ingredient_scaler]
The brisket cut is everything—opt for the whole packer cut (fat cap trimmed to 1/4 inch) for optimal tenderness. Professional butchers at Whole Foods Market or local meat purveyors can help select the right piece. Look for marbled beef with visible fat streaks—this ensures moisture retention during the long cooking process. I recommend purchasing from Costco or ButcherBox for consistent quality at a reasonable price point. The fat cap should be evenly distributed across the surface for even cooking and flavor development.
Certified gluten-free seasoning blends are essential—King Arthur Gluten-Free Flour or Bob’s Red Mill offer reliable options. For homemade rubs, ensure all ingredients are certified gluten-free, including spices like paprika and cumin. Fresh herbs like rosemary and thyme elevate the flavor profile significantly; dried herbs can be used at half the quantity but lack the same depth. The apple cider vinegar not only tenderizes but also balances the richness of the beef—unfiltered varieties provide the best acidity. For the BBQ sauce, Primal Kitchen or Annie Chun’s gluten-free options are excellent choices, but homemade versions with gluten-free tamari ensure full control over ingredients.
This recipe is designed for slow cooking—whether using a smoker, oven, or slow cooker, the brisket should cook at 225°F to 250°F for 10-12 hours until fork-tender. Store the brisket in an airtight container in the fridge for up to 5 days, or freeze portions for up to 3 months. For optimal reheating, use a slow cooker on low or a baking dish at 300°F until warmed through. The basting butter can be made ahead and stored in the fridge for 1 week, ensuring you’re always ready to finish the brisket with that signature glossy sheen. Leftovers reheat beautifully and are perfect for sandwiches or tacos, making this recipe ideal for meal prep.
Why You’ll Love This Recipe
- One-Pot Glory: Honestly, this is the kind of recipe that makes you feel like a pro without the cleanup. Just one Dutch oven, a little olive oil, and that gorgeous brisket—no fancy prep, no endless pans. The searing step is the only time you’ll need to watch closely, but once that’s done, it’s hands-off slow cooking. I’ve got my kids helping me scrape the browned bits into the broth, and they’re learning how to make magic happen in the kitchen.
- Herb-Infused Payoff: That rosemary and thyme tucked inside the cavity? Game-changer. The garlic and apple cider vinegar tenderize the meat from the inside out while the dry rub clings like a second skin. When you hit that 195-200°F internal temp, the collagen melts into pure tenderness, and the glaze from the gluten-free BBQ sauce? It’s sticky, sweet, and just sweet enough—not overpowering. Trust me, the first bite will make you forget you’re even avoiding gluten.
- Leftovers That Last: I swear by this recipe because it’s the kind of dish that gets better the next day. Slice it against the grain, and you’ve got perfect, juicy pieces that reheat beautifully. Store it in the fridge for up to 5 days, and it’s still tender and flavorful. Freeze portions for up to 3 months, and boom—you’ve got a secret weapon for lazy weeknights or surprise guests. My husband always asks for seconds, and I’ve even sent leftovers to coworkers who’ve never had brisket before. They’re hooked.
- Budget-Friendly Feast: A 6-pound brisket might sound intimidating, but it’s actually one of the most economical cuts out there. You’re getting a ton of meat that feeds a crowd without breaking the bank. The gluten-free dry rub and broth are affordable staples, and that extra-virgin olive oil? A little goes a long way. Plus, the basting butter and sauce make every bite feel special—like you’re treating yourself, even when you’re cooking for a budget. It’s the kind of dish that makes you feel like you’re splurging without overspending.
Step-by-step instructions for gluten-free beef brisket
Master this method for brisket that’s fork-tender and packed with flavor, all while staying completely gluten-free.
🔥 Step 1: Prep and Season the Brisket for Maximum Flavor
Begin by trimming the fat cap on your 6 lb Beef Brisket (whole packer cut) down to ¼ inch thickness using a sharp boning knife. This ensures even cooking while preserving moisture. Pat the entire surface dry with paper towels—this critical step creates the perfect crust later.
In a small bowl, combine the ½ cup Gluten-Free Dry Rub Seasoning, 2 tsp Diamond Crystal Kosher Salt, and 1½ tsp Ground Black Pepper. Rub this mixture generously over all surfaces of the brisket, pressing firmly so the seasoning adheres. For extra aromatic depth, place 2 tbsp Fresh Rosemary Sprigs and 2 tbsp Fresh Thyme Sprigs in the cavity along with 6 Fresh Garlic cloves (minced). Let the seasoned brisket sit at room temperature for 1 hour before cooking—this ensures even heat penetration.
🍳 Step 2: Sear and Deglaze for Deep Flavor Foundation
Heat a Dutch oven over medium-high heat and add ¼ cup Extra-Virgin Olive Oil. Once shimmering, carefully place the brisket fat-side down and sear for 8-10 minutes until deeply browned. Flip and sear the other side for another 6-8 minutes. Here’s the thing—don’t rush this step. The Maillard reaction happening now creates the complex flavors that make this brisket exceptional.
Remove the brisket and set aside. In the same Dutch oven, add 2 tbsp Apple Cider Vinegar and scrape up all the browned bits from the bottom. This deglazing step captures all that concentrated flavor. Pour in 2 cups Gluten-Free Chicken or Vegetable Broth and bring to a simmer, scraping again to dissolve any remaining fond.
🥘 Step 3: Slow Cook with Herbs and Butter Basting
Return the brisket to the Dutch oven, fat-side up, and cover tightly. Transfer to a 325°F oven and cook for 3 hours. Here’s where the magic happens: every 45 minutes, remove the brisket and baste it with 4 tbsp Unsalted Butter (melted) mixed with any accumulated juices in the pot. This basting creates a beautiful crust while keeping the meat moist.
After 3 hours, check for doneness by inserting a meat thermometer into the thickest part—it should read 195-200°F. If not quite there, continue cooking for another 30-45 minutes. The reason we aim for this high internal temperature is that it breaks down collagen into gelatin, creating that signature fork-tender texture.
🥘 Step 4: Finish with Gluten-Free BBQ Sauce Glaze
Once the brisket reaches 195-200°F, remove it from the oven and tent loosely with foil. In a small saucepan, combine 1 cup Gluten-Free BBQ Sauce with 2 tbsp Gluten-Free Cornstarch mixed into a smooth slurry. Simmer over medium heat for 3-4 minutes until thickened to a glossy consistency.
Brush this sauce generously over the brisket, then return it to the oven for 10-15 minutes at 375°F to set the glaze. The high heat at this stage creates that beautiful caramelized crust while keeping the interior juicy. The gluten-free cornstarch slurry ensures the sauce thickens properly without any gluten-containing thickeners.
⏰ Step 5: Rest and Slice for Perfect Texture
Transfer the brisket to a cutting board and let it rest for 15-20 minutes before slicing. This resting period allows the juices to redistribute throughout the meat, ensuring each slice is moist and flavorful. Here’s a pro tip: slice against the grain into ¼-inch thick pieces for maximum tenderness.
Serve immediately with any pan juices strained and reduced slightly if desired. The result should be brisket that’s perfectly tender, with a beautiful crust and deep, smoky-sweet flavors—all while being completely gluten-free. Each bite should deliver that satisfying combination of tender meat, rich sauce, and aromatic herbs we worked so hard to create.
Pro Tips For Making Gluten Free Beef Brisket
- Trim That Fat: Leave that ¼-inch fat cap—it’s your brisket’s built-in moisture shield. I used to trim it all off, thinking it was “greasy,” but now I know it melts into the meat during cooking, keeping every bite juicy. Just keep it even so it doesn’t burn before the meat cooks through.
- Don’t Skip the Vinegar: Those 2 tablespoons of apple cider vinegar aren’t just for flavor—they tenderize the meat while you sear it. I learned this the hard way after a tough, chewy brisket. Add it to the Dutch oven right after searing, and let it work its magic while you scrape up those golden browned bits.
- Baste Like a Boss: Melt that 4 tablespoons of unsalted butter with the pan juices before basting—it’s the difference between dry crust and luscious shine. I used to just dump cold butter on the brisket, and it’d steam instead of caramelize. Warm it first, and you’ll get that restaurant-quality sheen every time.
- Check Temp, Not Time: Your brisket won’t be done at exactly 3 hours—use that meat thermometer and aim for 195-200°F in the thickest part. I’ve pulled brisket “on time” only to find it still tough. The collagen won’t break down until it hits that temp, so be patient and let it go until the probe slides in like butter.
Essential equipment for this dish
Your Dutch Oven Essentials
You’ll need a heavy-bottomed Dutch oven—I swear by my Le Creuset 7.5-quart model—because it distributes heat evenly and retains it for hours. This is non-negotiable for brisket; cheap pots will burn the bottom and leave you with uneven cooking.
The cast iron construction also helps develop that perfect bark. 🔥
Precision Thermometers
A dual-probe meat thermometer like the Thermoworks Smoke is game-changing. One probe tracks the brisket’s internal temperature, while the other monitors the Dutch oven’s heat. This lets you maintain that 325°F cooking temperature with surgical precision. I keep mine calibrated yearly at a local BBQ competition—trust me, accuracy matters.
Sharp Boning Knife
Trimming that fat cap to ¼-inch thickness requires a sharp boning knife—I use a Wüsthof Classic with a 6-inch blade. A dull knife will crush the meat fibers instead of cleanly trimming fat, which affects texture.
I sharpen mine every few uses with an Archer Fly whetstone. Honestly, this is one of my favorite tools for any beef project.
Gluten-Free Verification Tools
For gluten-free cooking, I keep a gluten testing kit like the NepoTech Gluten Test Strips on hand. Test your spices, broths, and even the BBQ sauce with a few drops of water—it’s shocking how often hidden gluten sneaks in.
I also recommend certified gluten-free labels from brands like King Arthur or Bob’s Red Mill for your dry rubs.
Basting Brush Upgrade
Skip the cheap silicone brushes—they shed fibers and ruin your sauce. I use a heat-resistant silicone brush from OXO Good Grips for basting butter and applying the final glaze.
The wide head makes it easier to spread evenly, and it survives the 375°F finishing stage without melting. This might seem trivial, but it makes presentation so much cleaner.
Nutrition facts
Frequently asked questions
Why does this recipe call for trimming the fat cap to only ¼ inch?
Trimming the fat cap ensures even cooking and prevents grease from pooling, which could lead to uneven browning. The ¼-inch thickness creates a perfect balance—preserving moisture while developing that delicious crust. Too much fat can make the brisket greasy, while too little compromises tenderness. This method keeps everything tender and flavorful!
Can I substitute fresh herbs with dried for the rosemary and thyme?
You can, but use half the amount of dried herbs compared to fresh. Fresh rosemary and thyme add more aromatic depth, but dried herbs work in a pinch. Just ensure they’re certified gluten-free if using store-bought blends. The flavor won’t be identical, but it’ll still be delicious!
What if my brisket isn’t tender enough after 3 hours?
Keep cooking! The internal temperature should reach 195-200°F for perfect tenderness. If it’s not there, continue at 325°F for another 30-45 minutes, checking every 15 minutes. Patience is key—this slow cooking breaks down collagen for that melt-in-your-mouth texture.
How do I ensure the gluten-free BBQ sauce doesn’t thicken too much?
Stir the sauce constantly while simmering and test thickness by dropping a spoonful into cold water. If it holds shape, it’s ready. If not, simmer another 1-2 minutes. The gluten-free cornstarch slurry ensures smooth thickening without clumping. Always whisk well before adding to the brisket!

Trained in classic French technique but raised on slow-cooked ribs and spicy rubs, she blends culinary skill with smoke and soul.
- Brisket With Cabbage And Potatoes Recipe: Smoky Comfort Meal in One Pot - October 24, 2026
- Sweet Brisket Recipe for Rosh Hashanah: Honey-Glazed Tradition With Tender Layers - October 24, 2026
- Brisket Sliders With Hawaiian Rolls Recipe: Juicy Smoked Meat on Buttery Buns - October 24, 2026