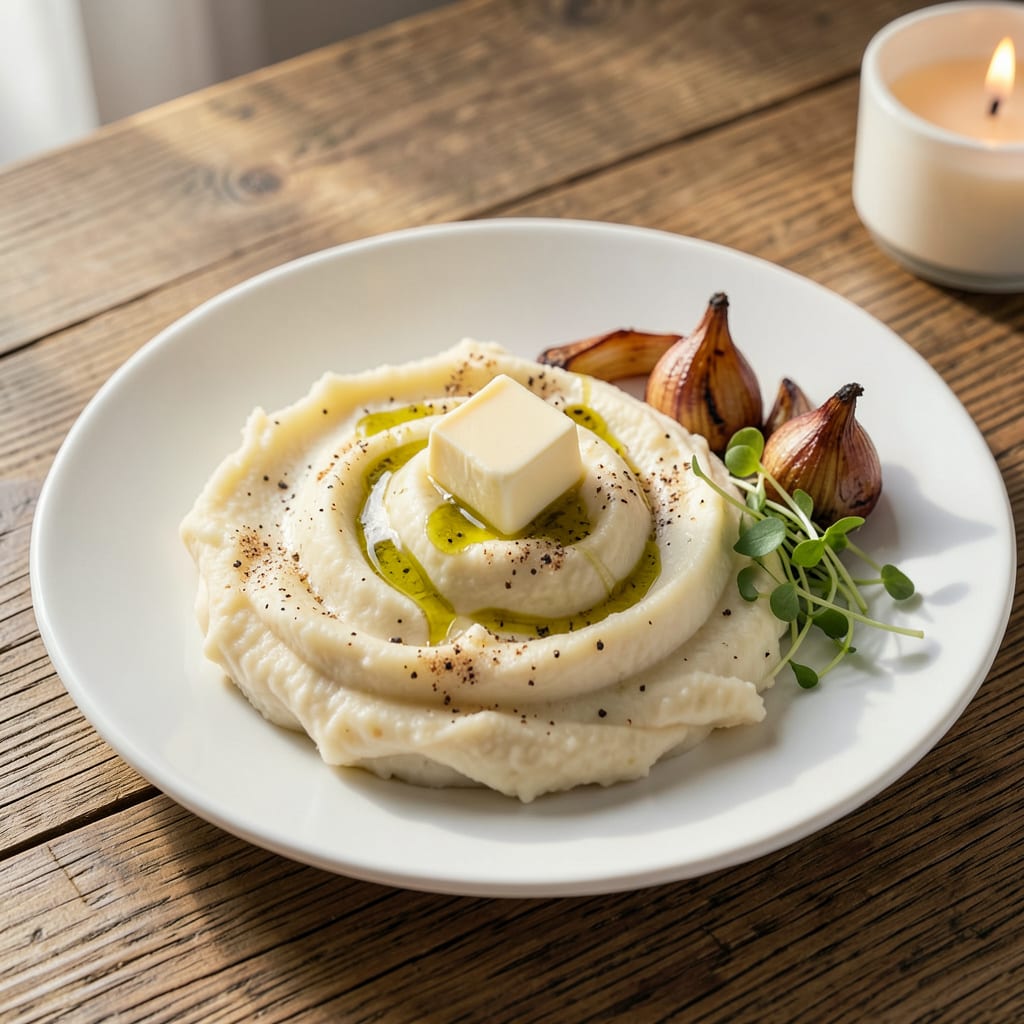
Let me tell you, the difference between homemade mashed potatoes and restaurant-worthy plating comes down to three simple techniques. I remember the first time I saw a chef pipe potatoes into perfect rosettes—game changer. This isn’t about fancy tools or complicated methods, just smart presentation that makes your dish look as good as it tastes.
You’ll need just a few basics: a piping bag or ziplock with the corner cut, a spoon for swirling, and maybe some cookie cutters for clean shapes. The real magic happens when you play with textures—think crispy fried shallots on creamy potatoes, or fresh chives against that smooth surface. Even the back of a spoon can create ridges that catch gravy beautifully.
Here’s the thing—chilling your potatoes for 10 minutes before plating gives you cleaner lines and sharper designs. Whether you’re going for rustic swirls or elegant quenched circles, that little chill makes all the difference. And don’t forget height: stacking potatoes with a protein or drizzling sauce in artistic patterns turns a side dish into the star of the plate.
I’ve used these techniques for everything from holiday feasts to simple weeknight dinners. The same mashed potatoes that looked ordinary suddenly get “wow” reactions. Pair them with pan-seared steak or roasted garlic mushrooms, and you’ve got a plate that could come from your favorite bistro. Ready to transform your presentation?
📚 In This Guide
- What You’ll Need
- Instructions
- Tips and Common Mistakes
What Youll Need
- ● Mashed potatoes: 2–3 cups freshly made (warm, creamy, and smooth for best results 🥔). Avoid chilled or gluey textures!
- ● Plating tools: 1 medium ice cream scoop (for quenched swirls) or 1 piping bag with a large star tip (for fancy designs)
- ● 1 offset spatula (to smooth edges like a pro)
- ● 1 small spoon (for detailing grooves or drizzles)
- ● Garnishes (pick 1–2): 2 tbsp melted butter (for glossy pools)
- ● 1 tbsp fresh chives or parsley (finely chopped, for color)
- ● ½ tsp smoked paprika or black pepper (for contrast)
- ○ ¼ cup crispy fried onions/shallots (optional crunch!)
- ● Serving dish: 1 warm, shallow plate (10–12″ diameter) per portion—white or neutral colors highlight your art!
- ○ Optional upgrades: Truffle oil (a few drops for luxury aroma)
- ● Edible gold leaf (for special occasions ✨)
Instructions for Plating Mashed Potatoes Like a Pro
Transform your homemade mashed potatoes into a restaurant-quality presentation with these simple techniques.
Prepare Your Plating Tools and Surface
Start by gathering your essential tools: a piping bag with a large star tip (or a plastic bag with the corner snipped), a rubber spatula, and your serving plates. I recommend using white or neutral-colored plates to make the potatoes stand out beautifully.
Warm your plates slightly by running them under hot water and drying them thoroughly. This prevents the potatoes from cooling too quickly when plated. Place a clean kitchen towel under your plate to prevent slipping while you work – this gives you better control for precise plating.
Create the Perfect Base Layer
Using your rubber spatula, spread a smooth, even layer of mashed potatoes across the bottom of the plate. This creates a stable foundation for your design. I like to make this layer about ¼-inch thick, leaving about 1-inch border around the plate edge.
For a polished look, dip your spatula in warm water and smooth the surface. This technique removes any ridges or imperfections, giving you that professional sheen. The base layer should look flawless before you add any decorative elements on top.
Pipe Decorative Elements with Precision
Fill your piping bag with the remaining mashed potatoes. Starting from the outer edge of your base layer, pipe a continuous spiral toward the center. Apply steady, even pressure to create consistent peaks – these will catch the light beautifully when served.
For a classic restaurant look, I recommend creating 3-5 concentric circles that gradually decrease in size. Finish with a small rosette in the very center. If you’re using a plastic bag, snip a ½-inch opening for the perfect swirl size.
Gently tap the plate on the counter to help the potatoes settle into place. This prevents any wobbling when you carry it to the table. The final presentation should have clean lines and defined shapes that hold their form until serving.
Add Finishing Touches for Visual Appeal
Create contrast by adding complementary elements to your plate. A pat of golden brown butter melting over the center adds both visual interest and rich flavor. Sprinkle with freshly cracked black pepper or chopped chives for a pop of color.
For an elegant touch, use the back of a spoon to create a small well in the center of your design. This becomes the perfect spot for gravy or additional butter. The key is to keep these additions balanced – you want to enhance the potatoes, not overwhelm them.
Step back and view your plate from all angles before serving. The presentation should look intentional and appetizing from every perspective. Remember, the goal is to make your guests pause to admire before they dive in to enjoy!
Tips and Common Mistakes for Perfect Plated Mashed Potatoes
These subtle techniques will transform your plating from good to truly professional.
The Base Layer Secret: When creating your ¼-inch base layer in Step 2, use a small offset spatula instead of a regular rubber spatula. The angled blade gives you better control for that perfectly smooth surface. I like to hold the spatula at a 45-degree angle and make long, sweeping motions from the center outward. This technique eliminates those pesky spatula marks that can ruin an otherwise perfect presentation.
Piping Perfection: For the concentric circles in Step 3, here’s what nobody tells you—practice your pressure control on a spare plate first. The key is maintaining consistent pressure while gradually decreasing the circle size. I find it helps to anchor my piping hand against my other hand for stability. And don’t forget to twist and lift slightly at the end of each circle to create those beautiful peaks that catch the light.
Temperature Matters: The warm water trick for smoothing your base layer works best when you use water that’s about 110°F—hot enough to smooth but not so hot it melts your potatoes. I keep a small bowl of this warm water nearby and dip my spatula frequently as I work. This is especially important if you’re working in a cool kitchen where potatoes can set up quickly.
Final Presentation Check: Before serving, do what professional chefs do—view your plate from above at arm’s length. This perspective reveals any asymmetries in your design. I like to imagine the plate divided into quadrants and check that each section has balanced elements. A quick adjustment with a clean spoon can make all the difference between good and spectacular presentation.
Pro Tips for Plate Mashed Potatoes
- These subtle techniques will transform your plating from good to truly professional.
- The Base Layer Secret: When creating your ¼-inch base layer in Step 2, use a small offset spatula instead of a regula…
- Piping Perfection: For the concentric circles in Step 3, here’s what nobody tells you—practice your pressure control …
Frequently Asked Questions
How do I keep mashed potatoes warm while plating?
Use a double boiler or a heat-safe bowl over a pot of simmering water. Cover with foil to retain moisture, and stir occasionally. For short-term holding, a slow cooker on “Warm” (≤2 hours) works great. Avoid direct heat—it can dry them out!
Can I plate mashed potatoes ahead of time for a dinner party?
Yes! Prep them 1–2 hours early, cover with plastic wrap (press it directly on the surface to prevent skin), and refrigerate. Reheat gently in the microwave with a splash of milk or butter, then fluff and plate. Pro tip: Under-salt slightly—they’ll absorb flavors as they sit!
What’s the best alternative to a piping bag for fancy plating?
No piping bag? No problem! Use a ziplock bag (snip a corner) or an ice cream scoop for quenched swirls. For rustic looks, spoon potatoes into a mound and drag a fork through the top for texture. Bonus: A cookie cutter makes perfect shaped portions!
Why do my plated mashed potatoes look dry or cracked?
Overworking or under-moistening is usually the culprit. Fix dry potatoes by folding in warm cream, butter, or broth before plating. If cracks appear, smooth with a damp spoon or add a drizzle of olive oil for shine. Key: Plate them immediately after whipping!
What garnishes pair well with mashed potatoes for plating?
Elevate your dish with:
- Fresh herbs (chives, parsley, thyme)
- Crunchy toppings (fried shallots, bacon bits, toasted breadcrumbs)
- Sauces (gravy drizzle, truffle oil, or brown butter)
- Color contrasts (roasted garlic, pomegranate seeds, or smoked paprika)
Plating mashed potatoes like a pro is all about texture, shape, and creativity—and now you’ve got the tools to make them shine! 🌟 Whether you’re swirling them into elegant peaks or adding a pop of color with garnishes, your dish will look (and taste) restaurant-worthy in minutes. Ready to impress? Grab your piping bag or spoon and start practicing—your next dinner guests won’t believe it’s homemade!

Trained in classic French technique but raised on slow-cooked ribs and spicy rubs, she blends culinary skill with smoke and soul.
- Meat Loaf Recipe With Beef And Pork: Homestyle Blend With Rich Gravy - October 3, 2026
- Hamburger Patty Recipe No Egg: Juicy Bind With Breadcrumbs and Milk - October 3, 2026
- Recipe for Oven Baked Halibut: Buttery White Fish with Zesty Lemon Topping - October 3, 2026