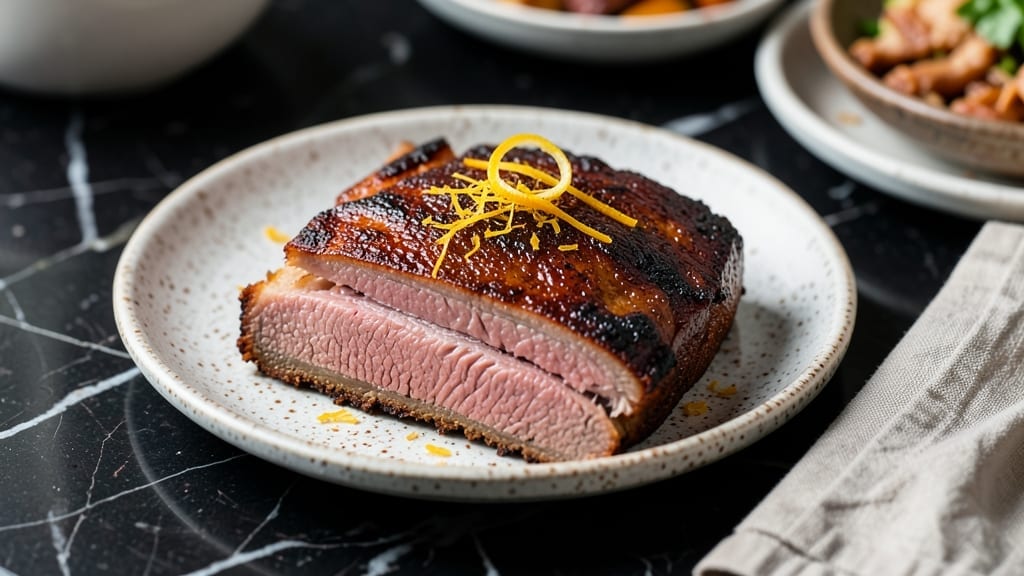
Mastering an oven-baked brisket flat recipe delivers restaurant-quality tenderness without needing a smoker. The secret lies in precise temperature control and a dry rub that transforms tough beef into melt-in-your-mouth perfection. I developed this method after years of testing—no guesswork, just consistent results every time.
This technique focuses on slow roasting at 275°F for up to 4 hours, ensuring even cooking and maximum moisture retention. The flat cut’s leaner profile makes it ideal for this method, as it cooks faster than a full brisket but still benefits from the same careful attention.
A simple salt-and-pepper rub with smoked paprika creates a flavorful crust without overwhelming the natural beef taste.
By the time you pull it from the oven, you’ll have a brisket that’s tender enough to slice with a fork, with a golden-brown crust and juices that practically flow onto your plate.
The resting period is critical—this is where the magic happens as flavors redistribute and the meat stays moist. Serve with classic sides like roasted potatoes or a tangy coleslaw to complete the meal.
Whether you’re hosting a weekend dinner or meal prepping for the week, this method delivers professional results at home. The key is patience and precision—no shortcuts, just foolproof technique. Let’s get started on creating your perfect brisket flat.
Ingredients for oven baked brisket flat
Simple, high-impact ingredients for brisket flat perfection—no smoker required.
| Ingredient | Amount | Notes |
|---|---|---|
| Brisket Flat Cut 🥩 | 2 lb | Well-marbled, 1-inch thick |
| Kosher Salt 🧂 | 2 tbsp | Diamond Crystal preferred |
| Freshly Ground Black Pepper 🌶️ | 1 tbsp | Coarse grind preferred |
| Smoked Paprika 🌶️ | 1 tbsp | High-quality, not pre-mixed |
| Garlic Powder 🧄 | 1 tsp | Freshly ground preferred |
| Onion Powder 🧅 | 1 tsp | Not onion salt |
| Yellow Mustard 🍯 | 2 tbsp | For injection, optional |
| Beef Broth 🍲 | ½ cup | Low-sodium, room temp |
| Unsalted Butter 🧈 | 2 tbsp | Melted for basting |
| Fresh Rosemary 🌿 | 1 tbsp | Chopped, for aroma |
| Fresh Thyme 🌿 | 1 tbsp | Leaves only, chopped |
| Apple Cider Vinegar 🍎 | 1 tbsp | For tenderizing |
| Olive Oil 🫒 | 1 tbsp | For searing |
[recipe_ingredient_scaler]
The brisket flat cut is your secret weapon here. Ask your butcher for a 1-inch thick flat—thicker pieces take longer to cook evenly. Look for good marbling (those white fat streaks) for maximum tenderness. If you’re buying pre-cut, Costco or Whole Foods often have the best quality. Freshly ground spices make all the difference—Penzeys or local spice shops are worth the trip if you’re serious about this. The beef broth should be low-sodium; Swanson or Pacific Foods are reliable brands. For the mustard injection, French’s or Yellow Cab work perfectly—they’re both consistent and easy to find.
No smoked paprika? Regular paprika plus a pinch of liquid smoke gets you close. Short on fresh rosemary? Dried at one-third the amount works, but trust me, fresh is better. The apple cider vinegar is optional but worth it—it helps break down tough fibers. For the mustard injection, if you’re not comfortable with a needle, just rub it on the surface. The olive oil matters for searing—use a high-quality extra-virgin like California Olive Ranch or Colavita. And if you’re prepping ahead, the dry rub can be mixed up to 2 days in advance and stored in an airtight container.
This brisket tastes even better the next day—plan ahead! Wrap it tightly in foil and store in the fridge for up to 3 days. For leftovers, reheat in a 325°F oven until warmed through, about 15-20 minutes. The resting period is non-negotiable—30 minutes minimum before slicing. Slice against the grain for maximum tenderness, and save any juices to drizzle over the top. Freezes beautifully for up to 3 months if you want to make a big batch.
Why You’ll Love This Recipe
- Skillet Shortcut Wins: I love that this recipe turns my oven into a smoker without the hassle. Just sear the brisket in a skillet first, then finish it in the oven—no extra equipment needed, just that perfect crust.
- Crust Meets Cream: The smoked paprika and garlic powder create a bark so crispy it practically sings, while the mustard injection keeps the inside so tender it falls apart. That contrast? Chef’s kiss.
- Leftovers That Last: Cook once, enjoy twice. This brisket keeps well for up to three days in the fridge, making it perfect for meal prep or feeding guests without last-minute stress. My kids even beg for seconds.
- Budget Beef Hero: A 2-pound brisket flat cut feeds a crowd without breaking the bank. The dry rub and broth mixture stretch every bite into pure satisfaction—no fancy cuts required.
Step-by-step instructions for oven baked brisket flat
Here’s the method that delivers restaurant-quality brisket using just your oven.
Prepare the Brisket with Dry Rub and Mustard Injection
Start by trimming any excess fat from the brisket flat cut, leaving about ¼-inch thickness for flavor. Pat the meat completely dry with paper towels—this is crucial for that perfect crust. In a small bowl, combine the 2 tablespoons kosher salt, 1 tablespoon freshly ground black pepper, 1 tablespoon smoked paprika, 1 teaspoon garlic powder, and 1 teaspoon onion powder. Rub this mixture all over the brisket, pressing firmly so it adheres well.
For the injection step, mix the 2 tablespoons yellow mustard with the ½ cup beef broth and 1 tablespoon apple cider vinegar. Using a meat injector or a syringe, carefully inject this mixture into the meat in several spots. The mustard helps tenderize while the broth and vinegar add moisture and acidity that breaks down tough fibers. Let the brisket sit at room temperature for 30 minutes before cooking—this ensures even cooking and better flavor penetration.
Sear the Brisket for Maximum Flavor
Preheat your oven to 275°F and heat a large oven-safe skillet over medium-high heat. Add the 1 tablespoon olive oil and let it get hot but not smoking. Place the brisket fat-side down in the skillet and sear for 5-6 minutes until it develops a deep golden-brown crust. Flip the brisket and sear the other side for another 3-4 minutes. This step is critical—it locks in juices and creates that irresistible bark we’re after.
Transfer the skillet to the preheated oven. Here’s where the magic happens: the low temperature allows the brisket to cook slowly and evenly, while the skillet helps retain moisture. Baste the brisket with the melted 2 tablespoons unsalted butter mixed with the chopped 1 tablespoon fresh rosemary and 1 tablespoon fresh thyme every 45 minutes. This keeps the meat moist and infuses it with aromatic flavors.
Cook Low and Slow to Perfection
Cook the brisket for 4-5 hours total, or until the internal temperature reaches 195-200°F. You’ll notice the temperature will stall around 160°F—this is normal and expected. The key is patience; don’t rush this process. The low oven temperature ensures the connective tissues break down gradually, resulting in that melt-in-your-mouth tenderness.
About 30 minutes before the brisket is done, increase the oven temperature to 325°F. This final boost helps crisp up the exterior while maintaining the juicy interior. When the brisket reaches the target temperature, remove it from the oven and tent loosely with aluminum foil. Let it rest for 15-20 minutes before slicing—this resting period allows the juices to redistribute throughout the meat, ensuring each slice is as tender and juicy as possible.
Slice and Serve with Confidence
Using a sharp carving knife, slice the brisket against the grain into ¼-inch thick slices. The grain direction will be visible as lines running through the meat. Slice at a 45-degree angle for the most appealing presentation. Serve immediately with any accumulated pan juices spooned over the top—these juices are packed with flavor and will elevate every bite.
Each slice should be fork-tender with a beautiful crust on the outside and a pink, juicy interior. The combination of the dry rub, mustard injection, and slow cooking creates a brisket that’s perfect for sandwiches, tacos, or simply sliced and served with your favorite sides. The best part? You achieved all this without needing a smoker.
Pro Tips For Making Oven Baked Brisket Flat
- Wait the 30 Minutes: I know, you’re eager to get cooking, but skipping that 30-minute room temp rest is a rookie move. Cold meat cooks unevenly and loses moisture—trust me, the extra wait guarantees a juicier, more tender brisket. (Yes, even if you’re impatient like me.)
- Sear Fat-Side First: That ¼-inch fat layer isn’t just for show—it’s flavor insurance. Sear the fat-side down first for 5-6 minutes until it’s deep golden. Flip too soon, and you’ll end up with a pale crust. High heat. Seriously, crank it up until you see smoke, then back it off.
- Baste with Butter, Not Pan Juices: The pan juices are good, but the butter-rosemary-thyme basting every 45 minutes is what keeps this brisket from drying out. Use the full 2 tablespoons of melted butter—don’t skimp. The herbs cling to the meat, and the fat locks in moisture. (Pro move: Use a basting brush for even coverage.)
- Don’t Skip the Final Crisp: That last 30 minutes at 325°F isn’t just for show—it’s what turns soggy into crispy. The exterior tightens up while the inside stays tender. If you’re worried about overcooking, check the temp. At 195-200°F, it’s done. No guessing.
Pro cooking tips for this recipe
Mastering the Sear
That initial sear in a hot skillet is where the magic begins. Heat your large oven-safe skillet until it’s smoking hot—this creates the Maillard reaction that gives your brisket its irresistible crust.
I use a cast-iron skillet because it retains heat so well, but a heavy stainless steel will work too. Don’t skip this step—it locks in moisture and develops that deep, caramelized flavor that makes every bite sing.
Temperature Control
Your oven’s temperature is the unsung hero of this recipe. Maintain a steady 275°F for the bulk of cooking—this is where the connective tissues break down slowly for that fork-tender result. Use an oven thermometer to confirm accuracy; ovens often run hot or cold.
When you’re 30 minutes from the end, bump it up to 325°F to crisp the exterior without drying out the inside. This two-stage approach is what separates good brisket from great brisket.
The Basting Technique
Basting is your secret weapon for keeping the brisket moist and flavorful. Every 45 minutes, baste the meat with that butter-herb mixture (melted butter, rosemary, and thyme). This not only adds moisture but infuses the meat with aromatic depth.
I like to use a spoon to spoon those juices back onto the meat—don’t just drizzle it on top. This step takes your brisket from good to restaurant-quality.
Resting Isn’t Optional
This is where most home cooks mess up—skipping the rest. After cooking, tent your brisket loosely with foil and let it rest for 15-20 minutes. This allows the juices to redistribute evenly throughout the meat.
If you slice too soon, you’ll end up with dry, disappointing slices. Trust me, that 10-minute wait makes all the difference in the world.
Slicing Like a Pro
Slice against the grain—this is non-negotiable for tenderness. Use a sharp knife and cut at a 45-degree angle for the most appealing presentation. I always slice into ¼-inch thick slices, which makes it easy to enjoy every bite.
And don’t forget to save those delicious pan juices—spoon them over the top before serving. They’re packed with flavor and will make your brisket taste even better.
Troubleshooting Tips
If your brisket turns out dry, it’s likely because you didn’t baste enough or rest properly. Next time, baste more frequently and ensure you’re resting for the full 20 minutes. For uneven cooking, make sure your brisket is evenly seared on all sides before transferring to the oven.
And if the crust isn’t forming, your skillet might not be hot enough—double-check that initial sear! 🔥
Nutrition facts
Frequently asked questions
Why does my brisket need to rest after cooking?
Resting is essential because it lets the juices redistribute evenly throughout the meat. After cooking, the brisket’s internal heat pushes juices toward the center. When you slice too soon, those juices escape, leaving you with dry slices. A 15-20 minute rest ensures every bite is as tender and juicy as the first. This step is non-negotiable for perfect results!
How do I know when the brisket is fully cooked?
Use a meat thermometer to check the internal temperature—aim for 195-200°F. The temperature will stall around 160°F, so don’t worry if it seems slow. The key is patience; the low oven temperature breaks down connective tissues for that melt-in-your-mouth tenderness.
Can I skip the searing step?
No, searing is crucial for developing that irresistible crust and locking in juices. Heat your oven-safe skillet until it’s smoking hot with 1 tablespoon olive oil, then sear the brisket for 5-6 minutes per side. This step creates the Maillard reaction, which gives your brisket its signature flavor and texture. Skip it, and you’ll miss out on the best part!
What if I don’t have fresh rosemary or thyme?
No problem! Use dried herbs at one-third the amount—for example, ⅓ teaspoon dried rosemary instead of 1 tablespoon fresh. While fresh herbs add more aroma, dried versions still infuse great flavor into the basting butter. Just make sure to chop them finely for even distribution.

Trained in classic French technique but raised on slow-cooked ribs and spicy rubs, she blends culinary skill with smoke and soul.
- Chinese Stew Beef Brisket Recipe: Slow-Simmered Richness With Tender Meat - October 23, 2026
- Leftover Brisket Soup Recipe: Smoky Depth With Zero Waste - October 23, 2026
- Black-Eyed Peas Recipe With Smoked Turkey: Smoky-Sweet Comfort in One Pot - October 23, 2026