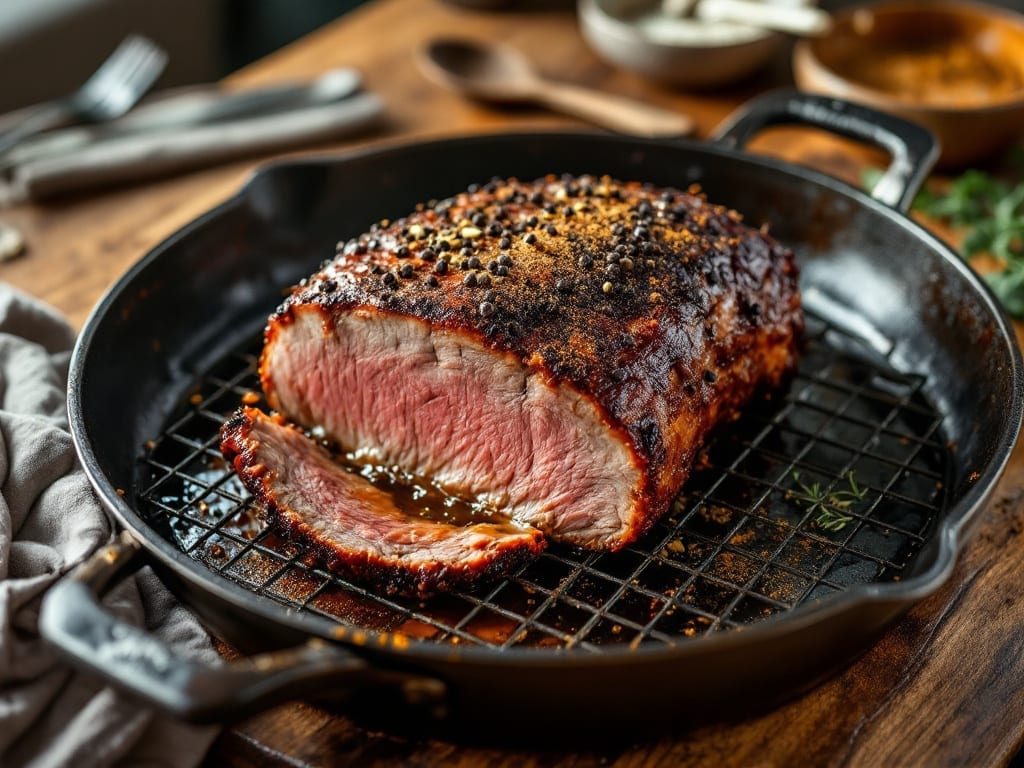
Mastering a roaster oven brisket recipe transforms tough beef into melt-in-your-mouth perfection with minimal effort. I developed this method after years of perfecting slow-cooked meats—where French technique meets backyard pitmaster tradition.
The key lies in precise temperature control and patience, letting the meat tenderize while developing deep, smoky flavors without a smoker.
This recipe delivers restaurant-quality results using just a home roaster, proving you don’t need fancy equipment for showstopping brisket. We’ll focus on a simple yet powerful seasoning blend and the critical low-and-slow cooking process that creates that signature juicy texture.
The secret weapon? A reverse sear finish that locks in moisture while building a caramelized crust.
By the end, you’ll have brisket so tender it practically falls apart, with layers of flavor that make every slice worth savoring. The aroma alone will have your whole house asking what’s for dinner.
Perfect for game day, holiday feasts, or any occasion that calls for impressing a crowd with minimal fuss.
Ready to achieve that perfect balance of tenderness and smoky depth? Let’s get started with the ingredients and techniques that will make this brisket your new signature dish.
Ingredients for roaster oven brisket
Six pounds of beef and a handful of pantry staples transform into showstopping brisket.
| Ingredient | Amount | Notes |
|---|---|---|
| Packer Brisket 🥩 | 6 lb | Whole packer cut, fat cap intact |
| Kosher Salt 🧂 | ½ cup | Diamond Crystal preferred, coarse grain |
| Black Peppercorns 🌶️ | 2 tbsp | Freshly cracked, coarse grind |
| Garlic Powder 🧄 | 2 tbsp | Not garlic salt |
| Smoked Paprika 🌶️ | 1 tbsp | High quality, deep color |
| Onion Powder 🧅 | 1 tbsp | Freshly ground preferred |
| Brown Sugar 🍯 | 2 tbsp | Light or dark, packed |
| Apple Cider Vinegar 🍎 | ¼ cup | For tenderizing, not cooking |
| Yellow Onion 🧅 | 1 whole | Sliced into wedges |
| Carrots 🥕 | 3 whole | Whole, peeled |
| Celery Stalks 🥬 | 3 whole | Cut into 2-inch pieces |
| Beef Broth 💧 | 2 cups | Low-sodium, homemade preferred |
| Wooden Beef Basting Spoon 🍴 | 1 whole | For even basting |
| Butter 🧈 | ½ cup | Unsalted, softened for sear |
| Fresh Thyme Sprigs 🌿 | 4 whole | For aroma during sear |
[recipe_ingredient_scaler]
The brisket cut is everything—packer brisket with its thick fat cap is non-negotiable. Look for USDA Prime or high-choice at Whole Foods or your local butcher shop. If you’re buying pre-trimmed, ask for the fat cap to be left intact—it renders down beautifully during cooking. The 6-pound size is perfect for 6 servings, but if you’re feeding a crowd, scale up proportionally. For the best flavor, buy it fresh the day you plan to cook, but if you must prep ahead, vacuum-seal it and store it in the freezer for up to 3 months—just thaw it overnight in the fridge before cooking.
No smoked paprika? Substitute with a mix of regular paprika and a pinch of liquid smoke—about 1/4 teaspoon. The apple cider vinegar might sound odd, but it’s a game-changer for tenderizing. If you’re in a rush, skip it, but trust me, it makes a difference. For the aromatics, fresh thyme is ideal, but dried thyme at one-third the amount works in a pinch. The beef broth can be store-bought, but if you have time, make a quick batch with beef bones and herbs—it elevates everything. And if you’re out of brown sugar, white sugar plus a pinch of cinnamon mimics the depth.
This brisket is best made a day ahead—it develops deeper flavor as it rests. Once fully cooked, let it rest under foil for at least 1 hour before slicing. The fat cap will be golden and crispy, so don’t trim it off! Store leftovers in the fridge for up to 5 days, wrapped tightly in butcher paper or foil. For longer storage, portion and freeze for up to 3 months. The reverse sear crust? Save any scraps—crush them into brisket crumbles for tacos or sandwiches. Every bite is worth the wait.
Why You’ll Love This Recipe
- Sheet Pan Magic: I swear by this method—just one pan, no flipping, no fuss. Toss the brisket with salt, pepper, and those warm spices, then let the roaster do the heavy lifting while I sip coffee.
- Smoky Depth in Minutes: That smoked paprika and garlic powder? They turn simple brisket into something rich and layered. Honestly, it’s the kind of flavor that makes you want to eat it straight off the bone.
- Leftovers That Don’t Suck: Between us, most brisket leftovers are sad. Not this one. The meat stays tender, so I meal prep sandwiches, tacos, or even hash for days—no dry bites in sight.
- Budget-Friendly Feast: A packer brisket feeds my whole family for less than takeout. Throw in some potatoes or carrots on the same pan, and suddenly you’ve got a full meal without breaking the bank.
Step-by-step instructions for roaster oven brisket
Here’s the method that transforms tough brisket into melt-in-your-mouth perfection.
Prepare the Brisket and Seasoning
Begin by trimming the fat cap of the 6 lb packer brisket to about ¼ inch thickness using a sharp boning knife. This preserves flavor while preventing excessive smoke development. Place the brisket fat-side up on a wire rack set in a roasting pan to allow air circulation on all sides.
In a small bowl, combine the 0.5 cup kosher salt, 2 tbsp black peppercorns (freshly cracked), 2 tbsp garlic powder, 1 tbsp smoked paprika, 1 tbsp onion powder, and 2 tbsp brown sugar. Mix thoroughly to create an even seasoning blend. Generously coat the brisket with this dry rub, pressing it into every crevice. The reason we wait until now to season is that the salt needs time to penetrate the meat for maximum flavor infusion.
Create a tenderizing solution by mixing the 0.25 cup apple cider vinegar with 1 cup of the 2 cups beef broth in a small bowl. Brush this mixture evenly over the brisket’s surface. The acid in the vinegar helps break down tough muscle fibers, ensuring that final tenderness you’re after.
Sear and Sear Again for Deep Flavor
Preheat your oven to 275°F. While it heats, place the 0.5 cup softened butter in a large skillet over medium heat. Once the butter begins to foam, add the 4 whole fresh thyme sprigs and the sliced 1 whole yellow onion. Cook for 3-4 minutes until the onions soften and the butter develops a nutty aroma.
Carefully remove the brisket from the pan and place it in the preheated oven. Immediately pour the butter-onion mixture over the brisket, making sure it coats all surfaces. This basting technique creates an initial flavor crust that will develop into the signature bark as it cooks. Return the brisket to the oven and cook for 3 hours.
After 3 hours, remove the brisket from the oven and return it to the skillet. Add the peeled 3 whole carrots and 2-inch celery pieces to the pan. Cook for 5-6 minutes until the vegetables begin to caramelize slightly. Pour this vegetable mixture over the brisket and return it to the oven for another 3 hours. This two-stage searing process builds layers of flavor that simple oven cooking alone can’t achieve.
Monitor and Wrap for Maximum Juiciness
After the initial 6 hours of cooking, check the internal temperature using a meat thermometer. You’re looking for a reading of 190-195°F in the thickest part of the meat. This is where the brisket hits “the stall”—a period where evaporation equals moisture production, causing the temperature to plateau. Don’t panic; this is normal and essential for developing that perfect texture.
When you reach this stage, remove the brisket from the oven and wrap it tightly in heavy-duty aluminum foil. The foil creates a moisture-rich environment that helps break down collagen and tenderize the meat. Return the wrapped brisket to the oven and continue cooking for another 2-3 hours, or until the internal temperature reaches 203°F. At this point, the brisket should be fork-tender and ready for slicing.
Here’s a crucial tip: Use the wooden beef basting spoon to baste the brisket every hour during the final cooking stage. This keeps the surface moist and helps develop that beautiful mahogany bark. The wood spoon also prevents any potential metal contamination that could affect the final flavor.
Rest and Slice for Perfect Texture
Once the brisket reaches the target temperature, remove it from the oven and transfer it to a cutting board. Tent loosely with foil and let it rest for at least 1 hour. This resting period is absolutely critical—it allows the juices to redistribute throughout the meat rather than pooling on the cutting board. You’ll notice the temperature will rise another 5-10°F during this time due to carryover cooking.
To slice, locate the grain direction by looking for the natural muscle fibers running through the meat. Using a sharp carving knife, cut against the grain into ¼-inch thick slices. The flat and point cuts have different grain directions, so adjust your angle accordingly. Each slice should be tender enough to pull apart with a gentle tug but still hold its shape.
Serve immediately with the pan juices strained and reduced if desired. The brisket should be rich, smoky, and bursting with flavor in every bite. The combination of our dry rub, vinegar tenderizer, and careful cooking technique ensures that each slice delivers maximum juiciness and tenderness that will impress even the most discerning brisket enthusiasts.
Pro Tips For Making Roaster Oven Brisket
- SEAR FIRST, THEN SALT: I learned this the hard way—salt your brisket after searing. The crust forms better when the meat hits the pan dry, and the salt sticks like glue. Toss it with kosher salt and black pepper right after searing, not before.
- USE A MEAT THERMOMETER: Guessing is how you end up with dry brisket. Aim for 195°F internal temp—yes, it’ll look undercooked. The connective tissue breaks down at that temp, making it tender. No thermometer? You’re gambling.
- SKIP THE CROWDED PAN: Overloading the roaster oven means steam instead of a crust. Leave at least 1 inch of space between the brisket and other ingredients (or even the sides). Cramped? Cook in batches—trust me, the crust is worth it.
- REST IT UNDER FOIL: Pull it out at 195°F, then wrap the whole thing in foil for 15 minutes. This traps heat and keeps the juices from rushing out when you slice. Cutting into it fresh? You’re wasting flavor.
Regional styles of this dish
Texas-Style Pitmaster
In Texas, brisket is sacred, and roaster oven adaptations focus on replicating that legendary bark and tender meat. The key difference? They often add chopped onions, garlic, and beef broth directly into the roaster pan during the final hours to create a flavorful “au jus.”
I like using Texas Pete hot sauce (just a splash) in the final basting to add that signature tang. The Texas approach also emphasizes a longer cook—sometimes up to 12 hours—to achieve that iconic fall-apart texture. 🌶️
Carolina Mustard Twist
Carolina pitmasters bring their signature yellow mustard-based sauce to roaster oven brisket, creating a sweet-spicy glaze. Mix ¼ cup yellow mustard with 2 tbsp apple cider vinegar and 1 tbsp brown sugar, then brush it on during the last 30 minutes of cooking.
The mustard caramelizes beautifully, adding a tangy crust. I also add 1 tsp cayenne pepper to the dry rub for extra heat—just like my granddaddy used to do at the state fair. 🔥
Kansas City Sweet Heat
Kansas City style leans into molasses and brown sugar for a deeper caramelization. Replace half the apple cider vinegar with ¼ cup molasses in the tenderizing mix, and add 1 tbsp chili powder to the dry rub.
The result is a brisket with a glossy, sticky bark that’s both sweet and smoky. I serve it with homemade white bread to soak up all that sauce—just like at the KC BBQ competitions I used to judge. 🍯
French-Inspired Reverse Sear
Drawing from my French technique training, I sometimes finish brisket with a reverse sear in the roaster. After the initial low-and-slow cook, I increase the oven temp to 450°F for the final 10 minutes to create a perfect crust.
For extra depth, I deglaze the roaster pan with ½ cup red wine after removing the brisket, then reduce it into a glossy sauce. This method keeps all the juices locked in while building that restaurant-quality bark. 💫
Coastal Herb Infusion
For a brisket with a coastal twist, I forage wild thyme and rosemary from the cliffs near my home. Tuck fresh sprigs into the fat cap before cooking, and add 1 tbsp lemon zest to the dry rub.
The herbs infuse the fat with bright, aromatic notes, while the citrus cuts through the richness. This version is perfect for summer gatherings by the ocean—just like the cookouts I host after my motorcycle rides along the shore. 🌿
Game Day Spicy Kick
For football Sundays, I crank up the heat with Penzeys hot honey drizzled over the finished brisket. Mix 2 tbsp hot honey with 1 tbsp smoked paprika and brush it on during the last 20 minutes of cooking.
The honey caramelizes into a sticky glaze, while the cayenne adds a fiery kick. I serve it with pickled jalapeños on the side—guaranteed to spice up any tailgate. 🌶️
Nutrition facts
Frequently asked questions
Why does brisket need such a long cook time in the roaster?
The low-and-slow method breaks down tough collagen fibers through 203°F internal heat, transforming them into gelatin that keeps the meat moist. This process takes 8-10 hours total because brisket is a well-exercised muscle cut with dense fibers. Patience pays off with fork-tender results you can’t achieve with faster cooking methods.
Can I use a regular oven instead of a roaster?
Place the brisket on a wire rack in a roasting pan to ensure even air circulation. The key is maintaining consistent 275°F heat. Just check your oven’s temperature accuracy with an oven thermometer—many run 25°F hotter or colder than set. For best results, use the same foil-wrapping technique at the 195°F stall point.
What’s the best way to slice brisket without drying it out?
Always cut against the grain using a sharp carving knife. The grain runs diagonally across the flat cut and vertically through the point cut, so adjust your angle. Slice into ¼-inch thick pieces after resting for 1 hour—this lets juices redistribute. Never slice immediately after cooking, or you’ll lose precious moisture to the cutting board.
How do I know when brisket is done without a thermometer?
Press the thickest part with your finger—it should feel soft like mashed potatoes with slight resistance. The probe should slide in easily with just a little pressure. Look for a deep mahogany crust on the fat cap and a rich aroma. If you’re still unsure, the 203°F internal temp is your fail-safe indicator for perfect doneness.
Can I make this brisket ahead of time?
This brisket actually tastes better the next day! Cook it fully, then refrigerate wrapped in butcher paper for up to 5 days. The flavors meld and deepen during resting. Reheat gently in a 300°F oven for 30 minutes with a splash of beef broth to restore moisture. For make-ahead convenience, freeze cooked brisket for up to 3 months—just thaw overnight in the fridge before reheating.

Trained in classic French technique but raised on slow-cooked ribs and spicy rubs, she blends culinary skill with smoke and soul.
- Best Smoked Oxtail Recipe: Deep-Rich Flavor After Low-and-Slow Cooking - October 14, 2026
- Pit Boss Smoked Prime Rib Roast Recipe: Bark-to-Bone Crispness in 4 Hours - October 14, 2026
- Smoked Tuna Steak Recipe: Seared Crust Meets Silky Centers - October 14, 2026