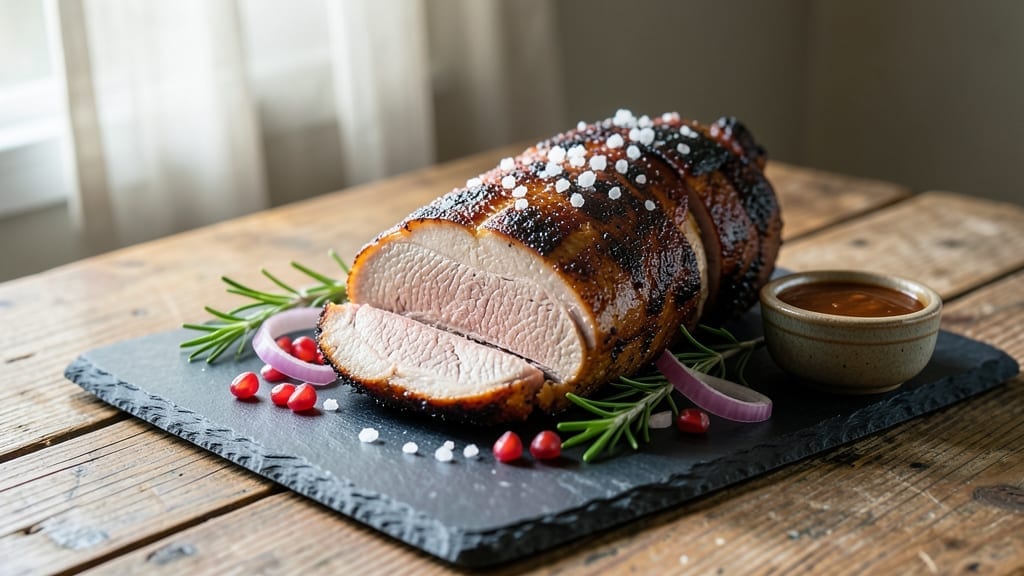
Mastering a smoked Boston butt pork roast transforms a simple cut into a showstopping centerpiece that falls apart at the touch of a fork. The key lies in patience—low-and-slow smoking until the internal temperature hits 195°F, where collagen breaks down into rich, tender juices.
Growing up in small-town Georgia, I learned that the best pork roasts aren’t rushed; they’re built over time, with a dark, crackling bark that seals in every last drop of flavor.
This recipe delivers restaurant-quality results with just a few essential steps: a dry rub of smoked paprika and brown sugar, hickory wood for that classic Southern smoke profile, and a steady 225°F temperature for 12-16 hours.
The magic happens when the meat rests—at least 2 hours—letting the juices redistribute so every bite is moist and flavorful. My heritage pigs from the farm always yield the most tender roasts, but any quality Boston butt will work with the right technique.
By the time you carve into this roast, you’ll have perfectly tender slices with a crisp bark that adds texture to every bite. Serve it with classic sides like creamy mac and cheese or tangy baked beans to soak up those rich juices.
The presentation is just as important as the cooking—slice against the grain for maximum tenderness and arrange on a platter with a drizzle of apple cider vinegar for brightness. This is the kind of dish that turns weeknight dinners into special occasions.
Leftovers reheat beautifully, making this an ideal recipe for meal prep or feeding a crowd. The secret to success is consistency—temperature control and resting time—and once you nail it, you’ll never buy store-bought pork again. Let’s get smoking!
Ingredients for smoked boston butt pork roast
Pantry staples plus a heritage pork roast. That’s all you need for restaurant-quality smoked pork.
| Ingredient | Amount | Notes |
|---|---|---|
| Boston Butt Pork Roast 🐖 | 10 lb | Heritage pork preferred, bone-in |
| Smoked Paprika 🌶️ | ½ cup | High-quality, not cayenne |
| Light Brown Sugar 🍚 | ¼ cup | Packed, no substitutions |
| Kosher Salt 🧂 | 2 tbsp | Diamond Crystal preferred |
| Ground Black Pepper 🌶️ | 1 tbsp | Freshly ground for best flavor |
| Garlic Powder 🧄 | 1 tbsp | Not garlic salt |
| Onion Powder 🧅 | 1 tbsp | For depth of flavor |
| Mustard Powder 🍯 | 1 tsp | Adds subtle tang |
| Hickory Wood Chips 🌳 | 2 lb | Unseasoned, 100% hickory |
| Apple Cider Vinegar 🍎 | 2 tbsp | For final glaze |
| Yellow Mustard 🍯 | 2 tbsp | For bark enhancement |
| Water 💧 | 1 cup | For water pan |
| Butter 🧈 | ½ cup | Unsalted, melted for resting |
[recipe_ingredient_scaler]
The pork roast is the star, so don’t cut corners. Heritage pigs from local farms yield the best flavor, but any quality Boston butt will work—just look for good marbling. A 10-pound roast feeds a crowd and gives you plenty of leftovers. For the best bark, I always buy from local butchers who carry heritage breeds. If you’re buying from the store, Smithfield or Hormel have reliable options. The wood chips matter too—100% hickory gives that classic Southern smoke flavor. Soak them for 30 minutes before using to prevent flare-ups.
No smoked paprika? Substitute 2 tbsp chili powder plus 1 tbsp sweet paprika for a similar effect. Running low on brown sugar? White sugar works in a pinch, but it won’t caramelize as nicely. The mustard powder adds depth—if you don’t have it, 1 tsp Dijon mustard in the glaze works too. For the wood chips, oak works but lacks the signature hickory flavor. If you’re short on time, pre-soaked wood chips from Traeger save you 30 minutes of prep. The vinegar and mustard glaze? Apple juice concentrate works too—just reduce it first.
This roast reheats beautifully—honestly tastes better the next day. Store leftovers in the fridge for 5-6 days or freeze for 3 months. I always slice it against the grain and portion it into containers for easy meals. The bark stays crispy if you reheat it in a 350°F oven for 10 minutes. For serving, a quick drizzle of the apple cider vinegar glaze keeps everything fresh. The butter baste? Save some for basting after smoking—it makes the bark extra crispy.
Why You’ll Love This Recipe
- No-Fuss Feast: This isn’t a recipe that demands your attention—it’s a 12-24 hour dry brine that lets you prep ahead while the rub works its magic. Just toss that smoked paprika, light brown sugar, and kosher salt mix on the meat, refrigerate, and forget about it until smoke day. The real work happens overnight, so you’re just smoking, not stressing.
- Smoky, Sweet, and Savory Perfection: That hickory smoke mingles with the garlic powder and onion powder in the rub to create layers of flavor—crispy bark meets fall-apart tender meat. The apple cider vinegar and yellow mustard glaze during the stall? Game-changer. It’s like a smoky, sweet, tangy hug for your taste buds.
- Budget-Friendly Crowd Pleaser: You’re feeding a crowd for less than you’d spend on takeout, and everyone will be begging for seconds. The bone-in heritage pork might cost more upfront, but it’s worth it for that melt-in-your-mouth texture. Plus, with 5-6 days in the fridge or 3 months frozen, you’re covered for lazy nights or unexpected guests.
Step-by-step instructions for smoked Boston butt pork roast
Here’s how to create melt-in-your-mouth smoked pork shoulder with a perfect bark every time.
Prepare the Rub and Season the Meat
In a medium bowl, combine the ½ cup smoked paprika, ¼ cup light brown sugar, 2 tablespoons kosher salt, 1 tablespoon ground black pepper, 1 tablespoon garlic powder, 1 tablespoon onion powder, and 1 teaspoon mustard powder. Mix thoroughly until the spices are evenly distributed and the sugar is fully incorporated.
Pat the 10 lb Boston butt pork roast dry with paper towels, removing any excess moisture from the surface. This step is crucial—wet skin won’t develop that coveted bark. Apply the spice rub generously to all sides of the meat, pressing it firmly into the crevices and fat cap. The rub should adhere completely, with no bare spots visible. Place the seasoned pork on a wire rack set over a tray and refrigerate uncovered for 12-24 hours. This dry-brining process enhances flavor penetration and creates the ideal texture for smoking.
Set Up the Smoker and Start Cooking
Soak the 2 lb hickory wood chips in water for 30 minutes before using. Fill your smoker with the soaked wood chips and preheat to 225°F. Place a water pan containing 1 cup water in the smoker to maintain moisture levels during the long cook. Once the smoker reaches temperature and you see clean, blue smoke (not thick white), you’re ready to begin.
Place the seasoned Boston butt pork roast fat-side up on the smoker grates. The fat cap should be positioned upward to render down and baste the meat as it cooks. Close the lid and maintain a consistent temperature of 225°F. Resist the urge to open the smoker during the first 4-6 hours—each time you peek, you lose heat and extend cook time. The pork is ready for the stall when the internal temperature reaches 165°F, typically after 6-8 hours of smoking. This is when the meat’s natural juices begin evaporating, causing the temperature to plateau.
Apply the Texas Crutch and Continue Smoking
When you reach the stall, it’s time for the Texas crutch technique. Mix together the 2 tablespoons apple cider vinegar and 2 tablespoons yellow mustard in a small bowl. Wrap the pork tightly in butcher paper (not aluminum foil), then brush the vinegar-mustard mixture generously over the wrapped meat. This combination enhances bark development while keeping the meat moist during the stall phase.
Return the wrapped pork to the smoker and continue cooking at 225°F. The internal temperature should begin rising again after about 1-2 hours. Cook until the internal temperature reaches 203°F, at which point a meat probe should slide in like butter with no resistance. This typically takes an additional 4-6 hours of smoking time. The bark should be dark mahogany with a crisp texture, and the meat should be fork-tender with a beautiful smoke ring visible beneath the bark.
Rest and Serve the Pork
Once the pork reaches 203°F, remove it from the smoker and place it on a cutting board. Tent loosely with aluminum foil and let it rest for at least 1 hour. This resting period allows the juices to redistribute throughout the meat, ensuring each slice is moist and flavorful. During this time, melt the ½ cup butter in a small saucepan over low heat.
After resting, carefully unwrap the pork and brush the melted butter generously over the surface. This step adds richness and helps maintain moisture. Slice the pork against the grain into ½-inch thick pieces. The meat should pull apart easily with just a slight tug, indicating perfect tenderness. Serve immediately with your favorite barbecue sauce or extra vinegar-mustard glaze for dipping.
Pro Tips For Making Smoked Boston Butt Pork Roast
- Skip the Wet Wood Chips: I learned this the hard way—soaking those 2 lb hickory wood chips for 30 minutes actually slows down the burn and makes your smoker take forever to stabilize. Toss them dry in the smoker and let them catch fire naturally. You’ll get that clean blue smoke faster, and your pork won’t spend extra time waiting.
- Press That Rub Hard: That ½ cup smoked paprika isn’t just for show—it’s the thing that matters most for flavor. Don’t just dust it on; dig your fingers into every crevice of the fat cap and bone indentations. If you see white spots after rubbing, you’ve shortchanged the taste. (Yes, even if you’re impatient like me.)
- Stall? Wrap Tight: When the pork hits 165°F and stalls, wrapping it in butcher paper isn’t optional—it’s how you avoid a dry, tough shoulder. Use the full 2 tbsp apple cider vinegar and yellow mustard mix before wrapping, then press the paper tight so no air sneaks in. Loose wrapping = wasted effort.
- Butter It Down Fast: That ½ cup melted butter isn’t just for flavor—it’s your insurance against dry slices. Brush it on immediately after unwrapping, while the pork is still warm. If you wait 10 minutes, the butter will pool instead of soaking in. (Your future self will thank you.)
Storing and reheating your smoked boston butt pork roast
Fridge Storage Secrets
Once your pork reaches 203°F, let it rest for at least 1 hour before slicing—this is non-negotiable for juicy results. I always wrap the sliced pork tightly in butcher paper (not foil) to preserve that crisp bark.
Store portions in glass Pyrex containers with airtight lids, leaving ½ inch headspace to prevent sogginess. These containers keep the meat fresh for 5-6 days in the fridge, and honestly? The flavors deepen overnight as the spices meld further. 💪
Freezer Preservation
For longer storage, freeze your pork in quart-sized freezer bags—squeeze out all air first to avoid freezer burn. I portion it into individual servings before freezing, making it easy to pull out just what you need later.
Wrapped this way, it stays perfect for up to 3 months. When you’re ready to eat, thaw overnight in the fridge rather than microwaving directly—this preserves that beautiful bark texture. ❄️
Reheating Like a Pro
Never reheat pork straight from frozen—always thaw first! For stovetop reheating, use a heavy-bottomed skillet with a splash of apple cider vinegar (just 1 tbsp) to keep the meat moist. Heat over medium-low for 10-12 minutes, stirring occasionally, until reaching 165°F.
The vinegar helps counteract any dryness that might develop. For oven reheating, wrap slices in foil and bake at 350°F for 15 minutes—this maintains that perfect bark. 🔥
Bark Protection Hacks
The bark is what makes this dish special, so here’s how to preserve it during reheating: After slicing, brush each piece lightly with melted butter before storing. When reheating, place the slices bark-side down in the pan or on the baking sheet.
This prevents the crispy exterior from turning mushy. I’ve even tried reheating in a cast iron skillet with a lid for 5 minutes—it works wonders! The residual heat keeps everything crispy. 💛
Portion Control Tips
If you’re feeding a crowd, I recommend pre-slicing the pork before storing—it reheats more evenly this way. For individual meals, portion ½-inch thick slices into containers, leaving a little space between them to prevent sticking.
When reheating, add 1 tbsp water or broth to the container to help steam the meat gently. This method keeps everything moist without making it soggy. The key is patience—never rush the reheating process! ⏰
Nutrition facts
Frequently asked questions
Why does my smoked pork need to rest before slicing?
Resting for at least 1 hour after smoking lets the meat’s juices redistribute evenly. This ensures every slice is moist and flavorful—skipping it means dry, disappointing bites. The collagen that tenderizes the meat needs time to settle, so patience here makes all the difference!
Can I use regular foil instead of butcher paper for the Texas crutch?
Butcher paper is ideal because it allows moisture to escape while keeping the meat moist inside. Foil traps steam, making the meat soggy and ruining that perfect bark. If you only have foil, wrap loosely and check often to prevent steam buildup.
How do I know when the pork has reached the stall phase?
Watch your internal temperature—when it hits 165°F after 6-8 hours of smoking, the stall begins. The needle will stall for 1-3 hours as moisture evaporates. This is normal! Just stay patient and keep the smoker at 225°F.
What if my smoker temperature fluctuates during cooking?
Small fluctuations are normal, but keep the average at 225°F. If it drops below 220°F, add more wood chips or adjust the vent. Consistency is key—big swings can dry out the meat. A good meat probe and thermometer are your best tools here!

Trained in classic French technique but raised on slow-cooked ribs and spicy rubs, she blends culinary skill with smoke and soul.
- Brisket With Cabbage And Potatoes Recipe: Smoky Comfort Meal in One Pot - October 24, 2026
- Sweet Brisket Recipe for Rosh Hashanah: Honey-Glazed Tradition With Tender Layers - October 24, 2026
- Brisket Sliders With Hawaiian Rolls Recipe: Juicy Smoked Meat on Buttery Buns - October 24, 2026