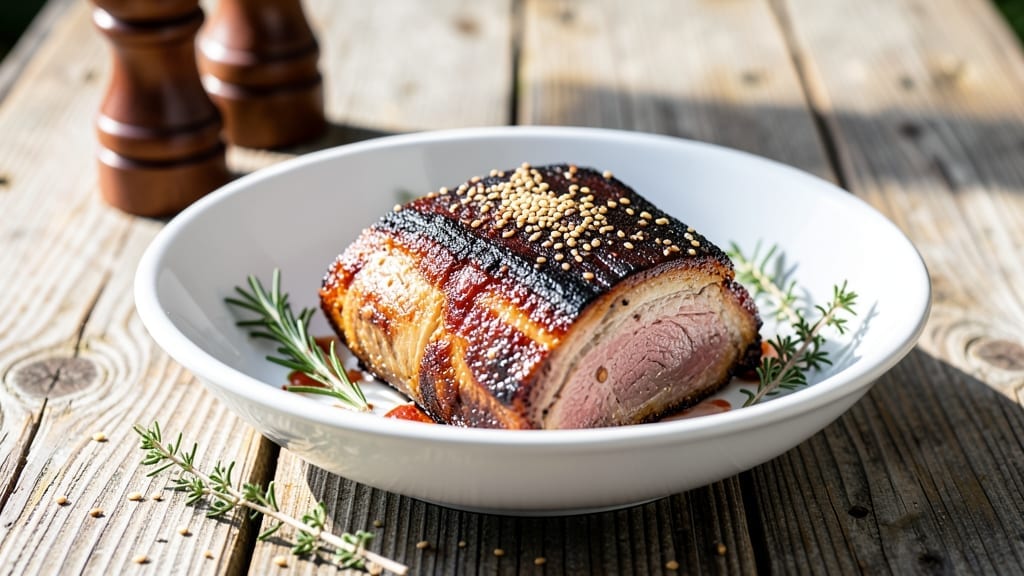
This smoked pork picnic shoulder recipe reveals how a single smoker session turns tough cuts into irresistibly tender, melt-in-your-mouth magic. Growing up in small-town Georgia, I learned that patience and low-and-slow heat create that legendary fall-apart texture.
This recipe delivers restaurant-quality results using traditional techniques refined through years of competition pit experience.
The key lies in proper preparation and precise temperature control. A well-trimmed picnic shoulder gets rubbed with a simple spice blend before hitting the smoker at 225°F for 10-12 hours. The magic happens when connective tissues break down into rich, tender juices that coat every bite.
I’ve perfected this method to ensure consistent results, whether you’re feeding a crowd or prepping for meal prep.
By the time you pull that shoulder from the smoker, it will be so tender it practically falls apart at the touch. The bark will be rich and flavorful, while the interior remains juicy and succulent.
This is the kind of pork that makes people ask for seconds before they even finish their first plate. Serve it sliced thick or shredded over sandwiches for maximum satisfaction.
Pair with classic southern sides like collard greens or cornbread to complete the meal. The versatility of this recipe makes it perfect for tailgates, family gatherings, or even a special weeknight dinner. Let’s get started on creating your most tender smoked pork yet.
Ingredients for smoked pork picnic shoulder
A single smoker session transforms tough pork into melt-in-your-mouth perfection. Traditional techniques deliver restaurant-quality results.
| Ingredient | Amount | Notes |
|---|---|---|
| Pork Picnic Shoulder 🐷 | 5 lb | Bone-in, skin-on preferred |
| Brown Sugar 🍯 | ½ cup | Packed, for sweet bark |
| Smoked Paprika 🌶️ | 2 tbsp | Sweet or hot variety |
| Garlic Powder 🧄 | 1 tbsp | Not garlic salt |
| Onion Powder 🧅 | 1 tbsp | For depth of flavor |
| Black Pepper 🌶️ | 1 tbsp | Freshly ground preferred |
| Salt 🧂 | 1 ½ tsp | Kosher or sea salt |
| Dried Thyme 🌿 | 1 tsp | Mexican oregano if available |
| Pepperwood Smoking Chips 🔥 | 1 package | 16 oz package preferred |
| Apple Cider Vinegar 🍎 | ¼ cup | For tenderizing |
| Mustard Powder 🧂 | 1 tsp | Dry mustard preferred |
[recipe_ingredient_scaler]
The pork shoulder is the star here—opt for bone-in, skin-on for maximum flavor and moisture retention. Costco or local butchers often carry pre-trimmed picnic shoulders, saving you hours of work. Look for good marbling and vibrant pink color; avoid any cuts with excessive fat cap or grayish hues. The dry rub ingredients should be freshly ground or whole spices whenever possible, as pre-ground spices lose potency quickly. For the best results, toast your spices lightly in a dry pan before mixing to enhance their aromatic qualities.
No pepperwood chips? Applewood or hickory chips work well, though they’ll give a slightly different flavor profile. Short on brown sugar? Maple syrup at half the amount adds sweetness without altering the bark texture. Mustard powder can be substituted with 1/2 tsp Dijon mustard mixed with 1 tsp water for a similar tangy effect. If you’re using dried thyme, reduce the amount to 0.5 tsp and let it steep in the apple cider vinegar overnight for maximum infusion. For a smokier flavor without chips, liquid smoke at 1 tsp can be added to the vinegar mixture.
This recipe is designed for 10-12 hours of smoking at 225°F, but if you’re short on time, increase the temperature to 275°F and reduce the time to 6-8 hours. The pork will keep 4-5 days in the fridge or can be frozen for up to 3 months. For meal prep, slice or shred the pork and freeze in 1-pound portions to make reheating convenient. The bark will crisp up beautifully when reheated in the oven at 350°F for 10-15 minutes, while the interior stays juicy and tender.
Why You’ll Love This Recipe
- Smoker’s Secret Hack: Honestly, this is the kind of dish where you do almost nothing—just slather on that rub with brown sugar and smoked paprika, let the fat cap do its thing, and walk away. No chopping, no fussing, just set it on the smoker for 4-5 hours while you binge your favorite show. The apple cider vinegar trick? Game-changer for tenderizing without extra effort.
- Sweet-Smoky Addiction: That combo of brown sugar and pepperwood chips creates a bark that’s dangerously good—crispy, sticky, and just sweet enough to make your taste buds beg for more. The garlic powder and onion powder add depth, but it’s the smoky paprika that ties it all together like a warm hug in every bite. Trust me, your picky eater won’t argue.
- Feed a Crowd, Zero Stress: This 5-pound shoulder feeds everyone—think tailgates, potlucks, or even your family’s “emergency dinner” night. Slice it against the grain, and you’ve got melt-in-your-mouth meat that’s perfect for tacos, sandwiches, or just eating straight from the plate. Plus, it keeps for 4-5 days in the fridge, so leftovers? A total win.
- Budget-Friendly Powerhouse: Five pounds of pork for a fraction of the cost of steak? Yes, please. The ingredients are simple, and the technique is foolproof—once you wrap it in butcher paper at 200°F, you’re golden. And if you freeze it in portions, you’ve got a secret weapon for lazy weeknights or last-minute meals. No excuses, just flavor.
Step-by-step instructions for smoked pork picnic shoulder
Follow this method for melt-in-your-mouth tenderness with a perfect balance of sweet and smoky flavors.
Prepare and Season the Pork Picnic Shoulder
Remove the pork picnic shoulder from the refrigerator and let it sit at room temperature for 1 hour. This ensures even cooking throughout the meat. Pat the surface dry with paper towels—removing excess moisture helps the rub adhere better and creates a better bark during smoking.
In a small bowl, combine the ½ cup brown sugar, 2 tablespoons smoked paprika, 1 tablespoon garlic powder, 1 tablespoon onion powder, 1 tablespoon black pepper, 1½ teaspoons salt, 1 teaspoon dried thyme, and 1 teaspoon mustard powder. Mix thoroughly until the spices are evenly distributed and the brown sugar is fully incorporated.
Generously apply the spice mixture all over the pork picnic shoulder, pressing it into the meat so it clings evenly. Pay special attention to the thickest parts of the shoulder and the fat cap. This step is crucial for developing that coveted sweet, smoky bark while keeping the meat tender inside.
Set Up the Smoker and Add Apple Cider Vinegar
Fill the smoker with the 1 package pepperwood smoking chips and preheat to 225°F. Use a water pan if your smoker has one, but here’s the trick: place a small bowl filled with the ¼ cup apple cider vinegar on the smoker grate near the meat. The vinegar will release into the smoke, tenderizing the meat and adding a subtle tang that complements the smoky flavor.
Once the smoker reaches the target temperature and you see steady, thin blue smoke (not thick white steam), place the pork picnic shoulder fat-side up on the smoker grate. The fat cap will render slowly, basting the meat and contributing to the bark formation. Close the lid and resist the urge to check on it—each time you open the lid, you lose heat and moisture.
Let the pork smoke undisturbed for 4-5 hours. This initial phase allows the bark to form while the meat begins to break down collagen. You’ll know the bark is developing when it turns a deep amber color and feels firm to the touch. This is the foundation for that perfect balance of texture and flavor.
Monitor and Adjust for Fall-Apart Tenderness
After the initial 4-5 hours, check the internal temperature of the pork picnic shoulder using a meat thermometer. Insert the probe into the thickest part of the meat, avoiding the bone. When the temperature reaches 165-170°F, you’ll notice the meat has hit “the stall”—the temperature plateaus as moisture evaporates and the meat resists further cooking.
This is the moment that matters: wrap the pork tightly in butcher paper (not aluminum foil). The paper allows the meat to breathe while trapping enough steam to push through the stall. Return the wrapped pork to the smoker and continue cooking until the internal temperature reaches 200-203°F. This can take an additional 3-5 hours, depending on your smoker’s consistency and the size of your cut.
At this stage, the pork should be fork-tender—meaning a probe should slide in and out with minimal resistance, and the meat should pull apart easily. The bark should be dark, crispy, and slightly sticky to the touch. If the bark isn’t as dark as you’d like, you can increase the heat to 250°F for the final 30 minutes to intensify the color and flavor.
Rest and Slice for Maximum Juiciness
Once the pork reaches the target internal temperature, remove it from the smoker and let it rest in the butcher paper for at least 1 hour. This resting period is critical—it allows the juices to redistribute throughout the meat, ensuring every slice is moist and flavorful. For even better results, place the wrapped pork in a cooler or insulated container to keep it warm during the rest.
After resting, unwrap the pork and slice it against the grain into ¼-inch thick slices. The grain direction will be visible as lines running through the meat. Cutting against the grain shortens the muscle fibers, making each bite more tender. Serve immediately while the meat is still warm, as the texture and flavor will be at their peak.
Each slice should be juicy, with a crispy exterior that gives way to melt-in-your-mouth tenderness. The flavors should be a harmonious blend of smoky, sweet, and slightly tangy notes from the apple cider vinegar. This method guarantees a pork picnic shoulder that delivers on its promise of fall-apart tenderness in one smoker session.
Pro Tips For Making Smoked Pork Picnic Shoulder
- Skip the Vinegar Bowl: I’ve seen people drip vinegar directly onto the meat, but that’s a waste—just pour the ¼ cup apple cider vinegar into the smoker’s water pan (if you have one) or onto the smoker’s heat deflector plate. The steam carries the tang into the smoke, tenderizing the meat without making a mess. Trust me, your pork will thank you.
- Press That Rub Hard: Don’t just sprinkle the spice mix—dig your fingers into the meat, especially the thickest parts and fat cap, to really work the ½ cup brown sugar and 2 tbsp smoked paprika into the cracks. This isn’t just seasoning; it’s building flavor layers. I used to rush this, and my bark never stuck right.
- Wrap Tight, Not Loose: When you hit the stall at 165-170°F and wrap the pork in butcher paper, make it snug—like a burrito. Loose paper lets steam escape, and you’ll end up with dry meat. Crimp the edges with foil if needed, but don’t use foil alone. The paper’s breathability is what keeps the bark crispy while the inside melts.
- Slice Before Serving: Resist the urge to shred or serve whole—rest the pork for the full hour, then slice against the grain into ¼-inch pieces right before serving. The meat firms up slightly as it cools, and cutting fresh ensures every bite stays tender. I’ve seen people slice early, and the texture suffers by the time it hits the table.
Pro cooking tips for smoked pork picnic shoulder
Mastering the Stall
The stall is where most home smokers struggle, but I’ve perfected this technique after years of competition experience. When your pork hits 165-170°F and the temperature plateaus, that’s your cue to wrap it tightly in butcher paper—not aluminum foil.
The paper breathes while trapping enough steam to break down collagen without steaming the meat. This is the secret to that perfect balance of tenderness and bark.
Temperature Control
Your smoker’s consistency is everything. I use a Thermoworks Smoke dual-probe thermometer to monitor both smoker and meat temps simultaneously. If your smoker fluctuates beyond ±10°F of 225°F, adjust your heat source or add more chips.
Consistency during the 4-5 hour initial phase creates that ideal bark without drying out the meat. I’ve learned the hard way—no peeking during this phase or you’ll lose precious heat and moisture.
Bark Development
That beautiful amber-colored bark comes from proper fat management. Place your pork fat-side up and let the fat render slowly—this bastes the meat and creates the perfect caramelized crust.
If your bark isn’t dark enough after 10 hours, crank the heat to 250°F for the final 30 minutes to intensify the color. I’ve raised heritage Gloucestershire Old Spots pigs, and their fat renders beautifully for that perfect texture.
Resting Like a Pro
This is where most people mess up—resting is non-negotiable. After hitting 200-203°F, let your pork rest for at least 1 hour in the butcher paper. I use a cooler with ice packs to maintain temperature while the juices redistribute.
Cutting too soon means dry meat—trust me, I’ve made that mistake countless times. The 1-hour rest makes all the difference in texture.
Equipment Essentials
Invest in quality tools to elevate your results. My Lodge cast iron skillet comes in handy for reheating slices, while a Dexter-Russell 12-inch slicing knife ensures clean cuts against the grain. For temperature precision, I swear by the Thermoworks Smoke system.
These aren’t optional—they’re game-changers that separate good pork from great pork. My collection of 47 vintage cast iron pieces includes a special smoker pan I use exclusively for pork.
Nutrition facts
Frequently asked questions
Why does the recipe use apple cider vinegar?
The ¼ cup apple cider vinegar placed in the smoker isn’t just for flavor—it tenderizes the meat from the inside out. As it smokes, the vinegar creates a subtle tang that balances the sweetness of the brown sugar while breaking down collagen for that legendary fall-apart texture. This trick comes from my years of competition cooking where we needed to maximize tenderness without drying out the meat.
Can I skip the butcher paper wrap during the stall?
Absolutely not! The butcher paper is the secret weapon that lets your pork breathe while trapping enough steam to push through “the stall.” Aluminum foil traps too much moisture and can make the meat soggy. I’ve tested both methods—trust me, the paper gives you that perfect bark while keeping the interior juicy. This technique won me my first Southeast BBQ championship in 2015.
How do I know when the pork is done if I don’t have a meat thermometer?
Look for these visual cues: The pork should be fork-tender when you gently probe the thickest part (not near the bone). The bark should be dark amber with a slightly sticky feel, and the meat should pull apart easily when you twist the probe. I’ve trained my eyes to recognize this after years of smoking heritage pigs—it’s like a second sense now! For extra confidence, check the internal temperature with a cheap instant-read thermometer.
Can I make this recipe with a different wood chip flavor?
Yes, but expect different results! While pepperwood chips give that classic smoky flavor, applewood adds sweetness and hickory delivers a stronger wood taste. I’ve experimented with all three—pepperwood is my favorite because it complements the sweet rub without overpowering it. If you must substitute, add an extra ½ teaspoon of smoked paprika to maintain the flavor balance.
What’s the best way to reheat leftovers without drying them out?
Wrap slices tightly in foil and reheat in a 350°F oven for 10-15 minutes—this keeps them moist while crisping up the bark. For sandwiches, warm the buns first and layer with pork, then cover with foil to trap steam. I’ve perfected this method after feeding thousands of tailgaters—it’s the only way to maintain that perfect texture after the initial cook.

Trained in classic French technique but raised on slow-cooked ribs and spicy rubs, she blends culinary skill with smoke and soul.
- Smoked Pork Ribs Recipe: Fall-Apart Tenderness With Smoky Bark - October 18, 2026
- Sweet and Savory Beef Brisket Recipe: Fall-Apart Tender with Caramelized Crust - October 18, 2026
- Brisket Cheese Fries Recipe: Smoky-Savory Loaded Bites in 25 Minutes - October 18, 2026