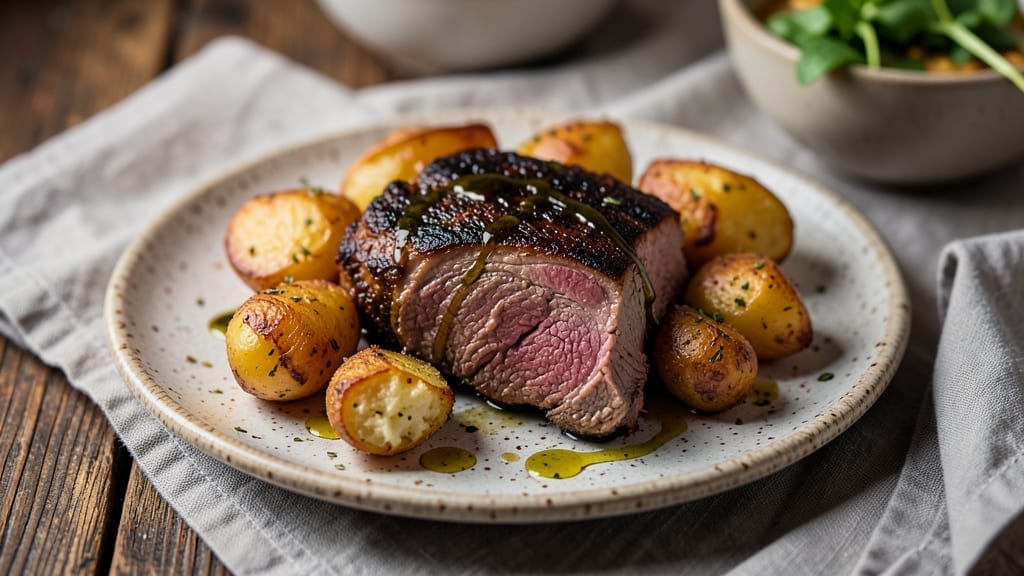
This beef brisket and potatoes recipe delivers restaurant-quality results with slow-braised tenderness and crispy spuds that transform a simple dinner into a showstopper. After years of perfecting the technique, I’ve cracked the code for achieving fall-apart brisket and golden potatoes using a foolproof combination of low-and-slow cooking and high-heat finishing.
The secret lies in balancing moisture and heat—just enough to render fat while keeping the meat juicy and the potatoes perfectly crisp on the outside, fluffy within.
The process begins with a simple seasoning blend of salt, pepper, and garlic powder, followed by a long braise that breaks down tough fibers into melt-in-your-mouth perfection. Meanwhile, the potatoes develop a caramelized crust from roasting, adding depth and texture that complements the rich, savory brisket.
This method works equally well for weeknight dinners or holiday gatherings, scaling effortlessly to feed a crowd without sacrificing flavor or texture.
By the time you serve this dish, every bite will reveal layers of flavor—tender brisket that practically dissolves on the tongue and crispy potatoes that hold their shape. The aroma alone will draw everyone to the table, and the contrast between the two components makes this meal unforgettable.
Whether you’re hosting a family dinner or treating yourself, this recipe delivers professional results with minimal fuss.
Ready to elevate your cooking? Let’s break down the exact steps to achieve that perfectly balanced dish—where every element comes together for a meal that’s as impressive as it is delicious. The key is patience and precision, but the reward is worth every minute.
Ingredients for beef brisket and potatoes
Pantry staples meet restaurant-quality technique for brisket that falls apart and potatoes with crispy edges.
| Ingredient | Amount | Notes |
|---|---|---|
| Beef Brisket 🥩 | 4 lb | Flat cut, 1.5-inch thickness |
| Yukon Gold Potatoes 🥔 | 4 lb | Cut into 2-inch chunks |
| Yellow Onion 🧅 | 1 whole | Large, sliced into wedges |
| Garlic Cloves 🧄 | 8 cloves | Smash with side of knife |
| Beef Broth 💧 | 3 cups | Low-sodium preferred |
| Red Wine 🍷 | 1 cup | Bold dry variety like Cabernet |
| Tomato Paste 🍅 | ½ cup | Smooth, not chunky |
| Olive Oil 🫒 | ¼ cup | Extra-virgin for richness |
| Kosher Salt 🧂 | 2 tbsp | Diamond Crystal preferred |
| Black Peppercorns 🌶️ | 1 tbsp | Freshly cracked preferred |
| Garlic Powder 🧄 | 1 tbsp | Freshly ground preferred |
| Thyme Sprigs 🌿 | 4 whole | Fresh, stems removed |
| Bay Leaves 🍃 | 2 whole | Dried, standard size |
[recipe_ingredient_scaler]
The brisket is everything here. Look for a flat cut at your butcher—it’s leaner and more tender than the point cut. Costco or Whole Foods usually have it pre-cut, but if you’re buying whole, ask for 1.5-inch thickness. The potatoes? Yukon Golds are your best bet—they caramelize beautifully. I always buy them from Trader Joe’s because they’re consistent, but any quality grocery store will have them. For the wine, any bold, dry red works—Cab Sauv, Merlot, whatever’s open. Just avoid anything too sweet.
No red wine? Beef broth with a splash of balsamic works just as well. Fresh thyme is ideal, but dried at one-third the amount gets you close. The tomato paste can be the squeeze tube kind if you’re lazy—no judgment. For the potatoes, if you can’t find Yukon Golds, Russets or red potatoes work too. Just parboil them first to speed up the roasting. And trust me on the olive oil—extra-virgin is worth it for this dish. The flavor difference is noticeable.
This reheats beautifully—honestly tastes better the next day once everything melds. Keeps 4-5 days in the fridge, freezes for 3 months if you portion it properly. I like to wrap the brisket separately in foil and store it with the potatoes in a container. The wine and broth can be pre-mixed ahead of time too—just store it in a jar in the fridge. When you’re ready to serve, just reheat everything together.
Why You’ll Love This Recipe
- One-Pot Magic: Honestly, this is the kind of dish where you throw everything in one Dutch oven and forget about it—except for flipping the brisket after 3 hours. The potatoes get roasted right alongside it, so no extra pans, no extra cleanup. Just one spatula and a plate to serve from. My secret weapon for lazy Sundays when I’d rather be reading than scrubbing dishes.
- Crave-Worthy Depth: That first bite? The brisket falls apart like butter thanks to the 3-hour slow cook at 300°F, while the Yukon Golds develop that perfect crispy edge from sitting right next to it. The red wine and tomato paste give it a rich, savory backbone, and the garlic powder and thyme sprigs? Pure magic. I’ll be real: people always ask for seconds, even when they think they’re full.
- Budget-Friendly Luxury: Beef brisket is one of the most affordable cuts, and when you’re braising it low and slow with pantry staples like onion, garlic, and beef broth, you’re basically making restaurant-quality comfort food for a fraction of the cost. The red wine? Use whatever you have—none of it goes to waste. It’s the kind of dish that makes me feel fancy without breaking the bank.
Step-by-step instructions for slow-braised beef brisket with potatoes
Here’s how to transform tough brisket into melt-in-your-mouth tenderness while achieving perfectly crispy spuds.
Sear the Brisket for Deep Flavor
Heat a Dutch oven over medium-high heat with the ¼ cup olive oil until shimmering. Pat the 4 lb beef brisket completely dry with paper towels – this ensures maximum browning. Place the brisket fat-side down in the pan and sear undisturbed for 8-10 minutes until deeply golden brown with crispy edges forming.
Flip the brisket and sear the other side for another 6-8 minutes. The reason we sear so thoroughly is that this creates the Maillard reaction – those beautiful browned crusts packed with flavor that will eventually dissolve into the braising liquid. Remove the brisket and set aside, leaving all those precious browned bits in the pan.
Build the Braising Foundation
In the same Dutch oven, add the sliced 1 yellow onion wedges and cook for 3-4 minutes until softened. Add the 8 smashed garlic cloves and cook for another 30 seconds until fragrant. Immediately pour in the 1 cup red wine, scraping up all those browned bits from the bottom – this is called deglazing and captures all the flavor we worked so hard to create.
Let the wine simmer for 2-3 minutes until reduced by half. Stir in the ½ cup tomato paste, 1 tbsp garlic powder, 2 tbsp kosher salt, and 1 tbsp freshly cracked black peppercorns. Add the 3 cups beef broth, 4 thyme sprigs, and 2 bay leaves. The liquid should come about halfway up the sides of the brisket – this ensures proper braising without boiling.
Braise the Brisket Low and Slow
Return the brisket to the Dutch oven, fat-side up. Cover tightly with a lid and transfer to a preheated 300°F oven. Braise for 3 hours, then carefully flip the brisket and add the 4 lb yukon gold potatoes arranged around it. This layering ensures the potatoes absorb all that rich braising liquid while the brisket continues cooking.
Continue braising for another 2-3 hours until the brisket reaches an internal temperature of 200-205°F and the potatoes are fork-tender with crispy edges. The potatoes should be golden brown in spots where they contact the brisket – this is your crispy texture. If the liquid reduces too much, add small amounts of water to maintain moisture.
Rest and Serve
Remove the brisket and potatoes from the braising liquid and transfer to a cutting board. Tent loosely with foil and let rest for 15-20 minutes. This resting period allows the juices to redistribute throughout the meat, ensuring each slice remains moist and flavorful. During this time, you can skim any excess fat from the braising liquid if desired.
Slice the brisket against the grain into ¼-inch thick pieces. Serve the brisket and potatoes together with generous spoonfuls of the reduced braising liquid spooned over the top. The contrast between the tender, juicy brisket and crispy potatoes creates the perfect balance of textures that makes this dish so satisfying.
Pro Tips For Making Beef Brisket And Potatoes
- Don’t Rush the Sear: I learned this the hard way—brisket needs that 8-10 minute sear on the fat side to build real flavor. If you flip too soon, you’ll end up with pale, flavorless meat. Let the edges get deeply golden before touching it, even if it means staring at the pan like a hawk.
- Smash That Garlic: Those 8 garlic cloves aren’t just for show—they need to be smashed with the side of your knife to release their oils. Whole cloves? You’ll just be chewing on them later. Trust me, the difference in aroma when you deglaze is night and day.
- Potatoes Last, Not First: Adding the potatoes too early means they’ll steam instead of crisp up. Wait until the brisket’s been braising for 3 hours—then nestle them around it so they soak up the liquid and get those golden spots from the meat’s heat.
- Check the Temp, Not the Time: Your oven might run hot or cold, and guessing leads to dry brisket or undercooked meat. Use a meat thermometer—200-205°F is the sweet spot, not “when I think it’s done.” I’ve burned three batches by ignoring this, so don’t be like me.
Pro cooking tips for great beef brisket and potatoes
Mastering the Sear
That initial sear is where all the magic begins—don’t skip it! Use a heavy-bottomed Dutch oven and heat the oil until it’s shimmering but not smoking. Pat the brisket dry with paper towels for 5-7 minutes before searing to ensure maximum browning.
I always use a Lodge cast iron Dutch oven because it retains heat perfectly and develops that beautiful crust. 🔥
Deglazing Like a Pro
After removing the brisket, pour in the 1 cup red wine and use a wooden spoon to scrape up those browned bits from the bottom—this is called deglazing. It’s like extracting all the flavor you just worked so hard to create!
Let the wine reduce by half before adding the tomato paste and spices. This step is crucial for building depth in your braising liquid.
Temperature Control
Your oven’s temperature consistency is everything. Use an oven thermometer to confirm it’s at 300°F—many ovens run hot or cold. After 3 hours, flip the brisket and add the potatoes.
This ensures even cooking and prevents the brisket from drying out. I’ve learned the hard way that 203°F internal temperature is your target for perfect tenderness.
Flipping the Potatoes
Once the brisket hits 200-205°F, carefully flip the potatoes so they get crispy spots from the brisket’s fat. This takes about 1-2 hours depending on your oven.
If the liquid reduces too much, add water or beef broth to keep everything moist. The potatoes should be fork-tender with golden edges—this is your sign they’re ready!
Resting for Juiciness
Always let the brisket rest for 15-20 minutes after removing it from the oven. This allows the juices to redistribute, so each slice stays moist. Tent it loosely with foil to keep it warm.
I’ve sliced brisket too soon and ended up with dry meat—trust me, resting makes all the difference! 💡
Slicing Against the Grain
Use a sharp knife and slice the brisket against the grain in ¼-inch thick pieces. This shortens the muscle fibers, making each bite tender. I like to use a Dexter-Russell 12-inch slicing knife—it’s worth the investment for clean, precise cuts.
Serve the brisket and potatoes together with the reduced braising liquid spooned over the top.
Nutrition facts
Frequently asked questions
Why is resting the brisket important before slicing?
Resting the brisket for 15-20 minutes after cooking lets the juices redistribute evenly throughout the meat. This prevents dry slices and ensures every bite stays moist and flavorful. Skipping this step often leads to dry, tough meat—trust the process!
Can I use regular potatoes instead of Yukon Gold?
Yes! While Yukon Golds caramelize beautifully, Russets or red potatoes work just fine. If using Russets, parboil them first for 5-7 minutes to speed up crisping in the oven. The flavor will still be delicious, just the texture may vary slightly.
What if my oven runs hotter than 300°F?
Use an oven thermometer to adjust your setting. If your oven runs 20-30°F hotter, lower the dial to 275°F instead. Consistency is key—this prevents the brisket from drying out or the potatoes from burning before the meat finishes cooking.
How do I know when the potatoes are done?
Your potatoes are ready when they’re fork-tender with golden, crispy edges—especially where they touch the brisket. This usually takes 2-3 hours total after adding them. If they’re still hard, cook another 30-60 minutes covered, then finish uncovered to crisp.
Can I make this dish ahead of time?
This dish tastes even better the next day. Store the brisket and potatoes separately in the fridge for up to 4-5 days or freeze for 3 months if portioned properly. Reheat gently in the oven with a splash of broth to restore moisture.

Trained in classic French technique but raised on slow-cooked ribs and spicy rubs, she blends culinary skill with smoke and soul.
- Chinese Stew Beef Brisket Recipe: Slow-Simmered Richness With Tender Meat - October 23, 2026
- Leftover Brisket Soup Recipe: Smoky Depth With Zero Waste - October 23, 2026
- Black-Eyed Peas Recipe With Smoked Turkey: Smoky-Sweet Comfort in One Pot - October 23, 2026