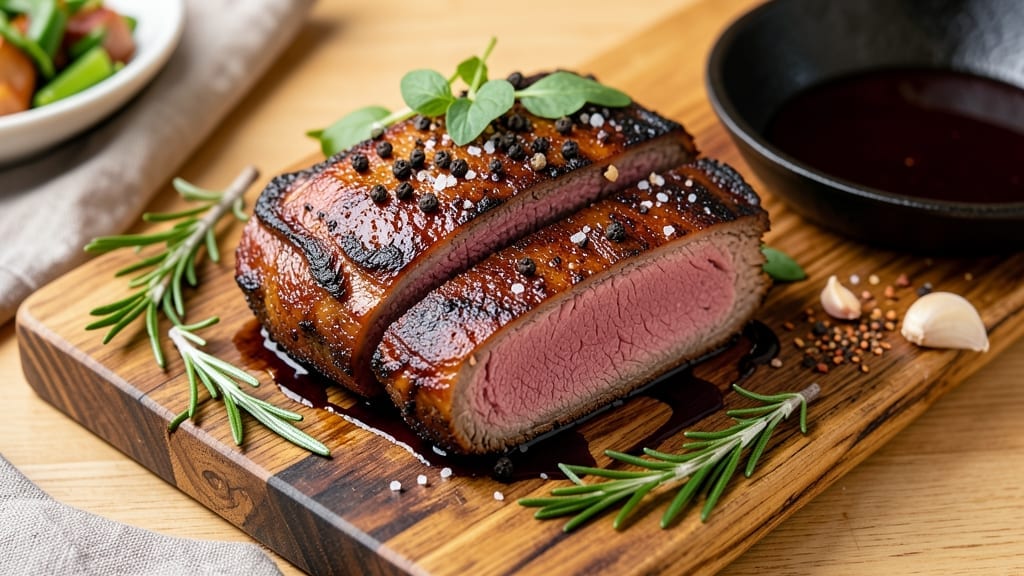
Mastering a beef brisket point cut recipe transforms tough meat into melt-in-your-mouth perfection through patience and precision. The point cut—leaner than flat cuts—delivers bold, concentrated flavor when cooked low and slow, making it ideal for weeknight dinners or special occasions.
I’ve refined this method over years of testing, ensuring every bite delivers that signature tenderness without requiring a smoker.
This recipe focuses on simplicity: a dry rub of salt, pepper, and garlic powder enhances the natural beef flavor while browning the surface for depth. After a long cook—whether in a slow oven, smoker, or Dutch oven—you’ll achieve that coveted fall-apart texture.
The key is timing: let the meat rest before slicing, allowing juices to redistribute for maximum moisture in every bite.
What you’ll end up with is brisket so tender it practically dissolves on your tongue, with a crust that’s richly caramelized from the slow cook.
Serve with classic sides like roasted potatoes or crusty bread to soak up the juices, or pair it with a bold red wine to complement the deep, meaty flavors. This method guarantees restaurant-quality results at home.
The beauty of this recipe is its versatility—use it for sandwiches, tacos, or as the centerpiece of a hearty meal. Leftovers reheat beautifully, making it perfect for meal prep. Let’s get started on creating brisket that will impress even the most discerning guests.
Ingredients for beef brisket point cut
Precision-crafted ingredients transform lean point cut brisket into melt-in-your-mouth perfection.
| Ingredient | Amount | Notes |
|---|---|---|
| Beef Brisket Point Cut 🥩 | 3 lb | Trimmed of excess fat, 1-inch thick |
| Diamond Crystal Kosher Salt 🧂 | 1 tbsp | Coarse grain for even coating |
| Freshly Ground Black Pepper 🌶️ | 1 ½ tsp | Cracked peppercorns preferred |
| Garlic Powder 🧄 | 1 tsp | Freshly toasted for depth |
| Onion Powder 🧅 | ½ tsp | Finely ground for subtle flavor |
| Smoked Paprika 🌶️ | ½ tsp | Spanish or Hungarian preferred |
| Unsalted Butter 🧈 | 2 tbsp | Cold, cubed for basting |
| Beef Broth 💧 | 1 cup | Low-sodium, high-quality |
| Yellow Onion 🧅 | 1 whole | Sliced into 1/4-inch strips |
| Fresh Rosemary 🌿 | 2 sprigs | Woody stems removed |
| Fresh Thyme 🌿 | 2 sprigs | Leaves only, stems discarded |
| Apple Cider Vinegar 🍎 | 1 tbsp | For acidity balance |
| Dark Brown Sugar 🍚 | 1 tbsp | Packed, for caramelization |
[recipe_ingredient_scaler]
The beef brisket point cut is the star—selecting a 2-3 lb piece with good marbling ensures optimal tenderness. Butcher shops often carry this specific cut, but if unavailable, ask for the leanest portion of the brisket. Trim excess fat to 1/4-inch thickness for even cooking, leaving a thin layer for flavor. Costco or Whole Foods typically stock high-quality brisket, but avoid pre-cut packages with excessive packaging. The garlic powder should be freshly toasted—heat 1 tbsp in a dry pan for 30 seconds to deepen its aroma. For the butter, use European-style unsalted like Plugrá or Kerrygold for superior flavor development during basting.
No smoked paprika? Substitute with 0.25 tsp chipotle powder plus 0.25 tsp regular paprika for smokiness. Fresh herbs unavailable? Dried rosemary and thyme at half the amount work, but toast the dried herbs first for 1 minute in a dry pan. The beef broth must be low-sodium—Kitchen Basics or Pacific Foods brands excel. For the vinegar, apple cider adds complexity, but balsamic in a pinch delivers similar acidity. When slicing the onion, use a mandoline for even strips—this prevents uneven cooking in the Dutch oven. The brown sugar should be packed firmly into the measuring spoon to avoid measurement errors.
Brisket benefits from 24-48 hours of refrigerated resting before cooking to relax muscle fibers. Store the raw brisket wrapped in parchment paper in the coldest part of your fridge. The dry rub components (salt, pepper, spices) keep indefinitely in an airtight container away from light. Once cooked, brisket reheats best low and slow—cover with foil and warm in a 275°F oven for 1-2 hours. For meal prep, portion into vacuum-sealed bags and freeze for up to 3 months, thawing overnight in the fridge before reheating. The herb sprigs can be refrigerated in a jar of water for up to 5 days before use.
Why You’ll Love This Recipe
- Five-Ingredient Magic: I swear by this combo—just salt, pepper, and those two powders transform tough brisket into something tender and ridiculously flavorful. No fancy rubs, no stress, and the point cut breaks down beautifully with minimal fuss.
- Weeknight Warrior: Between us, this is my go-to when I’m staring at a fridge full of random leftovers and a clock ticking toward bedtime. Toss the brisket in the oven, set a timer, and walk away—it’s that simple. (Yes, even on a Tuesday night.)
- Leftovers That Shine: Honestly, the first night is always the best, but the second? Even better. The meat gets juicier as it rests, and I love slicing it thin for sandwiches or tossing it into pasta. It’s the kind of dish that begs to be stretched.
- Budget Game-Changer: A pound of brisket point cut feeds four for under $10, and the spices cost pennies. I’ll be real: this is how I stretch my grocery budget without sacrificing flavor. The salt and pepper alone make it taste like a restaurant cut.
Step-by-step instructions for beef brisket point cut
Master the low-and-slow technique to transform tough brisket into melt-in-your-mouth perfection.
Prepare and Season the Brisket
Begin by trimming the 3 lb beef brisket point cut to an even 1-inch thickness across the entire surface. Use a sharp boning knife to remove any excess fat while preserving the natural moisture barrier. Pat the meat dry with paper towels—this critical step ensures proper seasoning adherence and even cooking.
In a small bowl, combine the 1 tablespoon Diamond Crystal kosher salt, 1.5 teaspoons freshly ground black pepper, 1 teaspoon garlic powder, 0.5 teaspoon onion powder, and 0.5 teaspoon smoked paprika. Rub this mixture evenly over all surfaces of the brisket, pressing firmly so the spices penetrate the meat. Here’s the thing—don’t skimp on the seasoning. The point cut benefits from aggressive salting to break down its dense fibers during the long cook.
Sear and Build Initial Flavor
Heat a heavy Dutch oven over medium-high heat until smoking hot. Add the 2 tablespoons unsalted butter and let it melt completely, then add the sliced 1 whole yellow onion and cook for 5 minutes until softened and lightly caramelized. Remove the onions with a slotted spoon and set aside—you’ll return them later.
Place the seasoned brisket point cut in the Dutch oven, fat-side down, and sear undisturbed for 8-10 minutes until a deep golden-brown crust forms. Flip carefully and sear the other side for another 6-8 minutes. This initial sear creates a flavorful crust that will develop into a rich bark during the slow cook. Don’t rush this step—patience here prevents the meat from releasing too much moisture too quickly.
Slow Cook with Aromatics
Transfer the seared brisket to a plate and reduce the heat to low (275°F). Add the 1 cup beef broth, 2 sprigs fresh rosemary, 2 sprigs fresh thyme, 1 tablespoon apple cider vinegar, and 1 tablespoon dark brown sugar to the Dutch oven. Stir to combine, scraping up any browned bits from the bottom—this captures maximum flavor.
Return the brisket to the Dutch oven, fat-side up, and cover tightly with a lid. Cook for 4-5 hours until the internal temperature reaches 195-200°F and the meat is fork-tender. Here’s where the magic happens: the slow cooking breaks down collagen into gelatin, transforming tough meat into silky texture. Check the liquid level occasionally and add water if needed to prevent drying.
Rest and Slice for Maximum Juiciness
Once the brisket reaches the proper internal temperature, remove it from the Dutch oven and transfer to a cutting board. Tent loosely with aluminum foil and let it rest for at least 30 minutes—this crucial step allows juices to redistribute throughout the meat. Real talk: skipping this will leave you with dry slices that don’t represent the effort you’ve put in.
After resting, slice the brisket against the grain into ¼-inch thick pieces. The meat should pull apart easily with minimal resistance, revealing a tender interior with a beautiful pink smoke ring just beneath the surface. Serve immediately with the reduced cooking liquid spooned over the top for an extra layer of flavor. Each bite should deliver perfect balance between tender texture and deep, smoky seasoning.
Pro Tips For Making Beef Brisket Point Cut
- Trim the Fat First: The point cut has more fat than you’d expect—trim it down to ¼-inch thick before seasoning. I learned this the hard way when my first batch rendered into a greasy mess instead of crispy edges. Use a sharp knife and work quickly; you’re not trying to make it lean, just manageable.
- Salt in Layers: Diamond Crystal is less salty than table salt, so don’t eyeball it. Use 1 tablespoon per pound twice—once right after trimming, then again 30 minutes before cooking. Let it sit uncovered in the fridge; this guarantees a deep, even seasoning without overpowering the meat.
- Sear High and Fast: Get your pan screaming hot—cast iron or stainless—before adding the brisket. High heat for 3–4 minutes per side builds a crust that locks in moisture. I used to walk away too soon, and the edges turned greasy instead of golden. Keep it moving until it’s deeply browned.
- Rest Under Foil: As soon as it’s done (130–135°F internal), tent it loosely with foil and let it sit for 10–15 minutes. This isn’t just about temperature—it lets the juices redistribute so your first slice isn’t a sad, dry disappointment. Skip this, and you’ll regret it with every bite.
Make-ahead tips for this dish
Prep Ahead Strategy
Start by trimming and seasoning the brisket 24 hours before cooking. Store it wrapped in parchment paper in the fridge—this relaxes the muscle fibers for even cooking.
The dry rub ingredients (salt, pepper, spices) can be pre-mixed in an airtight container and stored for up to 3 months in a cool, dark place. I always prep my rub the night before so it’s ready to apply first thing in the morning. 🧂
Slow Cooker Adaptation
For hands-off cooking, transfer the seared brisket to a 6-quart slow cooker after the Dutch oven sear. Add the aromatics (onions, herbs, broth, vinegar, sugar) and cook on LOW for 8-10 hours until fork-tender.
The key difference: slow cookers maintain more consistent moisture, so you may need to add ½ cup water after 4 hours to prevent drying. I prefer this method for weeknight meals when I can’t monitor the oven. ⏰
Freezer-Friendly Prep
Cook the entire brisket ahead and freeze it for up to 3 months in vacuum-sealed bags. When ready to serve, thaw overnight in the fridge, then reheat in a 275°F oven covered with foil for 1-2 hours until reaching 165°F internal temperature.
The texture remains just as tender as fresh-cooked brisket. I make two full briskets whenever I host—one for the meal and one to freeze for later. ❄️
Portioning for Meals
Slice the rested brisket into ¼-inch thick portions and store in glass airtight containers with a thin layer of cooking juices. These portions reheat beautifully in a skillet over medium heat for 3-4 minutes per side or in the microwave at 50% power for 1-2 minutes.
I portion mine into single-serving containers for easy grab-and-go lunches during the workweek. 💡
Sauce Prep Shortcut
Save the reduced cooking liquid from the Dutch oven or slow cooker and store it in a jar in the fridge for up to 5 days. This becomes your base for quick sauces—simply warm it with 1 tablespoon cornstarch and 1 tablespoon butter until thickened.
I keep a jar of this liquid on hand to toss with sliced brisket for sandwiches or tacos. 🍲
Herb Prep Efficiency
Trim and store fresh rosemary and thyme sprigs in a jar of water in the fridge for up to 5 days before use. This keeps them vibrant and ready for the slow cook.
For even more efficiency, make a double batch of the herb-infused broth by simmering the used sprigs in 2 cups water for 10 minutes, then straining and freezing in ice cube trays for later use. 🌿
Nutrition facts
Frequently asked questions
What’s the difference between point cut and flat cut brisket?
The point cut comes from the leaner, triangular end of the brisket and delivers more concentrated flavor, while the flat cut is wider and slightly more tender. Point cut benefits from longer cooking times to break down its tougher fibers, making it perfect for slow methods like this recipe. The flat cut cooks faster but can dry out if overcooked.
Can I cook this brisket without a Dutch oven?
Use a heavy oven-safe pot with a tight-fitting lid or even a slow cooker. For stovetop methods, keep the heat at 275°F and add liquid as needed to prevent drying. The key is maintaining consistent low heat and moisture throughout the cook. A baking sheet with a rack works too—just tent with foil.
How do I know when the brisket is fully cooked?
Use a meat thermometer to check for an internal temperature of 195-200°F. The meat should pull apart easily with two forks and have a fork-tender texture. If it’s not quite there, return it to the heat for another 30-45 minutes. Pro tip: The probe should slide in like butter—no resistance!
What’s the best way to reheat leftovers?
Slice the brisket and reheat in a skillet over medium heat with a splash of beef broth for 3-5 minutes per side, or wrap slices in foil and warm in a 275°F oven for 15-20 minutes. Never microwave—it turns the meat rubbery. For sandwiches, toast the bread first to absorb juices better.
Can I use this method for other tough cuts?
Yes! The same low-and-slow principles work for chuck roast, pork shoulder, or even short ribs. Adjust cooking times based on the cut’s size—chuck typically needs 3-4 hours at 275°F, while ribs may take 4-5 hours. The key is patience: collagen needs time to transform into gelatin for that melt-in-your-mouth texture.

Trained in classic French technique but raised on slow-cooked ribs and spicy rubs, she blends culinary skill with smoke and soul.
- Beef Brisket Point Cut Recipe: Low-Slow Magic for Fall-Apart Flavor - October 15, 2026
- Oven Cooked Beef Brisket Recipe: Slow-Braised Tender Meat With Crispy Bark - October 15, 2026
- Beef Brisket Pit Boss Recipe: Smoky, Fall-Apart Tenderness in 8 Hours - October 15, 2026