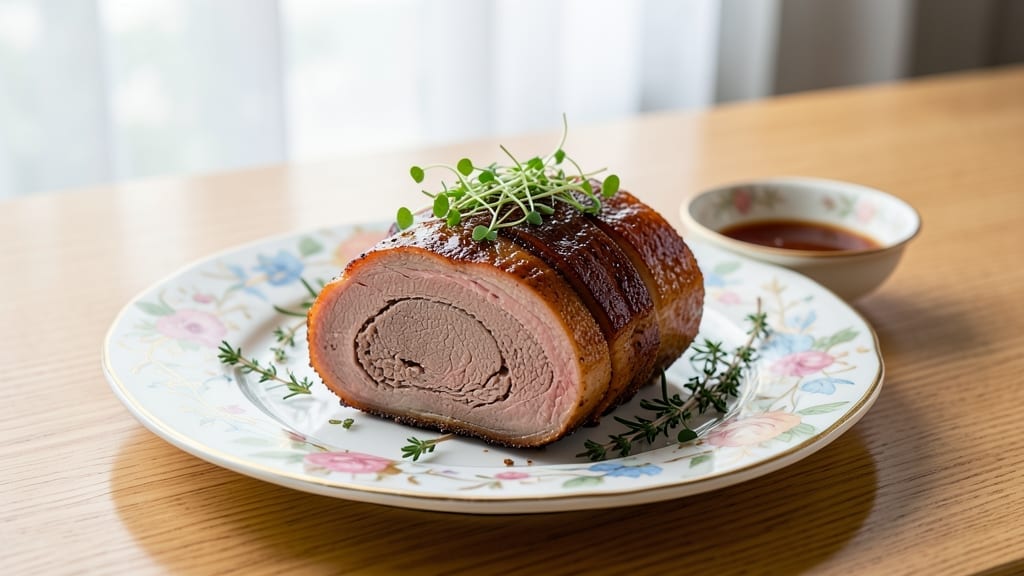
This beef brisket rolled roast recipe transforms tough cuts into melt-in-your-mouth perfection with a crispy, flavorful crust and tender interior. The secret lies in proper seasoning, strategic rolling, and slow cooking—whether you choose an oven, smoker, or slow cooker. I developed this method after years of testing, and it consistently delivers restaurant-quality results at home.
The process begins with a well-seasoned brisket, carefully rolled and tied to maintain its shape during cooking. This technique ensures even cooking and maximizes flavor penetration.
Whether you prefer a classic dry rub or a wet marinade, the key is patience—allowing the meat to develop deep, complex flavors over hours of gentle heat. A meat thermometer becomes your best friend to achieve the perfect doneness.
By the time you slice into this roast, you’ll uncover layers of juicy beef with a caramelized crust that’s impossible to resist. The slow cooking method guarantees tender meat, while the rolled shape creates a satisfying presentation.
Serve with classic sides like creamy mashed potatoes, tangy pickles, or a drizzle of rich BBQ sauce to complement the robust flavors. This dish is perfect for special occasions or a hearty weeknight dinner.
Ready to master this technique? The instructions walk you through every step—from seasoning and rolling to cooking and slicing—so you can achieve professional results in your own kitchen. Let’s get started on creating a showstopping centerpiece for your table.
Ingredients for beef brisket rolled roast
The perfect balance of bold flavors and tender beef—just these essentials transform brisket into showstopping roast perfection.
| Ingredient | Amount | Notes |
|---|---|---|
| Beef Brisket 🥩 | 4 lb | Whole packer cut, fat cap intact |
| Yellow Onion 🧅 | 1 whole | Sliced into 1/4-inch strips |
| Garlic Cloves 🧄 | 6 cloves | Peeled, smashed for aroma |
| Kosher Salt 🧂 | 2 tbsp | Diamond Crystal preferred |
| Black Peppercorns 🌶️ | 1 tbsp | Freshly cracked, coarse grind |
| Smoked Paprika 🌶️ | 1 tbsp | High-quality, not sweet |
| Ground Cumin 🌿 | 1 tbsp | Toasted for depth |
| Dried Thyme 🍃 | 1 tsp | French preferred |
| Dried Rosemary 🌿 | 1 tsp | Finely chopped |
| Butter 🧈 | ½ cup | Unsalted, softened |
| Mustard 🍯 | 2 tbsp | Dijon, high-quality |
| Beef Broth 💧 | 1 cup | Low-sodium, homemade preferred |
| Heavy Cream 🥛 | ¼ cup | Full-fat for richness |
| Butcher's Twine 🧵 | 1 package | Kitchen twine, 18-inch pieces |
[recipe_ingredient_scaler]
The brisket is non-negotiable—look for packer cuts with thick fat caps (that’s where flavor hides!). Costco or your local butcher are your best bets for quality. If you can’t find a whole packer cut, two 3-4 lb flats work too. The fat cap should be at least 1/4-inch thick—this renders down during cooking and keeps the meat moist. For the dry rub, Penzeys spices or bulk bins at Whole Foods give the best flavor punch. Toast your cumin seeds in a dry pan for 30 seconds before grinding—trust me, it makes all the difference.
No smoked paprika? Regular paprika plus a pinch of cayenne gets you close. Short on butter? Olive oil works in a pinch, but the butter adds richness that’s hard to replicate. The beef broth should be low-sodium—homemade is ideal, but Swanson or Pacific Foods brands are solid. For the mustard, Maille Dijon is the gold standard, but any good-quality Dijon will do. If you’re rolling multiple roasts, use two strands of twine per roast to keep them secure. And don’t skip the garlic—it’s the secret weapon for depth of flavor.
This roast reheats like a dream—wrap tightly in foil and bake at 300°F for 20 minutes. Store leftovers in the fridge for up to 5 days, or freeze for 3 months. For make-ahead prep, season the brisket and refrigerate overnight—this lets the rub penetrate deeper. The roast actually tastes better the next day as the flavors meld. Slice against the grain for maximum tenderness, and save the juices to drizzle over mashed potatoes or use in gravy.
Why You’ll Love This Recipe
- No-Fuss Roasting: I’ll be honest—this isn’t one of those dishes that requires a 10-step prep dance. Just trim that fat cap down to ¼-inch, score the brisket like a pro (or not, the onions and garlic will still work their magic), and roll it up with the butcher’s twine. The real work? Letting the oven do the heavy lifting while you sip a glass of wine. Honestly, the hardest part is resisting the urge to check on it every five minutes.
- Crust Meets Cream: That buttery mustard crust? It’s like the perfect first date—bold, tangy, and impossible to resist. The smoked paprika and toasted cumin add warmth, while the garlic cloves and onions tucked inside the roll infuse every bite with depth. Then there’s the pan sauce, velvety from the heavy cream and packed with all those browned bits. It’s the kind of dish where the last bite leaves you thinking, Why didn’t I make this sooner?
- Leftover Legend: Between you and me, this brisket doesn’t just disappear in one sitting. I’ve had families go back for seconds, thirds, and even questionable fourths. And the best part? Leftovers keep for up to five days in the fridge or freeze like a champ for three months. Toss it in a sandwich for lunch, chop it into tacos for game night, or reheat with the pan sauce for a lazy Sunday dinner. It’s the ultimate meal multiplier.
- Budget Beef Boost: A 4-pound brisket isn’t cheap, but it’s a steal when you consider how much you get out of it. That fat cap? It renders into flavor, keeping the meat juicy without breaking the bank. And the spices—smoked paprika, cumin, thyme—are pantry staples that stretch across a dozen meals. You’re not just feeding yourself; you’re feeding your wallet’s peace of mind. Plus, nothing says “I care” like a perfectly rolled, slow-roasted brisket on a weeknight.
Step-by-step instructions for beef brisket rolled roast
This method transforms tough brisket into melt-in-your-mouth perfection with a flavorful crust you’ll crave.
Prepare the Brisket and Seasoning
Begin by trimming the fat cap of the 4 lb beef brisket down to about ¼-inch thickness using a sharp boning knife. Leave the fat intact along the edges to protect the meat during cooking. Place the brisket fat-side down on a cutting board and score the surface in a diamond pattern about ½-inch apart—this helps the seasoning penetrate deeply.
In a small bowl, combine the 2 tbsp kosher salt, 1 tbsp black peppercorns, 1 tbsp smoked paprika, 1 tbsp ground cumin, 1 tsp dried thyme, and 1 tsp dried rosemary. Rub this mixture generously over the entire surface of the brisket, pressing firmly so the spices adhere. The reason for this aggressive seasoning? Every layer of flavor matters when you’re slow-cooking such a large cut.
Roll and Secure the Brisket
Now for the magic: roll the brisket tightly from one end to the other, starting with the thicker end. This creates a compact shape that cooks more evenly. As you roll, tuck the sliced 1 yellow onion and the 6 smashed garlic cloves inside the roll—they’ll infuse the meat with incredible depth of flavor. Secure the roll tightly with the 1 package butcher’s twine, tying it every 2 inches to maintain the shape.
Here’s where it gets crucial: place the rolled brisket seam-side down in a roasting pan. This prevents the twine from burning during cooking and helps maintain the roll’s integrity. The onions and garlic will release their juices as the meat cooks, basting the surface and keeping it moist. Let the brisket sit at room temperature for 30 minutes before roasting—this ensures even cooking from edge to center.
Slow-Roast with Butter and Mustard
Preheat your oven to 325°F. In a small saucepan, melt the ½ cup butter over low heat until just softened, then stir in the 2 tbsp mustard. Brush this mixture generously over the entire surface of the brisket—this creates that coveted crust while adding tangy complexity. Place the roasting pan in the oven and cook for 3 hours, then increase the temperature to 350°F for the final hour.
After the initial 3 hours, check the internal temperature using a meat thermometer. It should read 190-195°F at this point—the brisket will continue cooking as it rests. If the crust starts to darken too quickly, tent loosely with aluminum foil. The mustard butter mixture should caramelize into a glossy, flavorful crust that seals in all those delicious juices.
Finish with Broth and Cream
Remove the brisket from the oven and transfer it to a cutting board. Let it rest for 20 minutes before slicing—this resting period is non-negotiable for juicy perfection. While it rests, pour the 1 cup beef broth into the roasting pan and scrape up all the browned bits from the bottom with a wooden spoon. Return this to the oven and simmer for 5 minutes to create a flavorful pan sauce.
Stir in the ¼ cup heavy cream and simmer for another 2 minutes until slightly thickened. The sauce should coat the back of a spoon with a velvety texture. Slice the brisket against the grain into ½-inch thick pieces and serve immediately with the rich pan sauce spooned over the top. Each bite delivers tender, flavorful meat with that irresistible crust you’ve worked so hard to create.
Pro Tips For Making Beef Brisket Rolled Roast
- Score the Brisket Right: That diamond pattern isn’t just decoration—it lets the spices cling and the fat render properly. Use a sharp knife and cut deep enough to see the meat, but don’t go so wild you’re fighting the twine later. I learned this the hard way when my first attempt turned into a spice-slippery mess.
- Don’t Skip the 30-Minute Rest: That 30 minutes at room temperature isn’t optional. Cold meat cooks unevenly, and you’ll end up with a dry center or an overcooked crust. Pro tip: Stick it on the counter while you prep the mustard butter—multitasking saves time, and the brisket stays happy.
- Tie It Like a Pro: Twine every 2 inches, but don’t pull it so tight the brisket looks like a mummy. Too loose? It’ll unravel. Too tight? You’ll crush the meat. Practice with a smaller cut first if you’re new to this—your future slices will thank you.
- Save the Pan Sauce: Scrape every last bit off the roasting pan with that wooden spoon—those browned bits are pure flavor. Skip this, and you’re leaving behind the good stuff. I used to pour the sauce straight into a saucepan, but now I simmer it right in the pan where all the magic happened.
Make-ahead tips for this recipe
Prep the Night Before
Season your 4 lb brisket with the 2 tbsp kosher salt, 1 tbsp smoked paprika, 1 tbsp ground cumin, 1 tsp thyme, and 1 tsp rosemary—just like in the recipe.
Place it fat-side up on a plate, cover loosely with plastic wrap, and refrigerate overnight. This lets the spices penetrate deeply, creating a more flavorful crust. Honestly, the difference is night and day! 💫
Roll and Twine Early
After the overnight seasoning, roll the brisket tightly with the 1 yellow onion and 6 garlic cloves tucked inside, then secure it with butcher’s twine every 2 inches. Wrap it snugly in plastic wrap and refrigerate again for 4-6 hours before cooking.
This extra chilling step makes the rolling process easier and ensures even cooking. I’ve found this step reduces stress on game day!
Prep Sides Ahead
Make your sides the day before to save time. Cook mashed potatoes and let them cool, then refrigerate in an airtight container. For pickles, prepare them in a jar with vinegar, sugar, and spices—they’ll ferment perfectly by the next day.
Even a simple green salad with vinaigrette can be prepped and stored in the fridge. Warm them up quickly when serving. ✨
Thermometer Checklist
Before cooking, calibrate your meat thermometer by testing it in boiling water—it should read 212°F. Keep it handy during cooking to check internal temps. I use a Thermoworks Smoke probe thermometer for accuracy.
Pro tip: Write the cooking times and target temps on your oven door so you don’t forget to check the brisket at 190-195°F. Trust me, this saves time and stress! 🌡️
Sauce Prep Shortcut
Make your pan sauce ahead by simmering 1 cup beef broth and ¼ cup heavy cream with a splash of Dijon mustard. Cool it completely, then store it in a jar in the fridge.
When ready to serve, just reheat it in the roasting pan for 5 minutes to thicken. This ensures your brisket arrives with that luscious sauce ready to go. 💛
Resting and Serving Plan
After cooking, let the brisket rest for 20 minutes before slicing—this is non-negotiable for juicy perfection. While it rests, set the table and arrange your sides. Slice against the grain and arrange the pieces on a platter.
Drizzle the pan sauce generously over the top and serve immediately. I always plate my brisket on a wooden board for that rustic, farmhouse feel. 🍽️
Nutrition facts
Frequently asked questions
Why roll the brisket instead of cooking it flat?
Rolling the brisket creates a compact shape that cooks more evenly and helps maintain its structure during the long cooking process. The onions and garlic tucked inside infuse the meat with extra flavor while keeping it moist. Plus, it makes slicing against the grain much easier for maximum tenderness!
How do I know when the brisket is done?
Use a meat thermometer to check the internal temperature—aim for 190-195°F. The brisket will continue cooking slightly as it rests, so pulling it out at this temp ensures perfect doneness. Never guess; a thermometer is your best friend for juicy, tender results!
Can I make this recipe ahead of time?
Season the brisket overnight and refrigerate it before rolling and tying. You can also prep the pan sauce ahead and store it in the fridge. Just reheat it for 5 minutes before serving. This saves time and lets flavors develop even more!
What if my brisket dries out during cooking?
If the crust darkens too quickly, loosely tent the pan with aluminum foil to protect it. Also, ensure the brisket rests for 20 minutes before slicing—this lets juices redistribute for maximum moisture. Never skip this step!
What’s the best way to slice the rolled brisket?
Slice against the grain in ½-inch thick pieces for the most tender texture. This breaks up the muscle fibers for that melt-in-your-mouth experience. Arrange the slices on a platter and drizzle with the pan sauce for a showstopping presentation!

Trained in classic French technique but raised on slow-cooked ribs and spicy rubs, she blends culinary skill with smoke and soul.
- Pork Butt Smoker Recipe: Low and Slow to Juicy, Fall-Off-Bone Tenderness - November 2, 2026
- Brisket Recipe Slow Cooker: Fall-Apart Tender With Minimal Effort - November 2, 2026
- Smoked Brisket Recipe: Low and Slow to Fall-Apart Tenderness - November 2, 2026