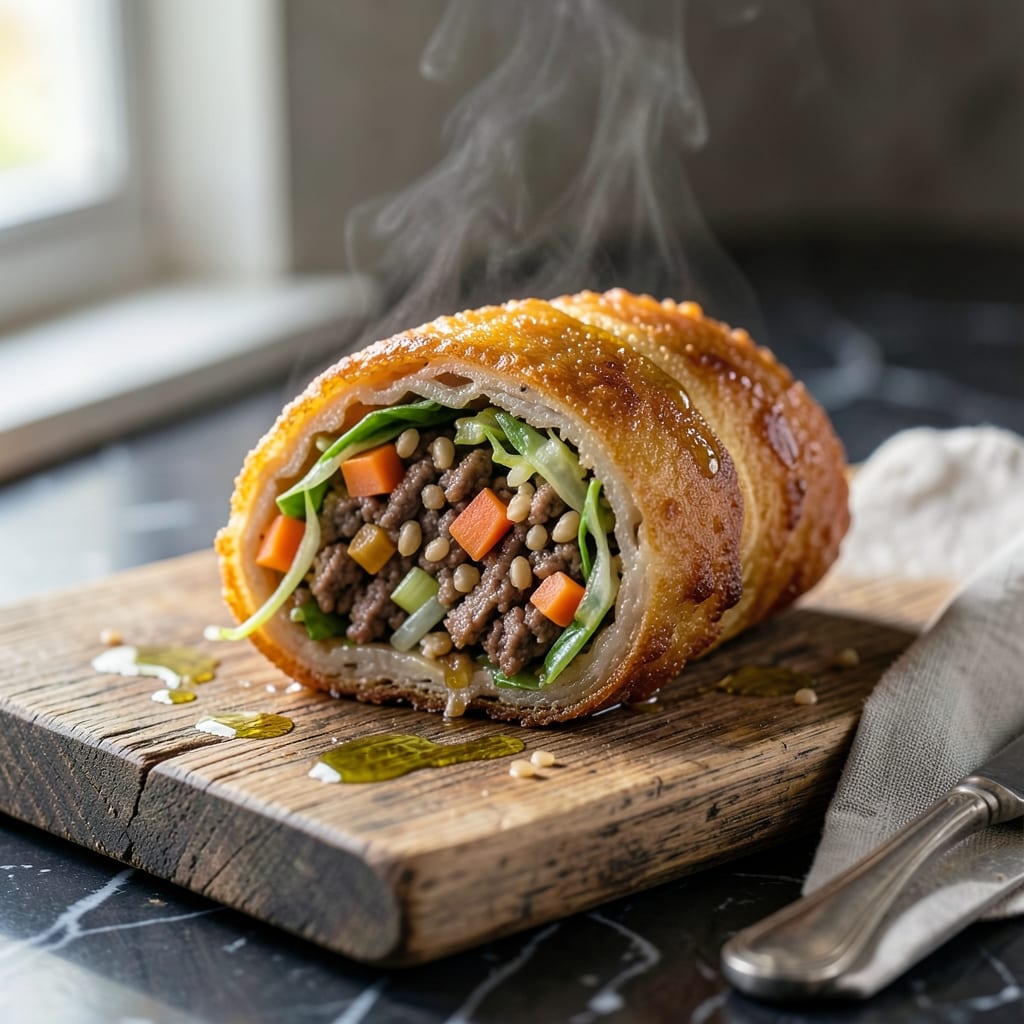
This Australian classic brings crispy, satisfying texture to any meal. I’ve perfected the traditional Chiko Roll, inspired by spring rolls but packed with hearty fillings like cabbage, barley, and beef.
The secret lies in the double-frying method, ensuring a crispy exterior that holds up to the rich, savory filling. Simple ingredients come together to create a dish that’s both comforting and nostalgic.
With a golden, shatteringly thin wrapper and a flavorful center, this recipe delivers the classic taste many grew up loving. Serve hot for the best experience.
Perfect for parties, snacks, or a trip down memory lane. Here’s how to make it at home.
Ingredients for Chiko Roll
Hearty barley, crisp cabbage, and savory beef create the nostalgic filling for this iconic dish.
| Ingredient | Amount | Notes |
|---|---|---|
| Ground Beef 🥩 | 1 lb | Lean ground beef preferred |
| Green Cabbage 🥬 | 4 cups | Finely shredded, packed |
| Pearl Barley 🌾 | 1 cup | Uncooked, rinsed thoroughly |
| Carrots 🥕 | 2 whole | Julienned or finely shredded |
| Celery Stalks 🥬 | 2 whole | Finely diced for texture |
| Soy Sauce 🫒 | 3 tbsp | Use low-sodium if preferred |
| Worcestershire Sauce 🫒 | 1 tbsp | Essential for authentic flavor |
| Beef Stock 🥘 | ½ cup | Low-sodium recommended |
| Spring Roll Wrappers 🥟 | 12 sheets | Thin, square egg roll wrappers |
| Vegetable Oil 🫒 | 4 cups | For deep-frying, neutral flavor |
| Cornstarch 🌾 | 2 tbsp | For thickening filling |
| Garlic Cloves 🧄 | 3 cloves | Minced for savory depth |
| Ground Black Pepper 🌶️ | ½ tsp | Freshly ground preferred |
| Salt 🧂 | 1 tsp | Adjust to taste after cooking |
[recipe_ingredient_scaler]
The beef is the backbone of this dish. Ground chuck (80/20 fat ratio) delivers the best flavor and texture—avoid extra-lean blends as they can dry out. Pearl barley adds the signature chew; look for it in the grain aisle at Whole Foods or bulk sections. For the wrappers, spring roll or egg roll wrappers (not won ton) are essential—Nasoya is a reliable brand found in most refrigerated sections.
No barley? Substitute with brown rice or bulgur wheat at a 1:1 ratio for similar texture. Beef can be swapped for ground turkey or pork, though the flavor profile will shift. Tamari works as a gluten-free soy sauce alternative. For extra umami, add a dash of fish sauce (optional but traditional in some variations). The cabbage can be swapped for Napa or Savoy if that’s what you have.
Barley keeps indefinitely in a cool, dark pantry. Once cooked, filling stays fresh in the fridge for 2-3 days or freezes for 3 months. Wrappers must stay refrigerated and used within 1 week of opening. Fry in batches to avoid overcrowding—this maintains the crispy texture the dish demands.
Why You’ll Love This Recipe
- One Pot Wonder: I just throw the beef, barley, and veggies in together—no fancy techniques, just hearty flavor building itself.
- That Umami Punch: The beef and barley soak up the cabbage and carrot juices, creating this deep, savory richness with zero effort.
- Feeds the Freezer: I make a double batch, wrap the rolls, and freeze them—perfect for those nights I can’t even.
- Budget Stretcher: A pound of beef, a head of cabbage, and some pantry staples feed my whole family for pennies per serving.
Step-by-Step Instructions for Crispy Spring Roll Inspired Australian Classic
This method ensures authentic texture and flavor with every bite.
Step 1: Prepare the Filling Base
In a large pot, combine the 1 lb Ground Beef, 4 cups Green Cabbage, 1 cup Pearl Barley, 2 whole Carrots, and 2 whole Celery Stalks. I recommend using lean ground beef for the best texture. Add 0.5 cup Beef Stock and bring to a gentle simmer over medium heat.
Cook for 25-30 minutes until the pearl barley is tender and the beef is fully cooked through. The mixture should have absorbed most of the liquid but remain slightly moist. Stir occasionally to prevent sticking and ensure even cooking throughout.
Remove from heat and drain any excess liquid, reserving it in case you need to adjust the filling’s moisture later. This base creates the hearty, savory foundation that defines this dish.
Step 2: Season and Thicken the Filling
Return the cooked filling to the pot and stir in the 3 tbsp Soy Sauce, 1 tbsp Worcestershire Sauce, minced 3 cloves Garlic Cloves, 0.5 tsp Ground Black Pepper, and 1 tsp Salt. These seasonings create the signature umami-rich flavor profile.
In a small bowl, mix the 2 tbsp Cornstarch with an equal amount of cold water to create a slurry. Stir this into the filling mixture and cook over medium-low heat for 3-4 minutes until the filling thickens to a spreadable consistency that holds its shape when cooled.
Taste and adjust seasoning if needed, though remember the flavors will intensify slightly as the filling cools. Transfer to a bowl and let cool completely before assembling—this prevents the wrappers from becoming soggy.
Step 3: Assemble the Rolls
Lay a 12 sheets Spring Roll Wrappers sheet in a diamond orientation on a clean surface. Place about ⅓ cup of the cooled filling near the bottom corner, leaving a 1-inch border. Fold the bottom corner over the filling, then fold in the sides, and roll tightly toward the top corner, sealing the edge with a bit of water.
Repeat with the remaining wrappers and filling. The key is to keep the rolls tight but not so tight that the wrapper tears. As you work, cover the assembled rolls with a damp towel to prevent them from drying out before frying.
Step 4: Deep-Fry to Golden Perfection
Heat the 4 cups Vegetable Oil in a deep, heavy-bottomed pot to 350°F. The oil should be deep enough to fully submerge the rolls. To test the temperature, drop in a small piece of wrapper—it should sizzle and rise immediately to the surface.
Fry the rolls in batches for 3-4 minutes per side until they’re golden brown and crispy all over. Avoid overcrowding the pot, as this can lower the oil temperature and lead to greasy results. Use a slotted spoon to transfer them to a paper towel-lined plate to drain.
The finished rolls should have a shatteringly crisp exterior that gives way to the savory, tender filling within. Serve immediately while hot for the ultimate texture contrast.
Pro Tips For Making Chiko Roll
- Pre-cook the Barley: Pearl barley needs at least 30 minutes simmering before mixing—otherwise it stays hard and chewy. I learned this the hard way after biting into undercooked grains in my first few attempts.
- Squeeze Out Cabbage: After shredding the green cabbage, salt it and let it sit for 10 minutes, then squeeze out all the water. Sounds tedious, but it prevents a soggy filling that ruins the roll’s texture.
- Brown the Beef Well: Don’t rush browning the ground beef—let it develop a deep color and crispy edges. This adds a rich, savory base that makes the whole roll taste better.
- Fine Dice the Veggies: Carrots, celery, and cabbage should be finely diced, almost to the size of the barley. This ensures even cooking and a uniform texture in every bite.
Health Benefits of These Flavors
Protein-Rich Fuel
The 1 lb ground beef in this dish provides about 70 grams of protein per serving, supporting muscle repair and growth. Beef is a complete protein, containing all nine essential amino acids your body needs daily. 💪
Fiber From Grains
Pearl barley contributes 6 grams of fiber per ½ cup, aiding digestion and promoting gut health. This whole grain also offers a steady release of energy, keeping you full longer.
Vitamin-Packed Veggies
Green cabbage and carrots bring a vitamin boost—cabbage is rich in vitamin K and vitamin C, while carrots provide beta-carotene for eye health. Both add crunch and nutrients without many calories.
Low-Calorie Indulgence
Each roll contains roughly 250-300 calories, making it a satisfying yet moderate option. The deep-frying adds crispiness without excessive oil absorption when done correctly.
Balanced Nutrition
This dish balances protein, fiber, and healthy fats, especially when served with a side of leafy greens. The combo keeps energy levels stable and satisfies hunger effectively. 🥗
Essential Minerals
The beef stock and soy sauce provide essential minerals like iron and zinc. Iron supports oxygen transport in the blood, while zinc boosts immune function.
Nutrition Facts
Frequently Asked Questions
Can I bake these instead of frying?
Yes, but the texture will differ. Brush rolls with oil and bake at 400°F for 20-25 minutes, flipping halfway. They’ll be less crispy but still tasty.
What can I use instead of barley?
Brown rice or bulgur wheat work well as 1:1 substitutes. Quinoa is another option, though it has a slightly different texture.
How do I prevent the wrappers from tearing?
Don’t overfill, and keep wrappers moist under a damp towel. Roll tightly but gently, and seal edges with a cornstarch-water paste.
Can I make these ahead of time?
Assemble and refrigerate uncooked rolls for up to 24 hours. Fry just before serving for best results. Freeze cooked rolls for up to 3 months.

Trained in classic French technique but raised on slow-cooked ribs and spicy rubs, she blends culinary skill with smoke and soul.
- Recipe for Boneless Pork Chops in Cast Iron Skillet: Sear and Baste to Juicy Perfection - October 3, 2026
- Recipe for Boneless Cross Rib Roast: Slow-Roasted Beef with Herb Crust - October 3, 2026
- Hamburgers in Sauce Recipe Crock Pot: Slow-Cooked Savory Delight - October 3, 2026