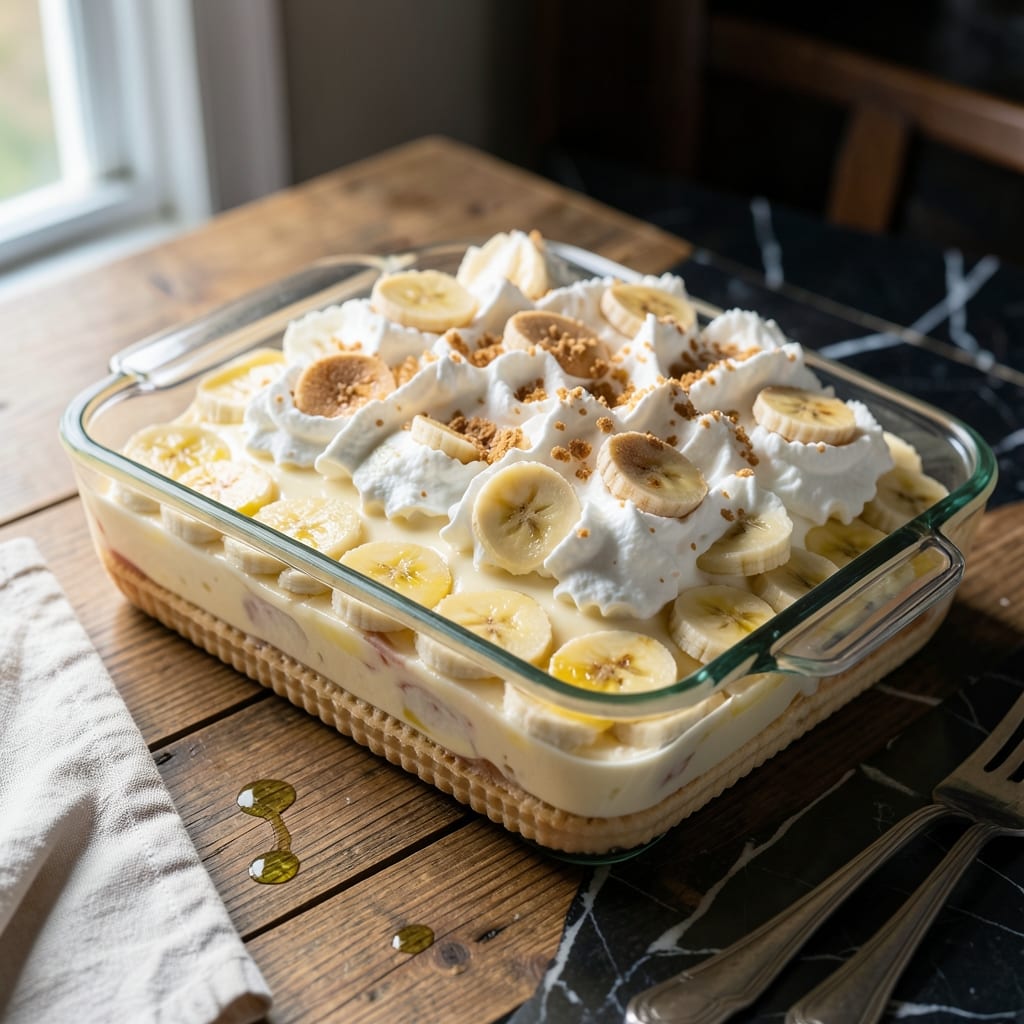
There’s a reason this layered dessert is a Southern staple—it’s the perfect balance of creamy, crunchy, and sweet. I’ve tested this version in my tiny Boston kitchen until it rivaled the best I’ve tasted.
The secret lies in the layers: tender vanilla wafers, fresh bananas, and a light, velvety custard that holds everything together. No baking required, just patience to let the flavors meld.
By the time it chills, you’ll have a dessert that’s rich yet refreshing, with every bite delivering that nostalgic comfort. The wafers soften just enough to blend with the cream.
Perfect for potlucks or a simple weeknight treat. This one never fails to disappear fast.
Ingredients for City Barbeque Banana Pudding
Vanilla wafers, fresh bananas, and creamy custard make this classic dessert unforgettable.
| Ingredient | Amount | Notes |
|---|---|---|
| Vanilla Wafers 🍪 | 8 oz | One 11-ounce box, about 45 wafers |
| Ripe Bananas 🍌 | 4 whole | Sliced into 1/4-inch rounds |
| Whole Milk 🥛 | 2 cups | Full-fat for creaminess |
| Granulated Sugar 🍚 | 1 ½ cups | Divided for custard and meringue |
| All-Purpose Flour 🌾 | ¼ cup | For thickening custard |
| Large Eggs 🥚 | 3 whole | Separated, yolks for custard |
| Salt 🧂 | ¼ tsp | Balances sweetness |
| Vanilla Extract 🌿 | 2 tsp | Pure extract for best flavor |
| Unsalted Butter 🧈 | 2 tbsp | For enriching custard |
| Heavy Cream 🥛 | 1 cup | Whipped for topping layer |
| Vanilla Wafers 🍪 | 4 whole | Crushed for garnish |
[recipe_ingredient_scaler]
The vanilla wafers are key—Nilla Wafers are the gold standard here (the ones in the yellow box). Most grocery stores carry them in the cookie aisle. Look for firm, just-ripe bananas—they’ll soften as the dessert chills but won’t turn mushy. The whole milk makes a difference in the custard; don’t swap for low-fat. I grab mine at Stop & Shop or Market Basket when I’m restocking.
No whole milk? 2% works in a pinch (just less rich). Out of vanilla wafers? Shortbread cookies or even graham crackers can stand in—texture will differ slightly. Want a shortcut? Instant vanilla pudding mix replaces the custard step (though homemade tastes better). The heavy cream can be coconut cream for a lighter twist, but it’ll add a subtle coconut flavor.
This tastes best after 24 hours in the fridge—gives the wafers time to soften perfectly. Keeps for 3-4 days covered (if it lasts that long). The meringue topping? Totally optional but adds that classic diner vibe.
Why You’ll Love This Recipe
- No-Bake Magic: I just layer the wafers, bananas, and custard—no oven required.
- Creamy Banana Bliss: The ripe bananas and vanilla wafers soak up that sweet custard made from whole milk and sugar.
- Potluck Hero: I bring this to every cookout and it disappears first.
- Leftovers? Please: Honestly, it tastes even better the next day after the flavors meld.
Step-by-Step Instructions for Banana Pudding with Vanilla Wafer Layers
This layered dessert comes together beautifully with just a few simple steps.
Step 1: Prepare the Vanilla Wafer Base
Line the bottom of a 9×13-inch dish with a single layer of the 8 oz Vanilla Wafers. I arrange them in neat rows to create an even base, but don’t worry about gaps—the custard will fill everything in perfectly.
Reserve the 4 whole Vanilla Wafers for the topping. You’ll crush these later for garnish, so keep them separate. This first layer sets the foundation for all those delicious flavors to build upon.
Step 2: Create the Banana Layer
Slice all 4 whole Ripe Bananas into 1/4-inch rounds and arrange them evenly over the vanilla wafers. The riper the bananas, the sweeter your pudding will be—look for bananas with plenty of brown speckles.
Press the banana slices gently into the wafers so they don’t shift when you add the custard. This layer adds natural sweetness and that classic banana pudding texture we all love.
Step 3: Make the Custard Layer
In a saucepan, whisk together the 2 cups Whole Milk, 1.5 cups Granulated Sugar, 0.25 cup All-Purpose Flour, 3 whole Large Eggs, 0.25 tsp Salt, 2 tsp Vanilla Extract, and 2 tbsp Unsalted Butter. Cook over medium heat for 8-10 minutes, stirring constantly until thickened.
You’ll know it’s ready when the mixture coats the back of a spoon and leaves a clear path when you run your finger through it. Pour this warm custard evenly over the banana layer, making sure all the bananas are covered completely.
Step 4: Add the Whipped Cream Topping
In a chilled bowl, whip the 1 cup Heavy Cream until stiff peaks form. Spread this gently over the custard layer, creating a smooth, cloud-like topping that will contrast beautifully with the creamy layers below.
Crush the reserved 4 whole Vanilla Wafers and sprinkle the crumbs evenly over the whipped cream. This adds a delightful crunch and visual appeal to your finished pudding.
Step 5: Chill and Serve
Cover the dish with plastic wrap, pressing it directly onto the surface to prevent a skin from forming. Refrigerate for at least 4 hours, but overnight is even better—this allows all the flavors to meld together perfectly.
When ready to serve, the pudding should be set but still creamy, with distinct layers visible when you scoop into it. The vanilla wafers will have softened slightly but retain some texture, creating the perfect bite every time.
Pro Tips For Making City Barbeque Banana Pudding
- Chill the Pudding: After assembling, refrigerate for at least 4 hours—I learned this the hard way when my first batch was still soupy after 2. The wafers need time to soften and soak up the custard properly.
- Use Overripe Bananas: The spottier the bananas, the sweeter and more flavorful your pudding will be. I used to toss them, but now I save the ugliest ones just for this.
- Skip the Lumps: Whisk the flour and sugar into the milk before heating to avoid clumps in your custard. After burning a batch with lumps stuck to the pan, I never skip this step.
- Layer Twice: Do a second layer of wafers, bananas, and pudding—it makes the texture more interesting and guarantees every bite has all the good stuff. I was skeptical until I tried it.
Health Benefits of This Dish
Potassium Powerhouse
Bananas pack a serious potassium punch—about 400mg per fruit—which supports heart health and helps regulate blood pressure. This dessert delivers that natural electrolyte boost in every creamy bite. I notice I feel more energized after enjoying a serving. 💪
Calcium from Dairy
The whole milk and heavy cream in this recipe provide a solid dose of calcium, essential for strong bones and teeth. One serving contributes about 20% of your daily calcium needs, making it a tasty way to support skeletal health.
Energy from Natural Sugars
Bananas contain natural sugars—fructose, glucose, and sucrose—that provide quick energy. Combined with the slow-digesting carbs from vanilla wafers, this dessert offers a balanced energy release that keeps you satisfied longer than processed sweets.
Protein from Eggs
The custard layer includes 3 large eggs, adding about 6 grams of protein per serving. Eggs also provide choline, a nutrient that supports brain health and metabolism. It’s a small but meaningful nutritional boost.
Antioxidant Benefits
Vanilla extract contains polyphenols, antioxidants that help combat oxidative stress. While not a superfood, every bite contributes to your daily intake of these protective compounds. The real magic is how these ingredients work together. ✨
Comfort with Nutrients
This dessert proves indulgence can come with nutritional perks. The combination of fruit, dairy, and eggs creates a treat that’s as nourishing as it is delicious. Perfect for when you want something sweet without completely abandoning nutrition.
Nutrition Facts
Frequently Asked Questions
Can I use instant pudding instead of homemade custard?
Yes, substitute 1 (3.4 oz) box of instant vanilla pudding mixed with 2 cups cold milk. It sets faster but lacks the rich depth of homemade custard.
How far in advance should I make this?
Prepare it 1-2 days ahead for best results. This gives the wafers time to soften perfectly while keeping their structure.
What if my custard doesn’t thicken?
Cook it longer over medium-low heat while stirring constantly. If still thin, mix 1 tbsp cornstarch with 1 tbsp cold water, then stir into the custard.
Can I make this gluten-free?
Swap the vanilla wafers for gluten-free shortbread cookies. Ensure all other ingredients are certified gluten-free.

Trained in classic French technique but raised on slow-cooked ribs and spicy rubs, she blends culinary skill with smoke and soul.
- Recipe for Boneless Pork Chops in Cast Iron Skillet: Sear and Baste to Juicy Perfection - October 3, 2026
- Recipe for Boneless Cross Rib Roast: Slow-Roasted Beef with Herb Crust - October 3, 2026
- Hamburgers in Sauce Recipe Crock Pot: Slow-Cooked Savory Delight - October 3, 2026