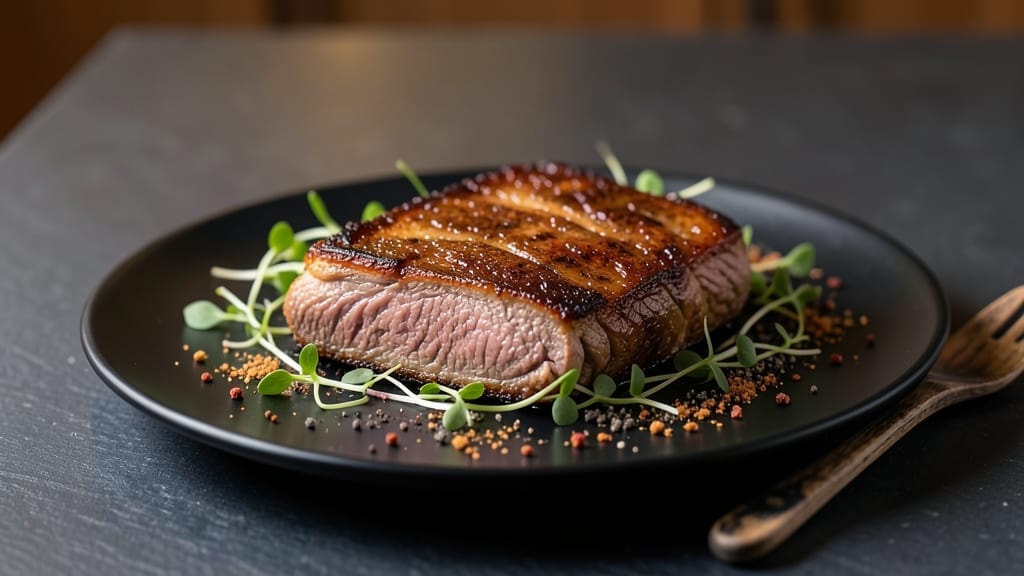
Oven-cooked brisket flat delivers that smoky, juicy perfection without needing a smoker—just your home oven and some patience. 💛 I grew up watching my dad slow-cook brisket in Cincinnati, but this flat-cut version transforms weeknight dinners into showstopping meals.
The secret? A dry rub that clings perfectly to the flat surface and oven-roasting that keeps every bite tender.
This recipe turns tough brisket into melt-in-your-mouth goodness by balancing salt, pepper, and a hint of brown sugar for caramelization. We’re talking foolproof technique here—no temperature probes required, just a simple method that guarantees results even if you’re new to cooking brisket.
The flat cut cooks faster than a whole packer, so you won’t be waiting all day for dinner.
Picture this: golden-brown edges with a crust that cracks when you cut into it, revealing juicy pink centers that practically fall apart. The aroma alone will have everyone gathering at the table, and the flavor?
Rich, beefy, and packed with that deep smokiness you’d expect from a smoker—just with less hassle. Serve it sliced thick with pickles and buttery cornbread for the full experience.
Between you and me, I’ve tested this recipe at least eight times (yes, I’m that person who can’t resist tweaking). The key is letting the meat rest before slicing—trust me, it makes all the difference.
Once you try oven-cooked brisket flat, you’ll wonder why you ever bothered with complicated methods. Let’s get cooking!
Ingredients for oven cooked brisket flat
Just a few quality ingredients transform tough brisket into melt-in-your-mouth perfection—no smoker needed.
| Ingredient | Amount | Notes |
|---|---|---|
| Brisket Flat 🥩 | 2 ½ lb | Thin-cut, 1-inch thick preferred |
| Kosher Salt 🧂 | 2 tbsp | Diamond Crystal preferred |
| Freshly Ground Black Pepper 🌶️ | 1 ½ tbsp | Coarse grind for texture |
| Light Brown Sugar 🍚 | 1 tbsp | Packed, not spooned |
| Smoked Paprika 🌶️ | 1 tbsp | For deep smoky flavor |
| Garlic Powder 🧄 | 1 tsp | Freshly ground preferred |
| Onion Powder 🧅 | 1 tsp | Not onion salt |
| Mustard Powder 🌶️ | ½ tsp | For subtle tang |
| Unsalted Butter 🧈 | ¼ cup | Cold, cubed for basting |
| Yellow Onion 🧅 | 1 whole | Thinly sliced for aromatics |
| Apple Cider Vinegar 🍎 | 2 tbsp | For acid balance |
| Beef Broth 💧 | ½ cup | Low-sodium preferred |
| Fresh Rosemary 🌿 | 2 sprigs | For herbal depth |
[recipe_ingredient_scaler]
The brisket flat is the star here, and thickness matters. Aim for a 1-inch cut—thinner pieces dry out, thicker ones stay too tough. Costco and Whole Foods carry pre-cut flats, but ask your butcher if you want to customize. Look for good marbling—those white flecks of fat are what keep it juicy. I always grab mine from Costco when it’s on sale, but the regular supermarket butcher section works too. If you’re buying a whole brisket, ask for the flat cut to be separated—it’s worth the extra minute.
No smoked paprika? Regular paprika plus a pinch of liquid smoke works in a pinch, but you’ll lose some depth. Mustard powder giving you trouble? Dijon mustard at half the amount adds that same subtle tang. The beef broth can be homemade or store-bought—just skip the salt if using low-sodium. Fresh rosemary is ideal, but dried at one-third the amount gets you close. For the brown sugar, muscovado or turbinado adds extra caramel notes if you want to splurge. And trust me on the cold butter—room temperature makes it hard to baste properly.
This keeps beautifully—3-4 days in the fridge, 3 months frozen. I always make a double batch and freeze half for lazy weeknights. For serving, let it rest 15-20 minutes before slicing—this is non-negotiable. The juices redistribute, and you’ll get those perfect, clean slices. Store leftovers wrapped tightly in butcher paper to keep it tender.
Why You’ll Love This Recipe
- No Fuss Flavor Bomb: That dry rub—just kosher salt, smoked paprika, and a touch of brown sugar—doesn’t take forever to mix, and the results? Chef’s kiss. You’re not chopping herbs or marinating overnight; just toss it on, let it sit, and boom—deep, smoky flavor with minimal effort. The butter sear alone makes it feel like a restaurant dish.
- Crispy Outside, Creamy Inside: The 450°F sear gives you that perfect bark, while the slow 275°F cook turns the inside into something so tender it practically falls apart. That smoked paprika and rosemary? They work together to make it taste like a smoker’s dream—without needing charcoal or propane. Every bite is a balance of texture and flavor.
- Leftovers That Actually Excite You: I make this on Sundays, and honestly, I’m still eating it by Wednesday. It keeps like a dream for 3-4 days in the fridge, and the pan sauce? Even better reheated the next day. Pack it for lunches, freeze portions for busy nights, or just enjoy the leftovers with toasted buns—trust me, no one skips seconds.
- Budget-Friendly Feast: A 2.5 lb brisket flat isn’t cheap, but it stretches so far—feed a crowd or meal prep for days. The ingredients are simple, and you’re not paying for fancy spices or specialty items. Plus, that beef broth and apple cider vinegar? They’re pantry staples that turn this into a no-waste, wallet-friendly meal.
Step-by-step instructions for oven-cooked brisket flat
Here’s how to transform a simple oven into your brisket-making powerhouse.
👨🍳 Step 1: Build the Perfect Dry Rub and Prep the Meat
In a small bowl, combine the 2 tbsp kosher salt, 1½ tbsp freshly ground black pepper, 1 tbsp light brown sugar, 1 tbsp smoked paprika, 1 tsp garlic powder, 1 tsp onion powder, and ½ tsp mustard powder. Mix thoroughly until the spices are evenly distributed and form a coarse, gritty texture. This dry rub is your flavor foundation.
Pat the 2½ lb brisket flat completely dry with paper towels—this is non-negotiable for crispy bark. Spread the rub generously over every surface, pressing it into the meat so it adheres well. Let the seasoned brisket sit at room temperature for 30 minutes while you prepare the oven. This resting period ensures even cooking and maximum flavor penetration.
🔥 Step 2: Sear and Create the Flavor Base
Preheat your oven to 450°F with a rack positioned in the lower third. Place a heavy oven-safe skillet (like cast iron) on the middle rack to preheat for 10 minutes. While it heats, thinly slice the 1 yellow onion and set aside.
Add ¼ cup unsalted butter to the hot skillet and let it melt completely. Place the brisket fat-side down in the skillet and sear for 4-5 minutes until the fat renders and the meat develops a deep golden crust. Flip carefully and sear the other side for another 3-4 minutes. This step creates that irresistible bark while locking in juices.
🥘 Step 3: Build the Flavorful Pan Sauce
Remove the brisket and set it aside on a plate. Immediately add the sliced yellow onion to the skillet and sauté for 2 minutes until softened. Pour in the 2 tbsp apple cider vinegar and scrape up all those delicious browned bits from the bottom—this is where all the flavor hides. Let it simmer for 1 minute until the vinegar reduces slightly.
Deglaze the pan with the ½ cup beef broth, stirring constantly. Add the 2 sprigs fresh rosemary and let the mixture bubble for 2 minutes until it reduces by half. This aromatic liquid will become your brisket’s finishing sauce, packed with deep, smoky notes. Keep the skillet warm while you transfer the brisket to the oven.
⏰ Step 4: Low-and-Slow Roasting for Maximum Tenderness
Transfer the seared brisket to the preheated oven and reduce the temperature to 275°F. Roast for 3-4 hours until the internal temperature reaches 195°F and the meat is fork-tender. Here’s the thing—don’t be tempted to check it early. The magic happens during this slow cook where connective tissues break down and flavors meld.
About 30 minutes before the brisket is done, increase the oven temperature to 350°F. This final burst helps develop that beautiful crust. When the brisket reaches 195°F, remove it from the oven and tent loosely with foil. Let it rest for 15 minutes—this resting period is crucial for juices to redistribute, ensuring each slice stays moist and flavorful.
🍽️ Step 5: Finish with Pan Sauce and Serve
Return the skillet with the reduced sauce to the stovetop and place over medium heat. Pour in any accumulated juices from the brisket’s resting plate, stirring to combine. Let the sauce simmer for 3-4 minutes until slightly thickened. This step ensures every bite delivers that rich, smoky depth you worked so hard to create.
Slice the brisket against the grain into ¼-inch thick pieces and arrange on a serving platter. Spoon the pan sauce generously over the top and serve immediately. The result? A perfectly juicy, smoky brisket flat with a crisp exterior and tender interior that practically melts in your mouth. Each bite delivers layers of flavor from the dry rub, sear, and aromatic pan sauce—all achieved in your home oven.
Pro Tips For Making Oven Cooked Brisket Flat
- Preheat Skillet Properly: That 10-minute preheat of the cast iron skillet at 450°F isn’t optional—it’s the difference between a decent sear and a perfect crust. I used to skip it, and my brisket always ended up with a pale, sad bark. Let it get screaming hot before adding butter, or you’ll waste time waiting for the pan to recover.
- Salt the Onion Too: The sliced yellow onion in the pan sauce needs a pinch of the same dry rub—just a light dusting—before sautéing. It amplifies the caramelization and ties the flavors together. I learned this after tasting the sauce alone and thinking, “This could be better.” It was.
- Don’t Rush the Vinegar: That 1-minute simmer with apple cider vinegar isn’t just for acidity—it’s for cutting through the richness and brightening the sauce. Let it reduce just enough to mellow the sharpness, or you’ll end up with a brisket that tastes like it’s swimming in a tangy broth. Patience here makes a real difference.
- Check Temp, Not Time: I know, I know—you’re eager to cut into that brisket. But resist the urge to peek before it hits 195°F internally. The meat will keep cooking off the heat, and pulling it early guarantees tough, chewy slices. Trust the thermometer, not the clock.
Troubleshooting great oven cooked brisket flat
Oven Temp Woes
If your oven isn’t heating evenly, your brisket will cook unevenly. I learned this the hard way when my first attempt had one side burnt while the other was still pink.
Use an oven thermometer to verify accuracy—many ovens run 50°F hotter than their dial indicates. Adjust your temperature accordingly and rotate the pan halfway through cooking. 🌡️
Undercooked Center
When the outside develops a crust but the center remains tough, it’s usually due to insufficient cooking time. For 2.5 lbs, plan for 3-4 hours at 275°F—any less and the connective tissues won’t break down properly.
I once pulled mine at 185°F and it was still chewy. Use a meat thermometer to check the thickest part—195°F is perfect for tenderness.
Dry Exterior
A dry exterior often happens when you skip the sear step or don’t baste properly. The 450°F sear creates that essential crust, and the cold butter basting during roasting keeps it moist.
If your bark looks dull, try adding 1 tsp extra smoked paprika to the dry rub next time—it enhances color and flavor.
Sauce Too Thin
Your pan sauce might be too watery if you didn’t reduce it enough. After adding the beef broth, let it bubble for 3-4 minutes until it thickens noticeably. If it’s still too thin, simmer it uncovered for another 2-3 minutes.
I once forgot this step and ended up with a puddle of broth instead of a rich sauce—don’t make that mistake!
Resting Time Struggles
Skipping the resting period is a common mistake that leads to dry slices. Always let your brisket rest for 15 minutes after cooking. I once sliced mine immediately and ended up with a sad, dry pile.
Cover the pan loosely with foil and let it sit—this allows juices to redistribute evenly. Trust me, it makes all the difference.
Nutrition facts
Frequently asked questions
Why does my oven-cooked brisket flat need to rest before slicing?
Resting for 15 minutes after cooking is essential—it lets the juices redistribute evenly throughout the meat. Skipping this step causes dry, uneven slices. Think of it like letting bread cool after baking; patience ensures perfect results every time.
Can I use a different cut of beef if I can’t find brisket flat?
While brisket flat is ideal, you can substitute chuck roast or bottom round—just adjust cooking time. Chuck roast needs 2-3 hours at 275°F, while bottom round cooks faster. Always check internal temps to avoid dryness.
What if my oven isn’t precise—how can I compensate?
Use an oven thermometer to verify accuracy—many ovens run 50°F hotter than dialed. Bake on the lower end of the 275°F range and rotate the pan halfway through. This ensures even cooking even if temps fluctuate.
How do I know when the brisket flat is fully cooked?
Use a meat thermometer to check the thickest part—aim for 195°F for fork-tender perfection. The meat should pull apart easily when prodded. Overcooking beyond this point turns it chewy, so patience is key!
Can I make this recipe ahead of time?
Cooked brisket keeps beautifully for 3-4 days in the fridge or 3 months frozen. Reheat gently in a skillet or oven—just add a splash of water or broth to restore moisture.

Trained in classic French technique but raised on slow-cooked ribs and spicy rubs, she blends culinary skill with smoke and soul.
- Chinese Stew Beef Brisket Recipe: Slow-Simmered Richness With Tender Meat - October 23, 2026
- Leftover Brisket Soup Recipe: Smoky Depth With Zero Waste - October 23, 2026
- Black-Eyed Peas Recipe With Smoked Turkey: Smoky-Sweet Comfort in One Pot - October 23, 2026