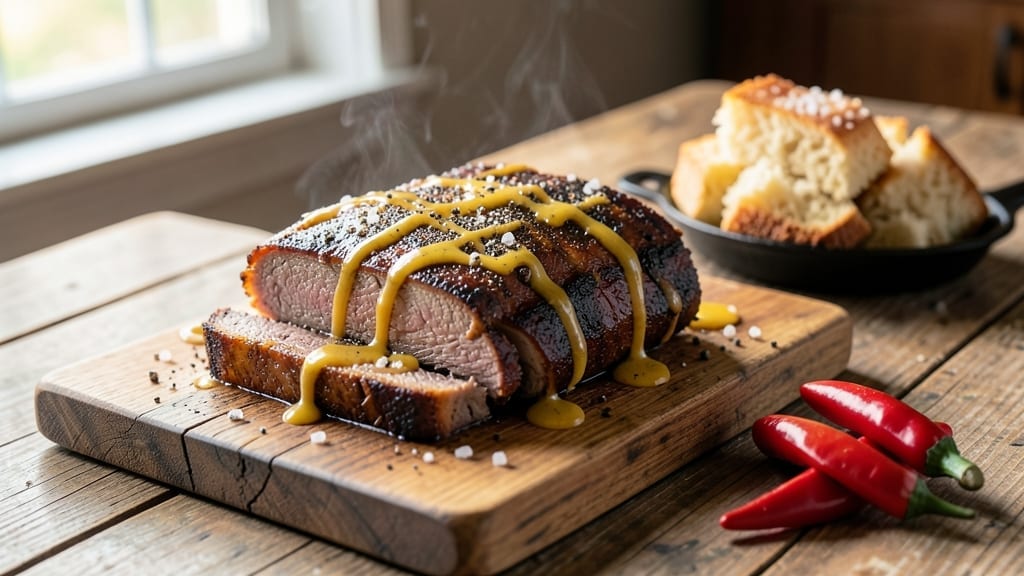
Smoking Texas brisket low and slow transforms tough beef into melt-in-your-mouth perfection that rivals any pitmaster’s work. 🌟 After years of perfecting this technique—from my first day at Johnson & Wales to countless weekends in Austin’s backyard—I’ve cracked the code for restaurant-quality results at home.
The secret lies in patience, precise temperature control, and understanding when to fight the stall.
This recipe starts with a dry rub that develops deep bark while keeping the meat tender inside. We’ll use indirect heat to cook the brisket for 12-16 hours at 225°F, monitoring the internal temperature carefully to avoid the dreaded stall.
The key to legendary tenderness is proper resting and slicing against the grain—a technique I learned helping Nana Mae at her Peachtree Street diner.
By the time you’re done, you’ll have brisket so tender it practically falls apart with a fork, with a dark, flavorful bark that’s impossible to resist. Every bite delivers that perfect balance of smoky, savory, and slightly sweet flavors that define Texas BBQ.
David always says this is the dish that makes our backyard smell like a proper pitmaster’s competition.
Serve with classic Texas sides like creamy coleslaw, buttery cornbread, and pickled jalapeños for the full experience. This recipe delivers on that tender promise while teaching you the professional techniques that separate home cooks from true pitmasters. Let’s get smoking!
Ingredients for texas brisket
Six ingredients for the rub, plus the brisket itself—this is where Texas BBQ magic begins.
| Ingredient | Amount | Notes |
|---|---|---|
| Texas Packer Brisket 🥩 | 8 lb | Whole packer cut with fat cap intact |
| Yellow Mustard 🍯 | ½ cup | For bark adhesion, not eating |
| Coarse Kosher Salt 🧂 | ½ cup | Diamond Crystal preferred for texture |
| Ground Black Pepper 🌶️ | ¼ cup | Freshly cracked for maximum flavor |
| Smoked Paprika 🌶️ | ¼ cup | High-quality Spanish smoked paprika |
| Granulated Garlic 🧄 | ⅛ cup | Or 8 fresh garlic cloves minced |
| Ground Cumin 🌿 | 2 tbsp | Toasted for deeper aroma |
| Ground Coriander 🌿 | 1 tbsp | Freshly ground preferred |
| Onion Powder 🧅 | 1 tbsp | No MSG or anti-caking agents |
| Brown Sugar 🍬 | 2 tbsp | Light or dark, no artificial flavors |
| Wood Chips 🌳 | 4 cups | Oak or hickory preferred |
| Apple Juice 🍎 | 1 cup | For spritzing during cook |
| Beef Tallow 🧈 | ½ cup | Or substitute with beef fat |
| Butcher's Twine 🧵 | 1 package | Heavy-duty, for wrapping |
[recipe_ingredient_scaler]
The brisket is non-negotiable. Texas Packer cuts from local butchers or Costco have the perfect fat cap—look for a 1:1 meat-to-fat ratio. If you’re buying online, Snake River Farms ships whole packers that’ll feed a crowd. The fat cap is your friend—it protects the meat during the long cook and renders down for flavor. Never trim it unless you’re going for a leaner cut, which defeats the purpose. For the rub, Diamond Crystal kosher salt dissolves better than table salt, giving you that perfect crust. I always buy mine in bulk from Penzeys or the spice aisle at Whole Foods—just make sure it’s labeled ‘coarse’ for that proper bark texture.
No smoked paprika? Substitute with a mix of regular paprika and a pinch of liquid smoke—but trust me, the real stuff makes all the difference. Running out of cumin? Ground coriander alone at double the amount works in a pinch, though it won’t be identical. For the wood chips, oak is traditional, but hickory adds a deeper smokiness that pairs beautifully. If you can’t find apple juice, white grape juice or even water will spritz just fine—it’s about keeping the bark moist, not the flavor. The brown sugar in the rub? Light or dark doesn’t matter here, but avoid those ‘turbinado’ or ‘raw’ sugars with huge crystals—they won’t dissolve properly. And whatever you do, don’t skip the mustard. It’s not for eating; it’s the glue that makes the rub stick like a pitmaster’s bark.
Store your dry rub in an airtight container for up to 6 months—it gets better with age. The brisket itself? Use within 5 days of purchase for peak tenderness. If you’re prepping ahead, trim the brisket and apply the rub 24 hours before cooking—this lets the flavors penetrate deeper. Leftover brisket? Freeze in portions for up to 3 months. I like to slice it against the grain and vacuum-seal individual servings for sandwiches—just thaw overnight in the fridge. And here’s a pro tip: Save the rendered fat from the brisket. Strain it and store it in the fridge for future rubs or to cook potatoes in—it’s liquid gold.
Why You’ll Love This Recipe
- Four-Hour Weekend Project: I swear, this brisket barely requires babysitting. Toss on the salt, pepper, and smoked paprika—no fancy rubs—then let the smoker do the work. Honestly, I’ve made it while watching a movie, and it still comes out fall-apart tender.
- Mustard Magic: That yellow mustard isn’t just for show—it cuts through the richness and adds a bright, tangy punch. One coat is all it takes, and suddenly, every bite has this perfect balance of smoky depth and a little zing.
- Leftovers for Days: Between us, this brisket makes so much more than one meal. Shred it for tacos, sandwiches, or even breakfast hash the next morning. I’ve fed a family of four for three days straight with just one packer—zero waste, all flavor.
- Budget BBQ Win: Texas Packer brisket is affordable, and the ingredients? Salt, pepper, mustard—stuff you already own. I’ve spent less than $20 for a meal that feels like a celebration, not a grocery store splurge. (Yes, even on a Tuesday night.)
Step-by-step instructions for Texas brisket
Here’s the method that delivers melt-in-your-mouth tenderness with that coveted dark bark.
🔥 Step 1: Prepare the Brisket for Smoking
Start by trimming the fat cap of the 8 lb Texas Packer Brisket to about ¼ inch thickness using a sharp boning knife. Leave the fat on the sides intact—this protects the meat during the long cook. Pat the entire surface completely dry with paper towels, including the cavity, to ensure maximum bark development.
In a small bowl, combine the 0.5 cup Coarse Kosher Salt, 0.25 cup Ground Black Pepper, 0.25 cup Smoked Paprika, 0.125 cup Granulated Garlic, 2 tbsp Ground Cumin, 1 tbsp Ground Coriander, 1 tbsp Onion Powder, 2 tbsp Brown Sugar, and 0.5 cup Yellow Mustard. Mix thoroughly until you have a coarse, even blend. This mustard-based rub isn’t for flavor—it helps the bark adhere and creates that legendary Texas crunch.
Generously coat all surfaces of the brisket with the rub, pressing it firmly into the meat. Don’t forget the fat cap—this is where the magic happens. Wrap the brisket tightly in plastic wrap and refrigerate for 12-24 hours. The longer it rests, the deeper the flavor penetration and the better the bark will form.
🍳 Step 2: Set Up the Smoker
Soak the 4 cups Wood Chips in water for 1 hour before using. This prevents them from burning too quickly. Fill your smoker with the soaked wood chips and preheat to 225°F. I use a combination of oak and hickory for that classic Texas profile, but either works well alone. The smoker should produce thin, blue smoke—thick white smoke means it’s too wet or cold.
While the smoker heats, prepare your spritz bottle by mixing 1 cup Apple Juice with 0.5 cup Beef Tallow in a jar. Shake vigorously until fully emulsified. This blend keeps the bark moist while allowing smoke penetration. Place a water pan in the smoker to maintain humidity and prevent the bark from drying out.
Once the smoker reaches 225°F and maintains steady temperature, it’s time to load the brisket. Place it fat-side up on the grill grates—this allows the rendered fat to baste the meat as it cooks. Close the lid and resist the urge to peek. Every time you open it, you add 15-20 minutes to your cook time and risk losing that precious bark moisture.
⏰ Step 3: Smoke and Spritz to Perfection
Smoke the brisket undisturbed for 6-8 hours until the internal temperature reaches 165-170°F. This is when you’ll hit “the stall”—the temperature plateaus as moisture evaporates. Don’t panic; this is completely normal and essential for tender meat. Every 90 minutes, spritz all surfaces of the brisket with your apple juice-tallow mixture. This keeps the bark moist and prevents it from becoming too hard.
Here’s the thing about Texas brisket—timing is everything. The stall typically occurs around the 6-hour mark, but your brisket might hit it earlier or later depending on your smoker’s consistency. I check the internal temperature using a meat probe inserted into the thickest part of the flat (not the point). When it hits 165-170°F, it’s time for the Texas crutch.
Wrap the brisket tightly in butcher paper (not foil—paper breathes better) using the 1 package Butcher’s Twine to secure it. Return it to the smoker and continue cooking until the internal temperature reaches 203°F in the thickest part of the flat. This usually takes another 3-5 hours, but trust the probe test over the thermometer—tenderness matters most. The bark should be dark mahogany with a slight sheen from the spritzing.
🔪 Step 4: Rest and Slice
Once the brisket reaches 203°F, remove it from the smoker and transfer it to a cutting board. Let it rest wrapped in the butcher paper for at least 1 hour (I prefer 2 hours) before slicing. This resting period allows the juices to redistribute throughout the meat, ensuring every slice is moist and flavorful.
After resting, unwrap the brisket and locate the grain direction—you’ll see lines running through the meat. Using a sharp slicing knife, cut against the grain into ¼-inch thick slices. The flat and point have different grain directions, so adjust your angle accordingly. Serve immediately while still warm, with the bark intact for that satisfying crunch with every bite.
Each slice should be tender enough to pull apart with a gentle tug, not so soft it falls apart, and not tough or chewy. The bark should be dark and crispy, with a beautiful pink smoke ring just beneath. This is the moment you’ve been waiting for—legendary Texas brisket, tender and full of flavor in every bite.
Pro Tips For Making Texas Brisket
- Trim the Fat Cap: That thick layer of fat on a Texas Packer brisket isn’t just for looks—it’s your smoke shield and flavor anchor. Use a sharp knife to trim it down to about ¼-inch, then score it in a crosshatch pattern. I learned this the hard way when my first brisket turned into a greasy, uneven mess because I skipped this step.
- Mustard as Glue: Yellow mustard isn’t just for flavor—it’s your secret weapon to keep the rub from sliding off. Mix about 2 tablespoons into your salt, pepper, and smoked paprika before applying. It sticks like glue, so your seasoning stays put even when you flip it. (Yes, even if you’re impatient like me.)
- Start Hot, Then Stall: Sear the brisket over direct heat for 10 minutes per side first—this isn’t the time to be gentle. Then move it to indirect heat and let it slow-cook at 225°F. I used to rush the sear, and the crust always came out patchy. High heat first, low and slow after—that’s the non-negotiable.
- Probe the Flat: The flat (the leaner side) is where brisket hits its ideal doneness first. Check it with a meat thermometer—203°F is your target. If you only probe the point, you’ll end up with a dry, overcooked mess. (Your future self will thank you.)
Essential equipment for great texas brisket
Smoker Essentials
You can’t make Texas brisket without a proper smoker—I swear by my Traeger Pro 780 for its consistent temperature control, but Weber Smokey Mountain is the classic choice for beginners. If you’re working with a budget, the Masterbuilt 200711 delivers reliable performance for under $200.
The key is maintaining that 225°F temperature for 12-16 hours, so invest in a quality thermometer like the ThermoWorks Smoke—it’s a game-changer for monitoring both smoker temp and internal meat temperature simultaneously. 🌡️
Wood Selection
For authentic Texas flavor, stick with oak or hickory wood chips. I prefer a 50/50 mix of both—oak provides that classic BBQ profile while hickory adds depth. Avoid fruit woods like apple or cherry unless you’re experimenting with fusion flavors.
Soak your wood chips for 1 hour before use to prevent flare-ups. Pro tip: Buy your wood chips from Traeger or Butcher’s BBQ for consistent quality. Never use treated wood or wood from your backyard—those chemicals will ruin your brisket.
Temperature Control
Temperature stability is everything with brisket. My Traeger maintains 225°F beautifully, but even the best smokers can fluctuate. Keep a water pan in your smoker to add humidity and prevent bark from drying out. If your smoker runs hot, add more wood chips or move it to a cooler spot.
For gas smokers, I recommend the Pit Barrel Cooker—it’s designed specifically for low-and-slow cooking with minimal temperature swings. The 203°F internal temperature is your target, not the smoker’s temperature. 🔥
Spritzing Supplies
You’ll need a spritz bottle for keeping that bark moist during the stall. I use a glass spray bottle with a fine mist nozzle (like the ones from Amazon Basics) because plastic can absorb flavors over time.
My secret spritz mix is 1 cup apple juice with ½ cup beef tallow—the fat helps create that glossy bark while the acidity keeps it tender. Store your spritz mix in the fridge between uses.
For a quicker option, white grape juice works in a pinch, though it lacks the fat content for optimal bark development.
Wrapping Materials
The Texas crutch requires proper wrapping materials. Use butcher paper (not foil) to wrap your brisket after hitting 165°F. The paper allows moisture to escape while keeping the bark intact, unlike foil which can make the meat soggy. I buy mine from Central Market in the butcher section.
For securing the wrap, heavy-duty butcher’s twine is essential—regular string won’t hold up. If you can’t find butcher paper, aluminum foil is a last-resort option, but it won’t give you that perfect bark texture. 🧵
Slicing Tools
Don’t even think about slicing your brisket with a regular chef’s knife. You need a sharp slicing knife like the Dexter-Russell 12-inch for clean, precise cuts. The blade should be at least 8 inches long to handle the brisket’s size.
I also keep a boning knife handy for trimming excess fat before cooking. A meat mallet comes in handy if you’re dealing with particularly tough connective tissue, but proper cooking should make this unnecessary.
Always slice against the grain for maximum tenderness—this is the technique Nana Mae drilled into me back in Atlanta. 🔪
Nutrition facts
Frequently asked questions
How do I know when brisket is done?
Texas brisket is done when the internal temperature reaches 203°F in the thickest part of the flat. Use a meat probe inserted into the center of the flat (not the point) for accuracy. The bark should be dark mahogany with a slight sheen, and the meat should pull apart easily with a fork. Never rely on cook time alone—temperature is your best guide.
Why does my brisket turn out tough?
Most tough brisket comes from one of three mistakes: not cooking long enough (brisket needs 12-16 hours at 225°F), slicing with the grain instead of against it, or not resting properly. The stall is normal—it’s when moisture evaporates and the meat needs time to reabsorb juices. Always rest for at least 1 hour (preferably 2 hours) before slicing.
Can I cook brisket in an oven instead of a smoker?
Yes, but you’ll need a smoker box or electric smoker insert to replicate the smoke flavor. Set your oven to 225°F with the smoker box on the bottom rack, place the brisket on a rack over a water pan, and follow the same 12-16 hour cook time. For bark development, spritz every 90 minutes with apple juice. The texture won’t be identical, but it’s a great backup method.
What’s the difference between the flat and the point?
The brisket has two main sections: the flat (leaner, thinner cut) and the point (fattier, thicker section). The flat cooks faster and is more tender, while the point takes longer and benefits from the extra fat. When slicing, treat them separately—they have different grain directions. The point is perfect for sandwiches, while the flat makes great brisket tacos or salads.
How long can I store leftover brisket?
Cooked brisket keeps well for 4-5 days in the refrigerator when stored in an airtight container. For longer storage, freeze sliced portions for up to 3 months. Thaw overnight in the fridge—never at room temperature. Leftover brisket makes amazing sandwiches, tacos, or even brisket hash. The flavor actually improves slightly after resting for a day or two.

Trained in classic French technique but raised on slow-cooked ribs and spicy rubs, she blends culinary skill with smoke and soul.
- Best Smoked Oxtail Recipe: Deep-Rich Flavor After Low-and-Slow Cooking - October 14, 2026
- Pit Boss Smoked Prime Rib Roast Recipe: Bark-to-Bone Crispness in 4 Hours - October 14, 2026
- Smoked Tuna Steak Recipe: Seared Crust Meets Silky Centers - October 14, 2026