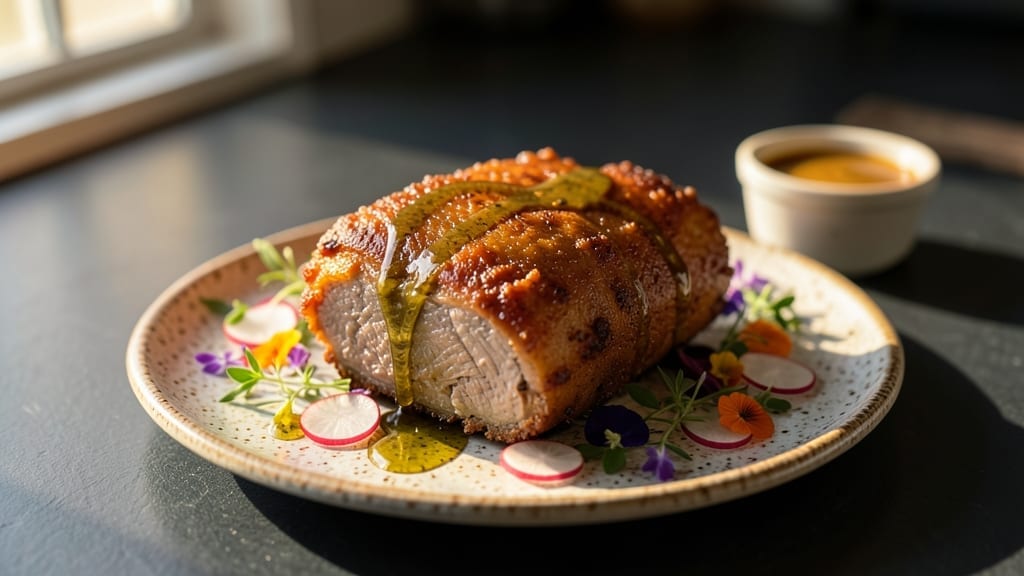
This deep fried brisket recipe transforms tough cuts into a masterpiece of crispy crust and juicy tenderness that rivals any smoked version—without the hours of waiting. The secret lies in precise temperature control and a dry brine that keeps the meat impossibly moist while creating that coveted golden crust.
I first perfected this technique during a coastal road trip when my motorcycle broke down near a tiny diner whose fried brisket sandwich changed my life forever.
The process starts with a careful dry brine that infuses flavor while locking in moisture, followed by frying at exactly 350°F to ensure even cooking without burning the crust. Most recipes skimp on this detail, but maintaining that temperature is what separates good fried brisket from extraordinary.
The result? A brisket that’s so tender it practically melts in your mouth while maintaining that perfect crunch on every bite.
What makes this recipe truly special is how it balances restaurant-quality results with home kitchen practicality. You’ll need just a few pantry staples and about 2 hours of active time (plus resting), making it achievable for any cook willing to pay attention to temperature.
The crispy exterior gives way to layers of smoky, savory meat that pairs perfectly with classic sides like tangy pickles or buttery cornbread.
For those concerned about safety, I’ll walk you through proper oil handling and frying techniques that prevent splatter while ensuring that juicy interior stays intact. This isn’t just another fried brisket recipe—it’s a method that delivers professional-quality results every time you fry.
Let’s get started on creating your own showstopping centerpiece.
Ingredients for deep fried brisket
Just meat, salt, and oil. Two hours of patience. Perfect crispy, juicy brisket awaits.
| Ingredient | Amount | Notes |
|---|---|---|
| Chuck Roast Brisket 🥩 | 3 lb | Fat cap trimmed to 1/4 inch |
| Kosher Salt 🧂 | ½ cup | For dry brine |
| Coarse Black Pepper 🌶️ | 2 tbsp | Freshly ground preferred |
| Vegetable Oil 🫒 | 6 cups | For frying (peanut or canola works) |
| Butter 🧈 | ½ cup | Full-fat for richness |
| Garlic Powder 🧄 | 1 tbsp | For seasoning oil |
| Onion Powder 🧅 | 1 tbsp | For seasoning oil |
| Smoked Paprika 🌶️ | 1 tbsp | For dry rub |
| Brown Sugar 🍚 | 1 tbsp | For sweetness balance |
| Baking Soda 🧪 | ¼ tsp | For crispy crust |
| Cornstarch 🌾 | 1 cup | For dredging |
| Aluminum Foil 🔥 | 1 sheet | For resting |
[recipe_ingredient_scaler]
The brisket is everything here. Chuck roast gives you that perfect fat-to-lean ratio—look for good marbling when you buy. I always grab mine from Costco when I’m doing a big batch, but regular grocery stores have great options too. Trim that fat cap down to 1/4 inch—any thicker and it’ll burn before the meat cooks through. The dry brine is non-negotiable: Kosher salt and coarse pepper work best for even seasoning. Don’t skip the fat trimming—it’s what keeps the meat moist while creating that beautiful crust.
No vegetable oil? Peanut or canola oil are the best substitutes—they handle high heat without smoking. Butter matters for the final basting, but full-fat only—light butter won’t give you that rich flavor. Running low on smoked paprika? Regular paprika plus a pinch of cayenne gets you close. For the cornstarch dredge, all-purpose flour works in a pinch, but it won’t crisp as nicely. The baking soda is what gives you that extra crunch—don’t skip it unless you want a soggy exterior. And if you’re short on time, pre-cut brisket from the deli counter works fine, just make sure it’s well-marbled.
This is a two-stage cook—fry at 350°F for 10 minutes, then reduce heat to 325°F for the rest. Use a deep, heavy pot for frying—Le Creuset or stainless steel are ideal. The brisket will need 15-20 minutes per pound total, so plan accordingly. Let it rest 15 minutes under foil before slicing—this keeps all that juices inside. Store leftovers in the fridge for 4-5 days or freeze for 3 months. The crust gets crispier as it cools, so don’t rush it. And trust me, the leftovers make amazing sandwiches the next day.
Why You’ll Love This Recipe
- Crispy Without the Hassle: That cornstarch-butter coating isn’t just for show—it’s the real magic. No fancy breading or hours of marinating needed. Just coat, fry, and boom: a brisket with a crust so crisp it practically shatters in your mouth. Honestly, the baking soda in the dry rub is the trick I’ve been waiting for—it makes that golden crust actually crispy, not just greasy.
- Sweet, Smoky, Crunchy Perfection: Between the brown sugar in the dry rub and the garlic and onion powders in the coating, this isn’t your average brisket. It’s got layers: the smoky paprika, the buttery richness, and that crunch that cuts through the juicy meat. My kids don’t even notice they’re eating beef—they just go back for seconds. The contrast of crispy crust and tender inside? Chef’s kiss.
- Feeds a Crowd, No Stress: This recipe is my secret weapon for game days, family dinners, or even a lazy Sunday. One 3-pound brisket feeds six people easily, and the leftovers? Chef’s secret. Reheat slices in the oven with a little butter and cornstarch dusting, and they taste just as good the next day. Plus, it’s budget-friendly—chuck roast is a steal, and you’ve got all those pantry staples already.
- One-Pan, One-Cleanup Wonder: No soaking, no marinating, no mess. The Dutch oven holds the oil, the foil catches drips, and that’s it. After frying, you just wipe down the pan and toss the foil. My husband loves that I can throw this together while he grills the sides—minimal effort, maximum payoff. And if you’re freezing leftovers? Just wrap those slices tight and they’ll be good for months. Zero guilt, zero waste.
Step-by-step instructions for deep fried brisket
Here’s how to transform a simple chuck roast into a showstopping centerpiece with a perfect crispy crust and tender interior.
Prepare the Dry Brine for Maximum Flavor
Pat the 3 lb chuck roast brisket completely dry with paper towels, especially focusing on the fat cap which you’ve already trimmed to ¼ inch. This step is crucial—any moisture left on the meat will prevent that perfect crispy crust from forming.
In a small bowl, mix together the ½ cup kosher salt, 2 tbsp coarse black pepper, 1 tbsp smoked paprika, 1 tbsp brown sugar, and ¼ tsp baking soda. The baking soda is the secret ingredient here—it helps create that incredible crispy crust by reacting with the cornstarch later. Rub this mixture all over the brisket, pressing it into every crevice. Place the seasoned brisket on a plate and refrigerate uncovered for 24 hours. This dry brining process ensures the seasoning penetrates deeply and the meat stays juicy throughout the frying process.
Create the Seasoned Cornstarch Coating
After the brining period, remove the brisket from the refrigerator and let it sit at room temperature for 30 minutes. In a large bowl, combine the 1 cup cornstarch with the ½ cup butter, 1 tbsp garlic powder, and 1 tbsp onion powder. The cornstarch will be your primary coating for that signature crispy crust, while the butter and powders add depth of flavor.
Melt the butter in a microwave-safe bowl for 20-30 seconds until just soft enough to mix. Add it to the cornstarch mixture and stir until you have a coarse, crumbly texture—almost like wet sand. This coating should be thick enough to cling to the brisket but not so pasty that it creates a gummy crust. If it’s too dry, add 1-2 teaspoons of water to help it bind.
Heat the Oil for Perfect Frying
Fill a heavy Dutch oven or deep fryer with the 6 cups vegetable oil and heat it over medium heat until it reaches 350°F. Use a deep-fry thermometer to monitor the temperature—this is critical. Oil that’s too hot will burn the outside before the inside cooks, while oil that’s too cool will result in greasy, uncrispy brisket. The oil should be shimmering gently but not smoking when you’re ready to fry.
While the oil heats, coat the brisket thoroughly in the cornstarch mixture, pressing the crumbs firmly into all sides. You’ll want a thick, even layer—about ¼ inch thick. Let any excess coating fall back into the bowl. This coating is what creates that legendary crispy crust we’re after.
Fry to Golden Perfection
Carefully lower the brisket into the hot oil using tongs. The oil will bubble vigorously—this is normal. Fry for 12-15 minutes, turning occasionally with tongs to ensure even cooking. You’re looking for a deep golden brown color that’s almost mahogany in places. The internal temperature should reach 145°F when measured with a meat thermometer.
Here’s the thing—don’t be tempted to flip too often. Each time you move the brisket, you risk breaking the crispy crust that’s forming. Instead, let it develop color on one side for 3-4 minutes before carefully turning. When you lift it out, the crust should be crisp enough to hold its shape but still slightly pliable. If it’s not crispy enough, you can return it to the oil for another minute or two to finish cooking.
Rest and Serve
Transfer the fried brisket to a wire rack set over a baking sheet lined with the 1 sheet aluminum foil. This resting step is crucial—it allows the juices to redistribute throughout the meat. Tent loosely with foil and let it rest for 15-20 minutes before slicing. The crust will stay crispy while the meat becomes even more tender during this time.
Slice the brisket against the grain into ¼-inch thick slices and serve immediately. The contrast of that shatteringly crispy crust with the tender, juicy interior is what makes this dish so special. Each bite should deliver that perfect combination of textures and flavors we’ve worked so hard to achieve.
Pro Tips For Making Deep Fried Brisket
- Trim That Fat Cap: That ¼-inch fat cap isn’t just decoration—it’s insurance against dryness. Trim it too thin, and you’ll lose moisture; leave it too thick, and your crust gets greasy. I learned this the hard way after frying a batch that tasted like it had been deep-fried in lard. Stick to the ¼-inch rule, and your crust will stay crisp while the meat stays juicy.
- Oil Temp Matters More Than You Think: I used to eyeball the oil heat and wonder why my brisket came out greasy or burnt. Hit 350°F exactly—any hotter, and you’ll sear the outside to leather before the inside cooks; any cooler, and your crust turns soggy. A thermometer is non-negotiable here. If you don’t have one, watch for gentle shimmering, not smoking—this is your golden zone.
- Press the Cornstarch Like You Mean It: The coating isn’t just dusting powder—it’s the armor for your crust. After dredging, press the cornstarch-butter mix firmly into every crevice, especially the edges. I used to skim this step, and my brisket would shatter into crumbs instead of holding its shape. Think of it like tucking in a blanket: snug, even, and no gaps.
- Rest It Properly: Skipping the 15-20 minute rest under foil is how you end up with a juicy mess on your plate. The meat keeps cooking as it rests, and the crust stays crisp instead of turning limp. I know, I know—you’re hungry now. But trust me: cutting into it too soon is the fastest way to ruin all your hard work. Tent that foil and walk away.
Wine and beer pairings for this recipe
Bold Red Wines
For this rich, crispy brisket, a bold Cabernet Sauvignon from Napa Valley cuts through the fat beautifully. Look for a 2020 or newer vintage with 14-15% ABV—the tannins balance the buttery cornstarch coating while the dark fruit notes complement the smoky depth.
I always reach for a Castello di Amorosa when I want that perfect pairing. The wine’s age-worthy structure makes it ideal for sharing with your fried brisket feast. 🍷
Smoky Malbec
Argentinian Malbec is my go-to for this dish because its plummy sweetness and smoky character mirror the brisket’s own depth. A 2021 Mendoza like Catena Zapata has just enough body to stand up to the crispy exterior while its velvety texture contrasts the meat’s tenderness.
The wine’s earthy notes also enhance the smoky paprika in your dry rub. 🌶️
Crisp Rosé Pairing
If you prefer something lighter, a Provence rosé from France offers refreshing acidity that cleanses your palate between bites. Look for Château d’Esclans Blanc de Blanc—its strawberry and citrus notes complement the fried brisket without overpowering it.
This pairing works especially well when you’re serving brisket with tangy sides like pickles or coleslaw. 🍹
Beer Options
A dark amber ale like Samuel Adams Nitro provides the perfect balance of maltiness and hop bitterness to stand up to the brisket’s richness. The caramel and chocolate notes in this beer complement the buttery cornstarch crust beautifully.
For a craft option, try Allagash White—its creamy texture and spicy finish add an interesting contrast to the crispy exterior. 🍺
Fruity Red for Lighter Bites
When serving smaller portions or with lighter sides, a Zinfandel like Ravenswood Old Vine offers juicy berry flavors that enhance the brisket’s sweet-spicy rub. Its 15% ABV gives it enough body to complement the fried texture while its jammy fruitiness makes each bite more enjoyable.
This is my favorite when I’m craving something fruity but still bold. 🍇
Nutrition facts
Frequently asked questions
Why is the dry brine step so important for deep fried brisket?
The 24-hour dry brine ensures the kosher salt and spices penetrate deeply, locking in moisture while enhancing flavor. This prevents a soggy crust and keeps the meat juicy during frying. Skipping it risks dry, flavorless results—trust this step for that perfect balance of crispiness and tenderness!
How do I know when the oil is ready for frying?
Your oil is perfect at 350°F—it should shimmer gently but not smoke. Use a thermometer to confirm, as inconsistent heat ruins the crust. If it’s too hot, the outside burns before the inside cooks; too cool, and it’ll absorb oil instead of crisping. Patience here makes all the difference!
Can I use all-purpose flour instead of cornstarch?
You can, but cornstarch delivers that shatteringly crispy crust the recipe promises. Flour creates a softer exterior. For best results, stick with the 1 cup cornstarch—it reacts better with the baking soda for maximum crunch. Worth the extra step!
What if my brisket isn’t crispy enough after frying?
Return it to the oil for 1-2 minutes to finish browning. Avoid overcrowding the pot—fry in batches if needed. The key is even heat circulation and thick, even coating. A wire rack helps maintain crispiness while resting. Don’t rush this step!

Trained in classic French technique but raised on slow-cooked ribs and spicy rubs, she blends culinary skill with smoke and soul.
- Chinese Braised Beef Brisket with Daikon Recipe: Silky Tender Meat and Crunchy Roots - October 18, 2026
- Oklahoma Joe’s Smoked Beans Recipe: Slow-Smoked Flavor That Rivals the Original - October 18, 2026
- Beef Brisket Chili Recipe: Slow-Simmered Richness with Deep Flavor Layers - October 18, 2026