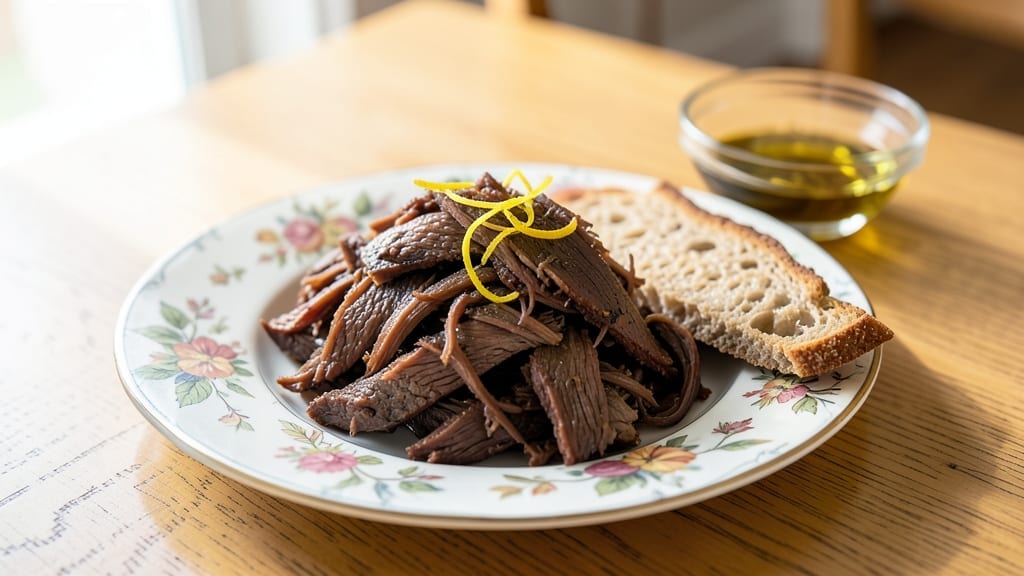
This smoked pulled beef recipe transforms tough beef shoulder into melt-in-your-mouth perfection with a deep, smoky flavor that lingers long after the first bite. The key lies in low-and-slow smoking, where patience and precision create that signature tender texture we all crave.
I’ve perfected this method over countless batches, and it consistently delivers restaurant-quality results at home.
Selecting the right cut is critical—beef shoulder or brisket yields the best results, offering a balance of fat and connective tissue that breaks down beautifully during the long cook. A simple dry rub of salt, pepper, and smoked paprika adds flavor without overpowering the meat’s natural richness.
The smoking process, typically at 225°F for 8-12 hours, ensures the beef stays tender while developing that unmistakable smoky aroma.
Once the beef reaches an internal temperature of 203°F, it’s ready to be pulled apart effortlessly, revealing strands of tender, juicy meat. The resting period is just as important—letting the meat rest for 30 minutes before shredding ensures all the juices redistribute, keeping every bite moist and flavorful.
This method guarantees a dish that’s both impressive and foolproof, perfect for feeding a crowd or meal prepping for the week.
The possibilities for serving are endless—pile it onto toasted buns with tangy coleslaw, serve it on tacos with fresh toppings, or even use it in loaded baked potatoes.
The versatility of smoked pulled beef makes it a staple for any occasion. Let’s get started on creating this showstopping dish that’s sure to become a family favorite.
Ingredients for smoked pulled beef
A crowd-pleasing smoked beef recipe with just eight essential ingredients and techniques.
| Ingredient | Amount | Notes |
|---|---|---|
| Beef Shoulder (or Brisket) 🥩 | 6 lb | Bone-in preferred for flavor |
| Smoked Paprika 🌶️ | 1 ½ tbsp | Sweet or hot variety |
| Coarse Kosher Salt 🧂 | 1 ½ tbsp | Diamond Crystal preferred |
| Black Pepper (Freshly Ground) 🌶️ | 1 tbsp | Medium-coarse grind |
| Garlic Powder 🧄 | 1 tbsp | Not garlic salt |
| Brown Sugar (Packed) 🍚 | 1 tbsp | Lightly sweetens rub |
| Onion Powder 🧅 | 1 tbsp | For depth of flavor |
| Chicken Bouillon Cubes (Low Sodium) 🍲 | 2 whole | Dissolved in 1 cup water |
| Apple Cider Vinegar 🍎 | ½ cup | For tangy depth |
| Beef Broth (Low Sodium) 🥘 | 2 cups | For moistening during cook |
| Liquid Smoke 🔥 | 1 tbsp | Enhances smoky flavor |
| Butter (Unsalted) 🧈 | ½ cup | For basting and richness |
[recipe_ingredient_scaler]
The beef shoulder is your star—bone-in cuts add flavor and moisture during the long cook. I always grab Costco’s pre-cubed shoulder for convenience, but whole pieces from local butchers work better if you’re smoking for hours. Look for marbled fat—it’s what keeps the meat juicy. The Diamond Crystal kosher salt makes a noticeable difference in texture compared to table salt. And trust me on the unsalted butter—salted can throw off the rub’s balance.
No liquid smoke? 1 tbsp apple cider vinegar plus 1 tsp smoked paprika mimics that smoky kick. Short on beef broth? Chicken broth works, but you’ll lose some depth. Want to skip the chicken bouillon? 1 tsp MSG adds umami without altering the dish’s character. The brown sugar is optional but balances the saltiness of the rub. For a spicier kick, add 1/2 tsp cayenne to the dry rub—just don’t tell the crowd it’s there.
Keep the beef in the fridge 1-2 days before smoking to let it age slightly. The rub can be made a week ahead—just store it in an airtight container. Once smoked, the beef keeps 4 days in the fridge or 3 months frozen. I portion mine into ziplock bags for easy reheating. Reheat gently in a pot with a splash of broth—microwaving dries it out. The leftovers? Loaded baked potatoes or nachos are my go-to.
Why You’ll Love This Recipe
- No Fuss Weeknight Win: That overnight rub prep? It’s the secret to not stressing on game day. Just mix your spices, slather it on, and let the fridge do the work while you sleep. Waking up to a ready-to-smoke slab is chef’s kiss—no last-minute scrambling.
- Smoky-Tangy Perfection: The combo of liquid smoke, apple cider vinegar, and brown sugar? It’s like a flavor hug for your taste buds. That crispy bark with the creamy, fall-apart center—honestly, it’s the kind of pulled beef that makes you forget to ask for seconds (until you do).
- Feeds a Crowd, No Guilt: Six pounds of beef shoulder stretches forever—think barbecue sandwiches for a football party, tacos for a lazy Sunday, or even a hearty breakfast hash the next day. And since you’re using bone-in cuts, you’re getting more meat for your money. Budget-friendly? Absolutely.
- Leftovers That Shame You: This recipe practically begs to be doubled. The rub can sit in your fridge for a week, and the cooked beef keeps for days. Freeze half for a future lazy night—just reheat with a splash of broth and butter, and it’ll taste like it just came off the smoker. No one will believe you made it ahead.
Step-by-step instructions for smoked pulled beef
Here’s how to transform a tough beef shoulder into melt-in-your-mouth pulled beef with smoky depth.
Prepare the Rub and Season the Beef
In a small bowl, combine all 1½ tablespoons smoked paprika, 1½ tablespoons coarse kosher salt, 1 tablespoon black pepper, 1 tablespoon garlic powder, 1 tablespoon brown sugar, and 1 tablespoon onion powder. Mix thoroughly until the spices are evenly distributed and form a fine, cohesive powder.
Pat the 6 lb beef shoulder dry with paper towels—this step is crucial for the rub to adhere properly and for developing that coveted bark later. Apply the spice mixture generously to all sides of the beef, pressing it into the meat so it sticks. Don’t be shy; you want a thick, flavorful crust. Place the seasoned beef on a wire rack set over a baking sheet and refrigerate uncovered for at least 4 hours, or ideally overnight. This resting period allows the rub to penetrate deeply and the meat to dry out slightly, which is key for that perfect bark.
Smoke the Beef Low and Slow
Preheat your smoker to 225°F using hickory or oak wood chips. Once the smoker reaches temperature and you see steady, thin blue smoke, place the beef shoulder fat-side up on the grill grates. The fat cap will render slowly, basting the meat and creating a flavorful crust. Close the lid and let it smoke undisturbed for 6-8 hours, maintaining a consistent 225°F temperature. This low-and-slow approach is what transforms tough connective tissue into tender, pull-apart perfection.
Every hour, check the temperature using a meat thermometer inserted into the thickest part of the meat (avoid touching bone). You’re aiming for an internal temperature of 195-203°F, where the collagen breaks down and the meat becomes fork-tender. Real talk: the stall will happen around 165°F, where the temperature plateaus. Don’t panic—this is normal and part of the process. If you’re worried about drying out, wrap the beef tightly in butcher paper (not foil) at this stage to help retain moisture while still allowing some bark to form.
Build the Flavorful Liquid Base
While the beef smokes, prepare the liquid base in a saucepan. Dissolve the 2 chicken bouillon cubes in ½ cup hot beef broth, then add the ½ cup apple cider vinegar. Stir in the 1 tbsp liquid smoke and bring the mixture to a gentle simmer over medium heat. Reduce the heat to low and let it cook uncovered for 30 minutes to allow the flavors to meld and the liquid to reduce slightly. This step is where the tangy, smoky depth of your pulled beef begins to develop.
Once the beef reaches 203°F and is fork-tender, remove it from the smoker and transfer it to a large bowl. Let it rest for 15 minutes before shredding. This resting period ensures the juices redistribute, making every bite juicy and flavorful. Here’s the thing—if you shred too soon, you’ll lose precious moisture and end up with dry pulled beef. Patience pays off.
Shred and Finish with Butter
Using two forks or a pair of tongs, shred the beef into 2-inch thick strands. Discard any large pieces of fat or connective tissue that don’t shred easily. Transfer the shredded beef to a large pot or deep skillet and pour in the reduced liquid base. Stir gently to combine, ensuring every strand of beef is coated in the flavorful liquid. Let the mixture simmer over low heat for 10-15 minutes, allowing the beef to absorb the liquid and the flavors to meld together.
Remove the pot from heat and stir in the ½ cup unsalted butter, letting it melt into the mixture. The butter adds richness and helps create a silky, cohesive texture. Taste and adjust the seasoning if needed—you might need a touch more coarse kosher salt or black pepper to balance the flavors. Serve immediately over toasted buns, in tacos, or alongside roasted vegetables. The result should be fall-apart tender beef with layers of smoky, tangy, and savory flavors that will have everyone asking for seconds.
Pro Tips For Making Smoked Pulled Beef
- Skip the Paper Towel Shortcut: I used to just wipe the beef shoulder with a damp cloth—big mistake. The paper towels in this recipe aren’t just for cleanliness; they pull out enough moisture to let that smoked paprika and salt cling like glue. That crust, or “bark,” is what makes your pulled beef taste like it came from a pitmaster, not a shortcut. Take the extra 2 minutes and pat it thoroughly—don’t half-ass it.
- Wrap in Butcher Paper: The stall hits around 165°F, and that’s when the panic starts—”Is it drying out?” Don’t wrap in foil (it steams the bark off). Butcher paper lets moisture stay in while keeping that crust intact. I’ve seen people skip this and end up with beef that’s tender but flavorless. Once you hit the stall, wrap it tight, and let the smoker do its thing.
- Don’t Rush the Liquid Base: That 30-minute simmer for the broth, vinegar, and bouillon cubes isn’t optional. Skimping here means a flat, one-note sauce. The vinegar needs time to mellow, and the liquid smoke to blend—not just float on top. After burning through three batches where the sauce tasted like a science experiment, I learned: low heat, uncovered, and no distractions. Let it work.
- Rest the Beef Like Your Life Depends on It: Fifteen minutes might feel like forever when you’re starving, but shredding early turns your masterpiece into dry, sad shreds. The juices need that time to soak back in—no exceptions. I’ve seen people slice into it at 10 minutes and wonder why it’s not juicy. Fork it, cover it, and walk away. Your future sandwich assembly will thank you.
Essential equipment for great smoked pulled beef
Smoker Must-Haves
Investing in a quality smoker is non-negotiable for consistent results. I use a Traeger Pro 575 for its temperature stability and even heat distribution, but even budget options like the Weber Smokey Mountain Cooker work well.
For precision, a Thermoworks Smoke dual-probe thermometer is a game-changer—it tracks both smoker temp and internal beef temp simultaneously. 🔥
Grill Grates Matter
Heavy-duty cast iron or stainless steel grates are essential for even heat transfer and fat rendering. I prefer Lodge cast iron grates because they develop a natural non-stick patina over time. Avoid cheap wire grates—they can tear your bark and cause uneven cooking.
Wood Chips for Flavor
Hickory and oak are classic choices, but fruitwoods like cherry or apple add sweetness. I keep Traeger brand wood chips on hand for reliability, but Bubba’s BBQ wood chips are a great budget alternative. Soak chips for 30 minutes before using to prevent flare-ups.
Wire Rack Setup
A sturdy wire rack over a baking sheet prevents direct heat exposure, allowing fat to render evenly. I use a 3-tier stainless steel rack from GrillGrates—it fits most smokers and keeps airflow consistent. This simple setup prevents soggy bark and ensures perfect bark formation.
Cutting Tools
For pulling and shredding, I rely on a Dexter-Russell 12-inch slicing knife and Fiskars meat hooks. The knife handles thick strands easily, while the hooks make shredding effortless. Never use dull knives—they tear meat fibers and release juices prematurely.
Storage Solutions
After smoking, store pulled beef in glass Pyrex containers with snap lids for up to 4 days. For longer storage, use ziplock freezer bags with air squeezed out. I portion mine into 1-pound servings—perfect for quick reheats or meal prep. Always label with date! ❄️
Nutrition facts
Frequently asked questions
Why does my smoked pulled beef turn out dry?
Dry pulled beef often happens when you skip the resting period or don’t wrap it properly during the stall. Always let the beef rest for 15 minutes after smoking before shredding, and consider wrapping it in butcher paper (not foil) at 165°F to retain moisture. The fat cap should render naturally when placed fat-side up on the grill grates—don’t rush the process!
Can I use a different wood type for smoking?
While hickory and oak are classic choices, fruitwoods like cherry or apple add sweetness, and mesquite delivers a bold, earthy flavor. Just soak the wood chips for 30 minutes before using to prevent flare-ups. Experiment to find your favorite—your crowd might even prefer a unique wood flavor!
How do I know when the beef is fully cooked?
Use a meat thermometer to check the thickest part of the beef—aim for an internal temperature of 203°F. This ensures the collagen breaks down completely for that perfect tender texture. The stall around 165°F is normal, so don’t panic if the temperature plateaus—just be patient!
What’s the best way to reheat leftover pulled beef?
Gently warm the beef in a pot with a splash of beef broth over low heat—microwaving dries it out. Stir in a pat of unsalted butter at the end for extra richness. For meal prep, portion it into freezer bags and freeze for up to 3 months—just thaw overnight in the fridge before reheating.
Can I make this recipe without a smoker?
Yes! Use a grill with indirect heat or an oven set to 275°F with a foil-lined tray for moisture. Place the beef on the tray and cook for 8-10 hours, basting occasionally. The key is low-and-slow cooking—just monitor the temperature closely to avoid drying out.

Trained in classic French technique but raised on slow-cooked ribs and spicy rubs, she blends culinary skill with smoke and soul.
- Chinese Braised Beef Brisket with Daikon Recipe: Silky Tender Meat and Crunchy Roots - October 18, 2026
- Oklahoma Joe’s Smoked Beans Recipe: Slow-Smoked Flavor That Rivals the Original - October 18, 2026
- Beef Brisket Chili Recipe: Slow-Simmered Richness with Deep Flavor Layers - October 18, 2026